Google acquired Postini in 2007 and merged it into their services as part of Google Web security.
Postini was an e-mail, web security, and archiving application used widely by companies for their security needs.
In 2011, Google officially shut down all of Postini’s services and shifted the users to Google Apps.
It retained most of Postini’s features and offered it on Google Vault.
Google Vault pricing
Google Vault is available for all the G Suite users. It is charged separately only for the Basic plan users.
G Suite Basic: $5 per month/Vault user
G Suite Business: Part of the package
G Suite Enterprise: Part of the package
G Suite for Education: Free
Uses of Google Apps Vault
Google Vault has the following features.
Archive: Set retention rules for storing data on user accounts and Google systems.
Legal hold: Place indefinite holds on users’ data for legal or other retention obligations.
Search: Search your domain’s data by user account, organizational unit, date, or keyword. Vault supports Boolean and wildcard operator searches.
Note: To know more about Google Vault Search operators, click here.
Export: Export data from any account for additional processing and review.
Audit reports: Use Vault’s audit reports to check the actions Vault users have taken during a specified period of time.
Note: You can access Google Apps Vault only if you have subscribed to either the Business plan or the Enterprise plan of G Suite. If you are a small business using the basic plan of G Suite, you should probably consider using SysCloud.
Why would a company need Vault
1. To retain organizational data as long as necessary before they’re deleted from Google systems
2. To hold an employee’s data forever for litigation purposes or to meet state regulations – even if the employee deletes them permanently
3. To search an organization’s data by user account, organizational unit, date range, or keyword
4. To export data from an account for additional review
5. To audit the usage of Vault by account users
Note: The advanced search in Vault can even search in the text in email attachments.
Next, let us see how to use Google Vault.
Using Google Apps Vault: Google Vault tutorial
How to access Google Apps Vault: Google Vault login
If you are a G Suite Admin, you can log in to Google Apps Vault by using this URL.
You can also access it directly from Google Apps icon on the top right-hand side of the Google homepage.
After entering the admin credentials, you can log in to see your Google Apps Vault home page.
You will see 3 main modules:
Retention
Matters
Reports
Google Vault retention
The Retention module can be used to create retention policies. Retention policies help:
1. To retain the organizational data – stored in Gmail, Hangouts, Drive, and Groups – for as long as necessary, even if a user permanently deletes them
2. To delete sensitive information from a user’s account after a period of time
Note: Organizations need to be very careful while configuring retention rules. Otherwise, it could cause accidental deletions of data that cannot be recovered!
There are two types of retention rules:
Default Retention Rules: These rules can be used to retain the data of all user accounts in the entire organization for a specific period of time or forever.
Custom Retention Rules: These rules can be used to retain a specific set of data.
Note: Custom rules take precedence over a default retention rule.
Creating a default retention rule
In the example below, the admin has set up default retention rules to keep all the users’ emails for one year and all the Drive files indefinitely.
By this rule, the Vault will have all the emails for one year, even if the user deletes them permanently from the trash.
Note: This retention period of 1 year applies only to deleted items. The emails in other labels like inbox and sent items will be retained.
The admin has also created a retention rule to retain all the Drive files forever.
As per this rule, all Drive files will be kept in Vault even if the user permanently deletes them.
Note: If there is a custom retention rule to delete specific Drive files, they will be deleted as custom retention rules overrule default retention rules.
Creating a custom retention rule
The below custom retention rule retains all the emails of students created between Jan 2017 and June 2018 for 365 days.
Here is another custom retention rule to keep all the Drive files of staff for 365 days from the date of modification.
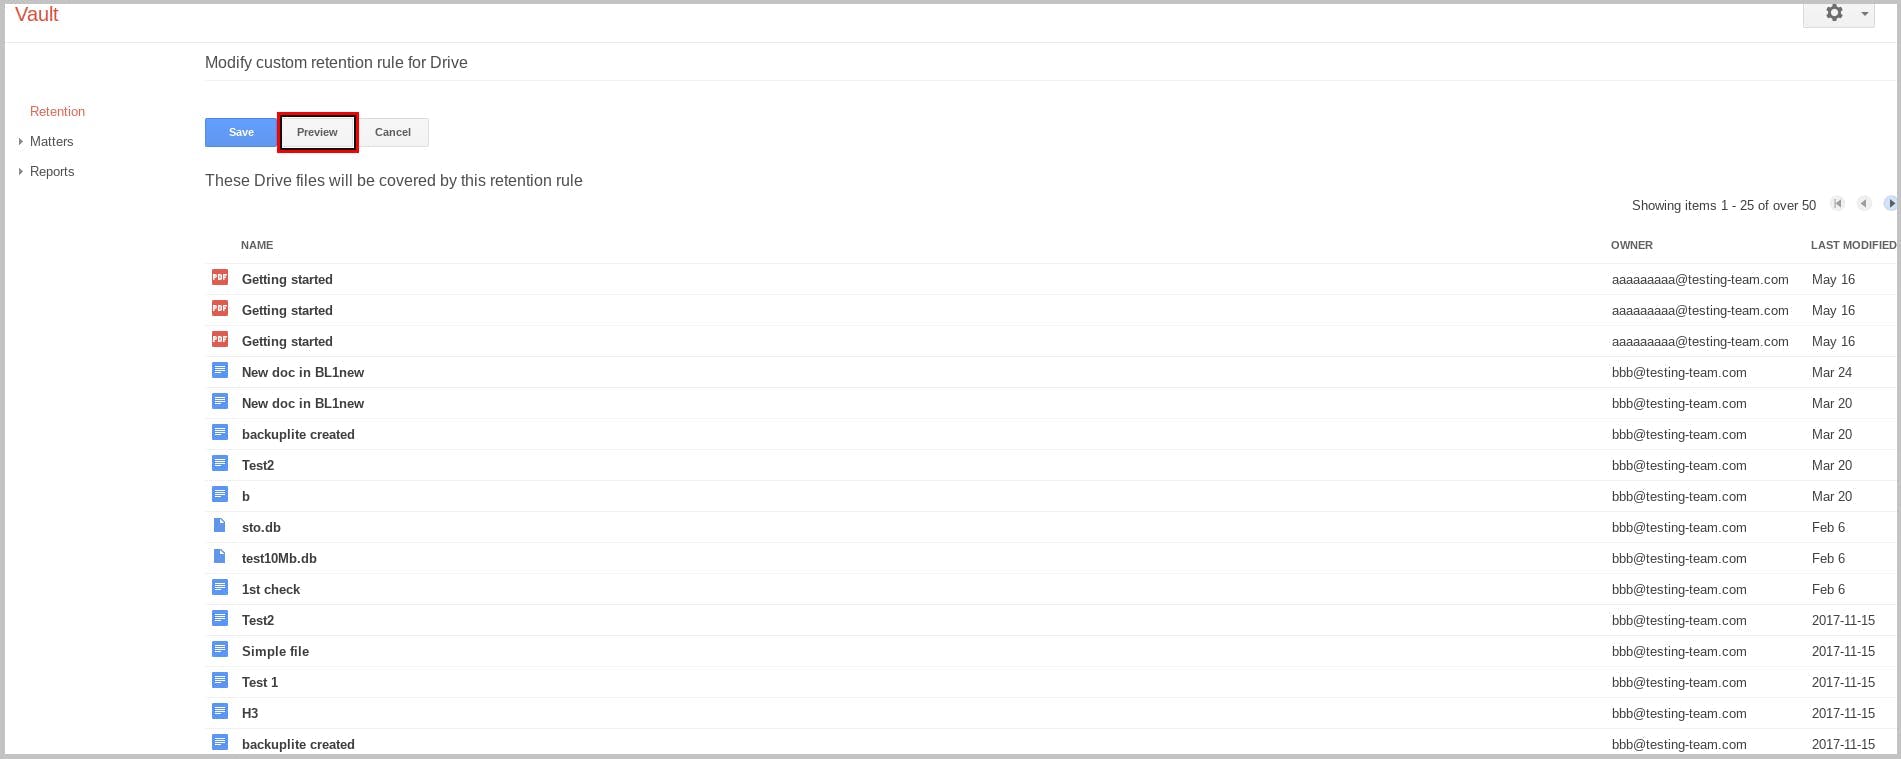
Note: When you create a custom retention rule, it is recommended to preview the files that will be affected by that rule. This will ensure that you don’t accidentally let Vault delete important files
For instance, clicking on the preview of the retention rule we created for drive shows the below results.
Google Vault matter
A matter is a container for storing data related to a specific issue, such as a litigation case or investigation.
A matter will primarily have:
1. The list of users with their data on hold,
2. Saved search queries, and
3. Export sets related to that matter.
Creating a matter
You can create a matter by clicking on the “CREATE” button.
Given below is a matter which is associated with the litigation case id “15-1-80304-7” and the employee “Bruce.”
Google Vault hold
An organization can use holds to keep the data of a user or an organizational unit indefinitely.
Once a user is on hold, even if s/he deletes data, it is removed from the account folder but retained in the Vault.
Vault users can search and export data as long as the user is on hold.
Note: If a user account is deleted, the data associated with the user is permanently removed from the Google system including Vault, irrespective of hold or retention rule. In order to retain data, companies will have to pay for both Vault and G Suite licenses of users for storing the account data.
To create a hold, a user should create a matter containing that hold.
Creating a hold
Open an existing matter – or create a new one – for storing the hold after creation.
You can click on the “CREATE HOLD” option.
For instance, here you can hold Bruce’s emails by selecting the type of service “Gmail” and entering his email address.
Note: You can also hold specific emails of Bruce based on criteria: sent date, terms, etc.
Similarly, you can also hold the Drive files and the chat messages of a user.
Here is an example of a Hold which retains Bruce’s Drive files.
Searching data on Google Vault
If your business has deployed Vault, you can search data related to an inquiry, investigation, or requests for records.
Google Apps Vault allows you to search for the following:
Email messages,
Conversations users had in Hangouts, and
Files in a user’s Drive.
All information related to a particular inquiry or investigation is stored in a matter.
You can click on the matter – if you’ve already created one – to start searching for data.
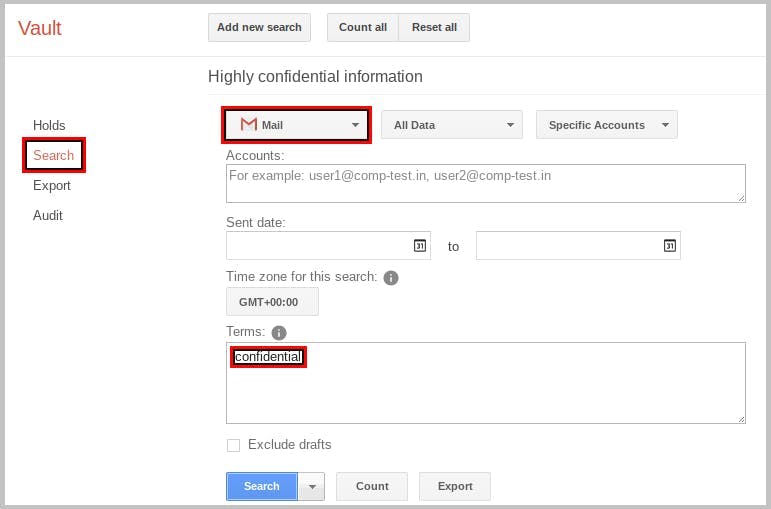
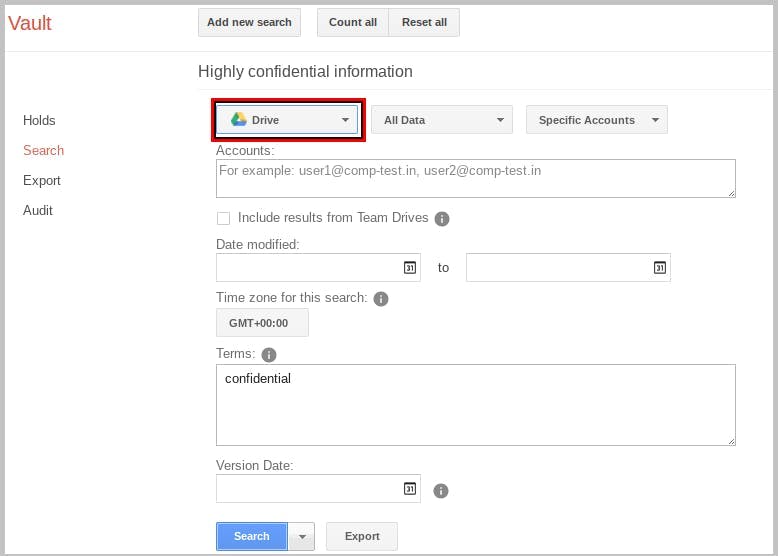
In this example, we are going to select the matter “Highly confidential information.”
Searching emails
Enter the word “confidential” in the “Terms” section.
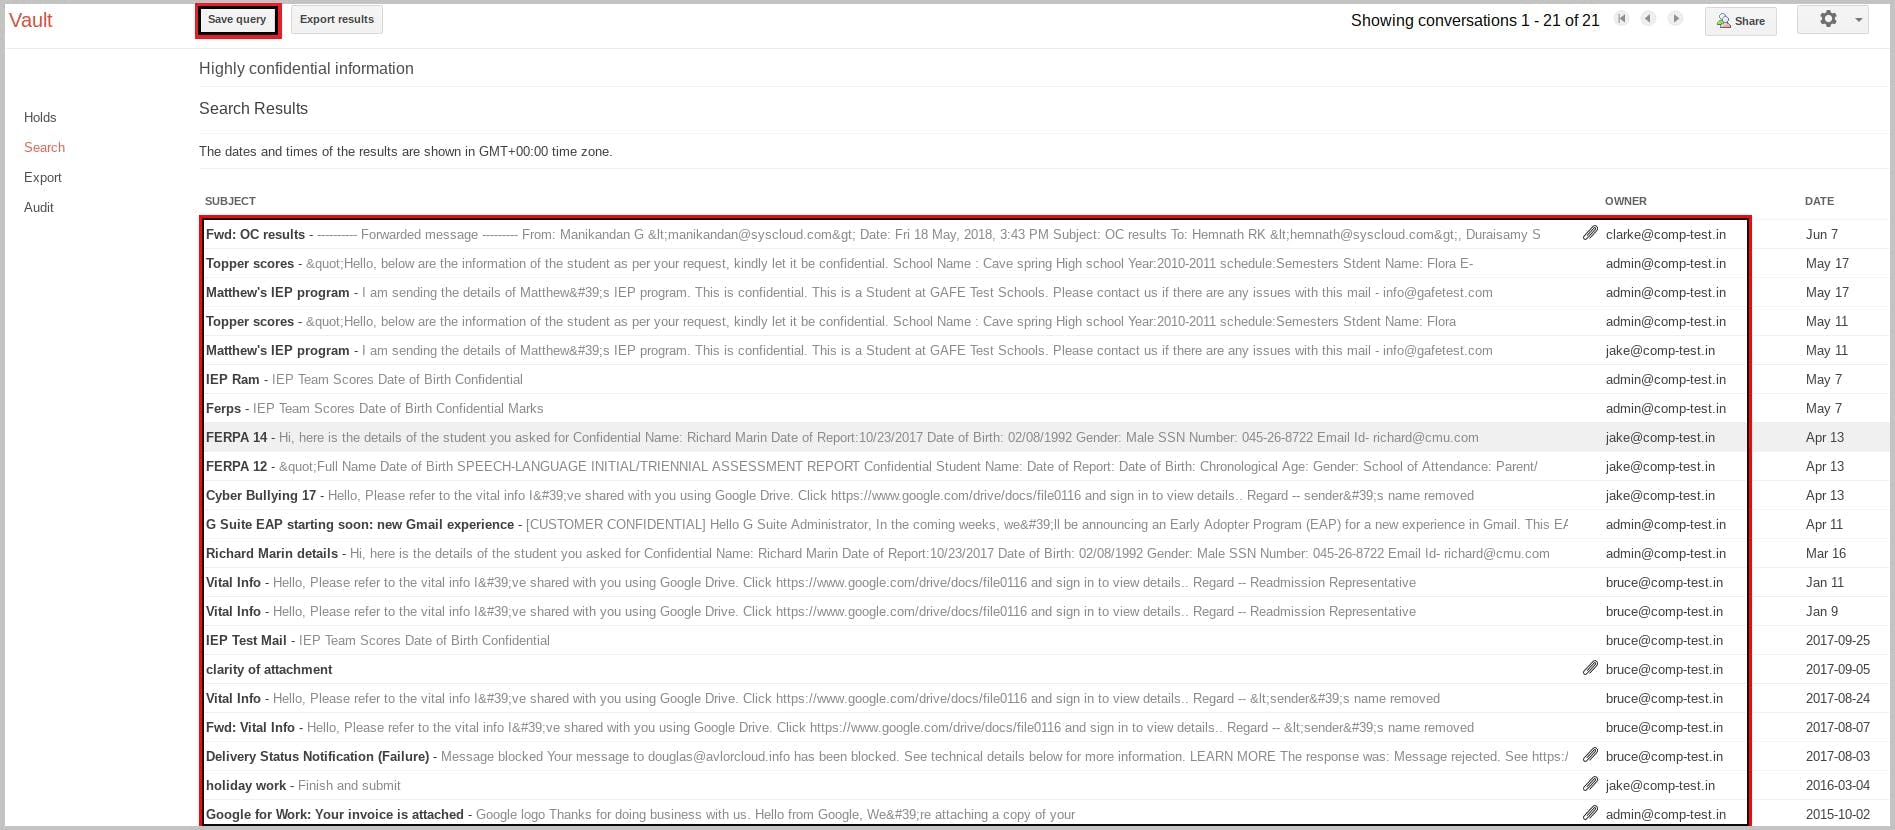
You would get the search results as below.
You can save the query by clicking on the “Save query” button for future reference.
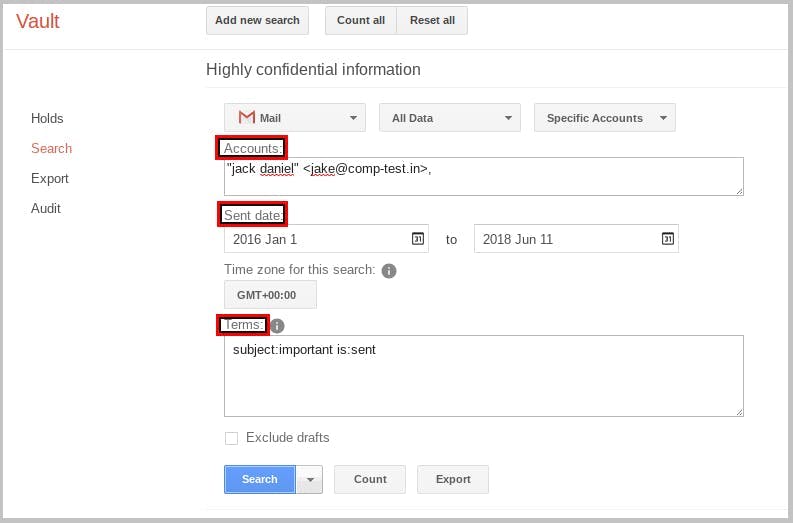
The search can also be refined to include user accounts, sent date, and advanced terms using operators.
After searching, you can also export the results by clicking on the “Export results” button.
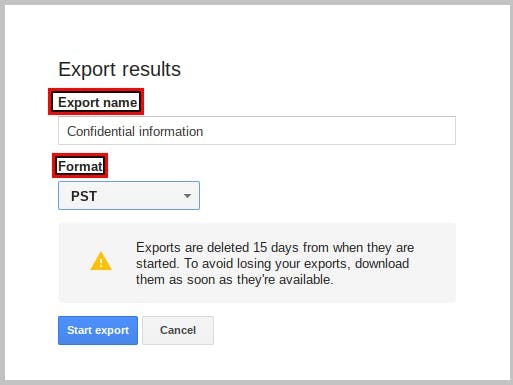
You can also give a name for the file to be exported and the type of file format to be exported in the next pop-up window.
Note: There are two formats available – MBOX and PST. MBOX is the standard format for emails, but PST files are easier to view using common email clients like Outlook. You can also export Hangout conversations in one of these formats.
Downloading the exported files
The exported files can be viewed and downloaded from the export module.
Note: The exported data is available to download only for 15 days, counted from the date of export. Clicking on “download” option will download all of the search results as zip files, which can be extracted and imported into an email client.
You can also search for files in a user’s Drive or Hangout conversations by changing the type of service to “Drive.”
Note: The Drive files will be exported in the same format as they’re present in a user’s account
To know about other methods of backing up your drive, check out this article.
Google Vault audit reports
When someone has access to Vault, they have access to your organization’s critical data. So, it’s important to monitor those who have access to Vault. Vault audits let you view the actions of Vault users during a specific time period. The access for Vault users is based on their privileges. Read about Vault privileges here.
Using audit
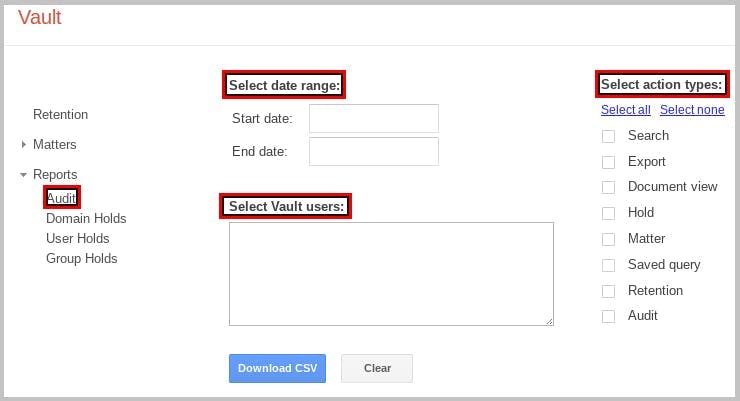
To view the audit of Vault users, you can navigate to “Reports”→“Audits.”
Once you select the Vault users, their action types and the time period – date range, you can download and view all of their actions in a CSV file.
To understand the parameters used in this spreadsheet, click here.
Note: An organization may not want all users to have the same level of access to Google Apps Vault. Different access permissions can be defined for different users using Admin rules.
With this feature, companies can perform audits without reading employers’ data.
How to restore data from the Vault
Restore using Vault
Vault is not a data recovery tool.
It is intended primarily to make searching for old files easier.
Nevertheless, you can restore emails and files if you have the time and technical expertise to do so.
Restoring critical emails: the hard way
Restoring a critical email or a Drive file back to its destination is not possible with built-in features of Vault.
You can also export data from Vault and restore it to its destination with the help of external third-party applications, but the functions are quite limited.
Restore using G Suite Migration tool
If you have exported and downloaded your emails from Google Apps Vault, a software called G Suite migration tool can help you in restoring those emails back to your email account.
1. Click on the Data migration icon in your admin console to launch the G Suite migration tool.
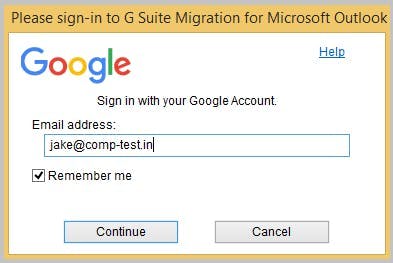
2. Provide the preferred email address for restoring the exported emails. Let’s assume that the emails exported from Jake’s email account have to be restored back to the original location – his Gmail.
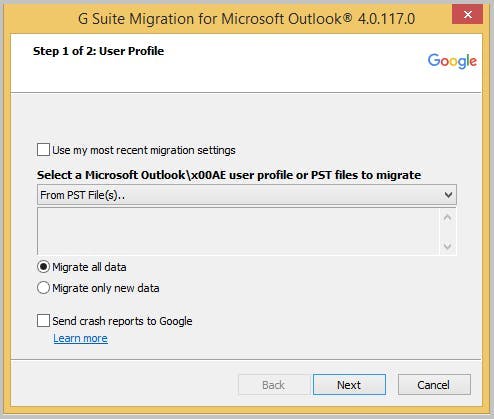
3. The G Suite migration tool would prompt you for access to Jake’s email account. Once the credentials are provided, you can choose the “From PST file(s)..” option, if you’ve downloaded emails in PST format.
Note: If the downloaded emails are in the MBOX format, you will have to convert them to PST format using third-party tools like “Softaken MBOX to PST converter” and then migrate using G Suite Migration tool.
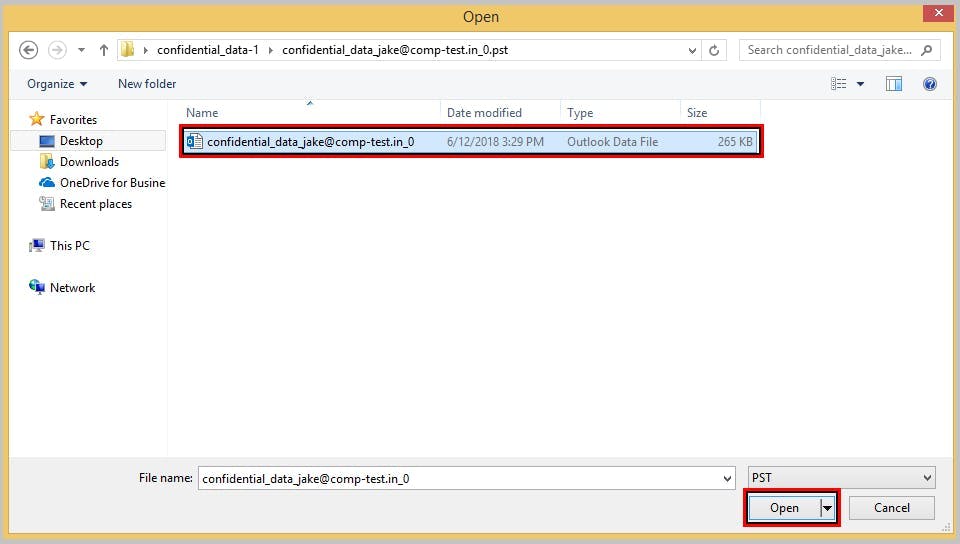
4. You can select the downloaded file from your desktop in the next screen.
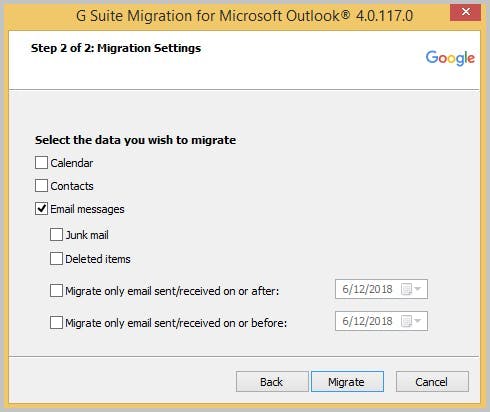
5. Once the downloaded files are open, you can choose the data to be migrated. You can choose “Email messages” if you have exported only emails.
Note: Other data like Calendar, Contact, and Hangout conversations can also be migrated using this tool. However, Google Apps Vault does not let you retain or export data stored in the Calendar and Contact sections!
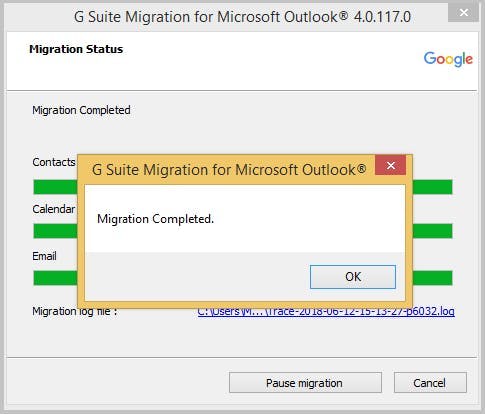
6. Once you click on “Migrate,” the migration process will take a few seconds to few hours, based on the size of the exported data.
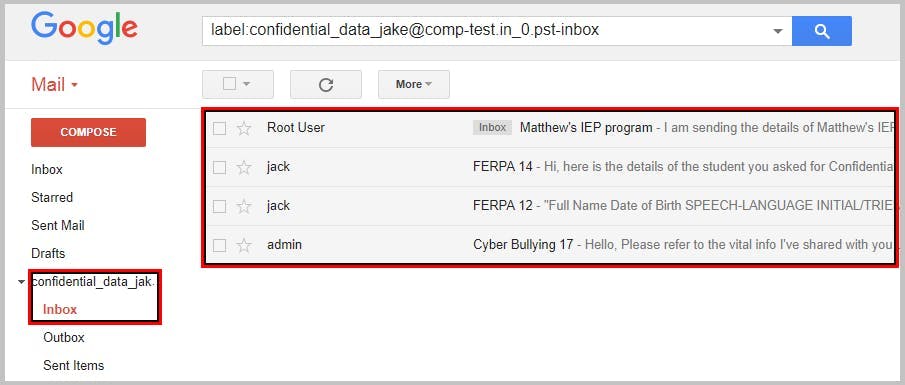
7. You can go back to the destination email account and view the migrated emails.
Note:
The migration tool creates a label and imports the emails under them.
Drive files can be directly imported to your Drive after exporting them from Vault. However the folder structures and sharing permissions will not be recovered if you import it manually.
If the folder structure and sharing permissions are also important for you, click here to learn about SysCloud’s Backup solution.
Google Apps Vault is a great product for archiving data and accessing some specific information.
But, it can become a nightmare if you want it to recover lost data.
Caution
Vault does not create a separate archive for data. So, you need to exercise extreme caution while creating retention rules. A small mistake in configuring the retention rule could probably delete critical data from users’ accounts. For instance, if you set a default retention rule to retain all emails for 365 days, all the emails will be deleted at the end of the duration.
What happens when organizations mistake Vault as a backup solution?
Complicated recovery process: Organizations would struggle when they have to restore any data. Google Apps Vault doesn’t have a built-in restore feature.
Data loss: Once a user account is deleted, all the data associated with the user is permanently removed. Google Apps Vault does not retain data of deleted accounts.
Waste time and money: Data in Google services like Calendar, Contacts are not retained at all. A data loss incident would cost a lot of time and money. Imagine losing all your meeting invites, access codes, contacts. You can’t afford to miss an important business meeting, can you?
And, do you agree that Vault cannot be used as a backup solution?
Advantages of using a backup solution
Regular backup: You can back up important data periodically
Store all data: You can even back up data in Google services like Calendar and Contacts
Easy-to-use: You can easily restore data with a single click
Cost-effective: You can back up and archive an individual user’s data – reuse the account license for a new employee, thereby reducing cost
Saves time: You can effortlessly restore data retaining the sharing permissions and folder structure intact
Multi-data restore: You can also restore multiple folders and multiple user data at the same time
If you want to know why backing up your data is important, read this.
What are you still waiting for? Create your backup today!
In this article
What Is Google Vault?
The transition from Postini to Google Vault
Google Vault pricing
Uses of Google Apps Vault
Why would a company need Vault
Using Google Apps Vault: Google Vault tutorial
How to restore data from the Vault
Advantages of using a backup solution
Try SysCloud's Backup Solution
Restoring lost data is just a matter of a few clicks