In this article
  • How to back up and restore Outlook emails – individual user
  • How to back up and restore Outlook emails- for IT Administrators

How to Backup Outlook Emails: A Complete Guide (with screenshots)

11 May 2021
|
17 min read
|
Annu Palathingal
twitterlinkedin
Blog Articles

Outlook is one of the most popular email services. 

The most recent data shows Microsoft 365 has over 258 million monthly active users. With so many people depending on Outlook for communication and data sharing, it is necessary to learn about various methods to keep your Outlook data safe. 

Whether you are an IT administrator or a personal Outlook email user, here are all the possible ways to back up and restore Outlook email data. 
Take a look at this flowchart to find the most suitable way for you to back up and restore your Outlook data. 

Flow chart Outlook

How to back up and restore Outlook emails – individual user

If you are an individual user and have not taken a backup for your Outlook data, you have the following options:  

1. Recover deleted emails from the deleted items folder 

2. Using Import/Export Wizard 

3. Using Drag and Drop 

4. Using email forwarding 

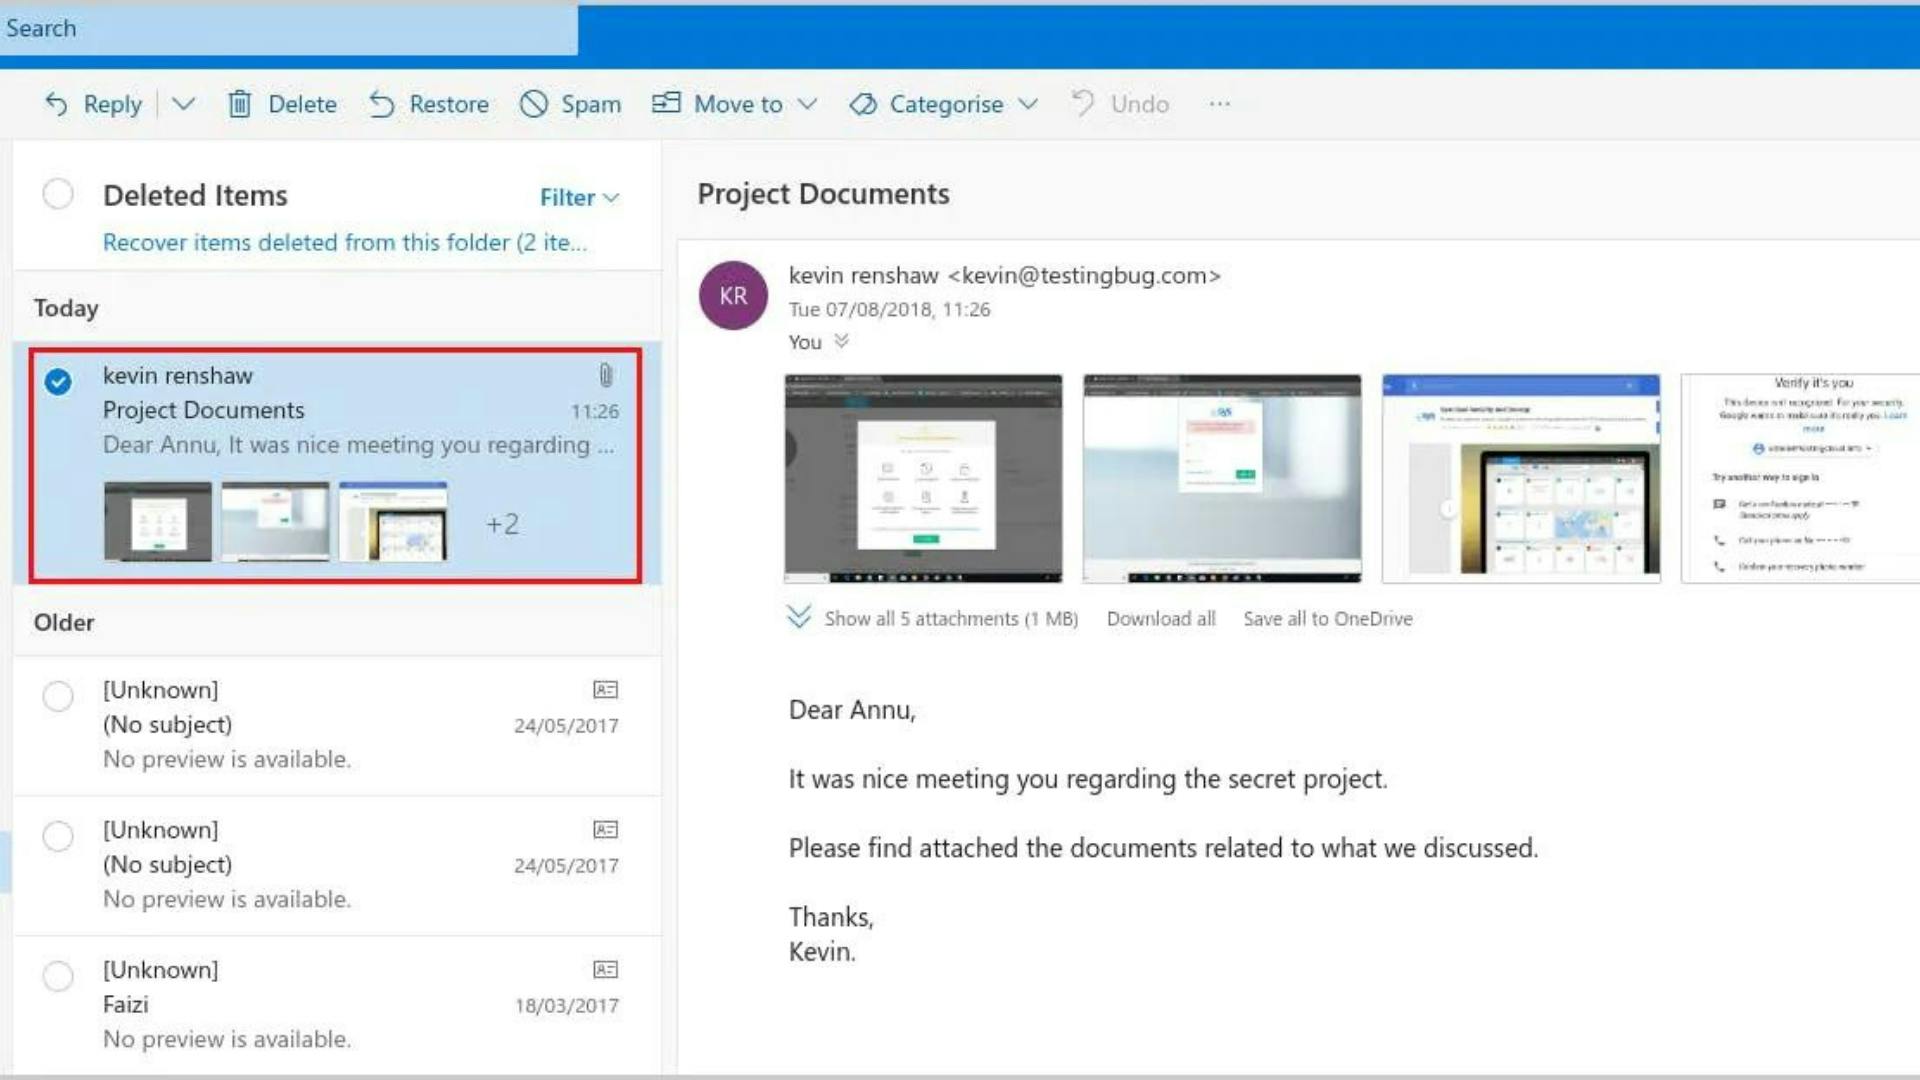
Recovering Deleted Emails from the Deleted Items folder 

If an email is accidentally deleted from the inbox, it can be easily restored from the list of deleted items. Deleted emails remain in the Deleted Items folder for 30 days.

  • Log in to your Outlook account. 

  • Navigate to the Deleted Items folder on the left pane.

  • Select the email that you want to restore.

Deleted items
  • Click on the button Restore on the menu bar. This will restore the email o the inbox.

Note: This action can also be performed by right-clicking on the desired email and selecting the option Restore

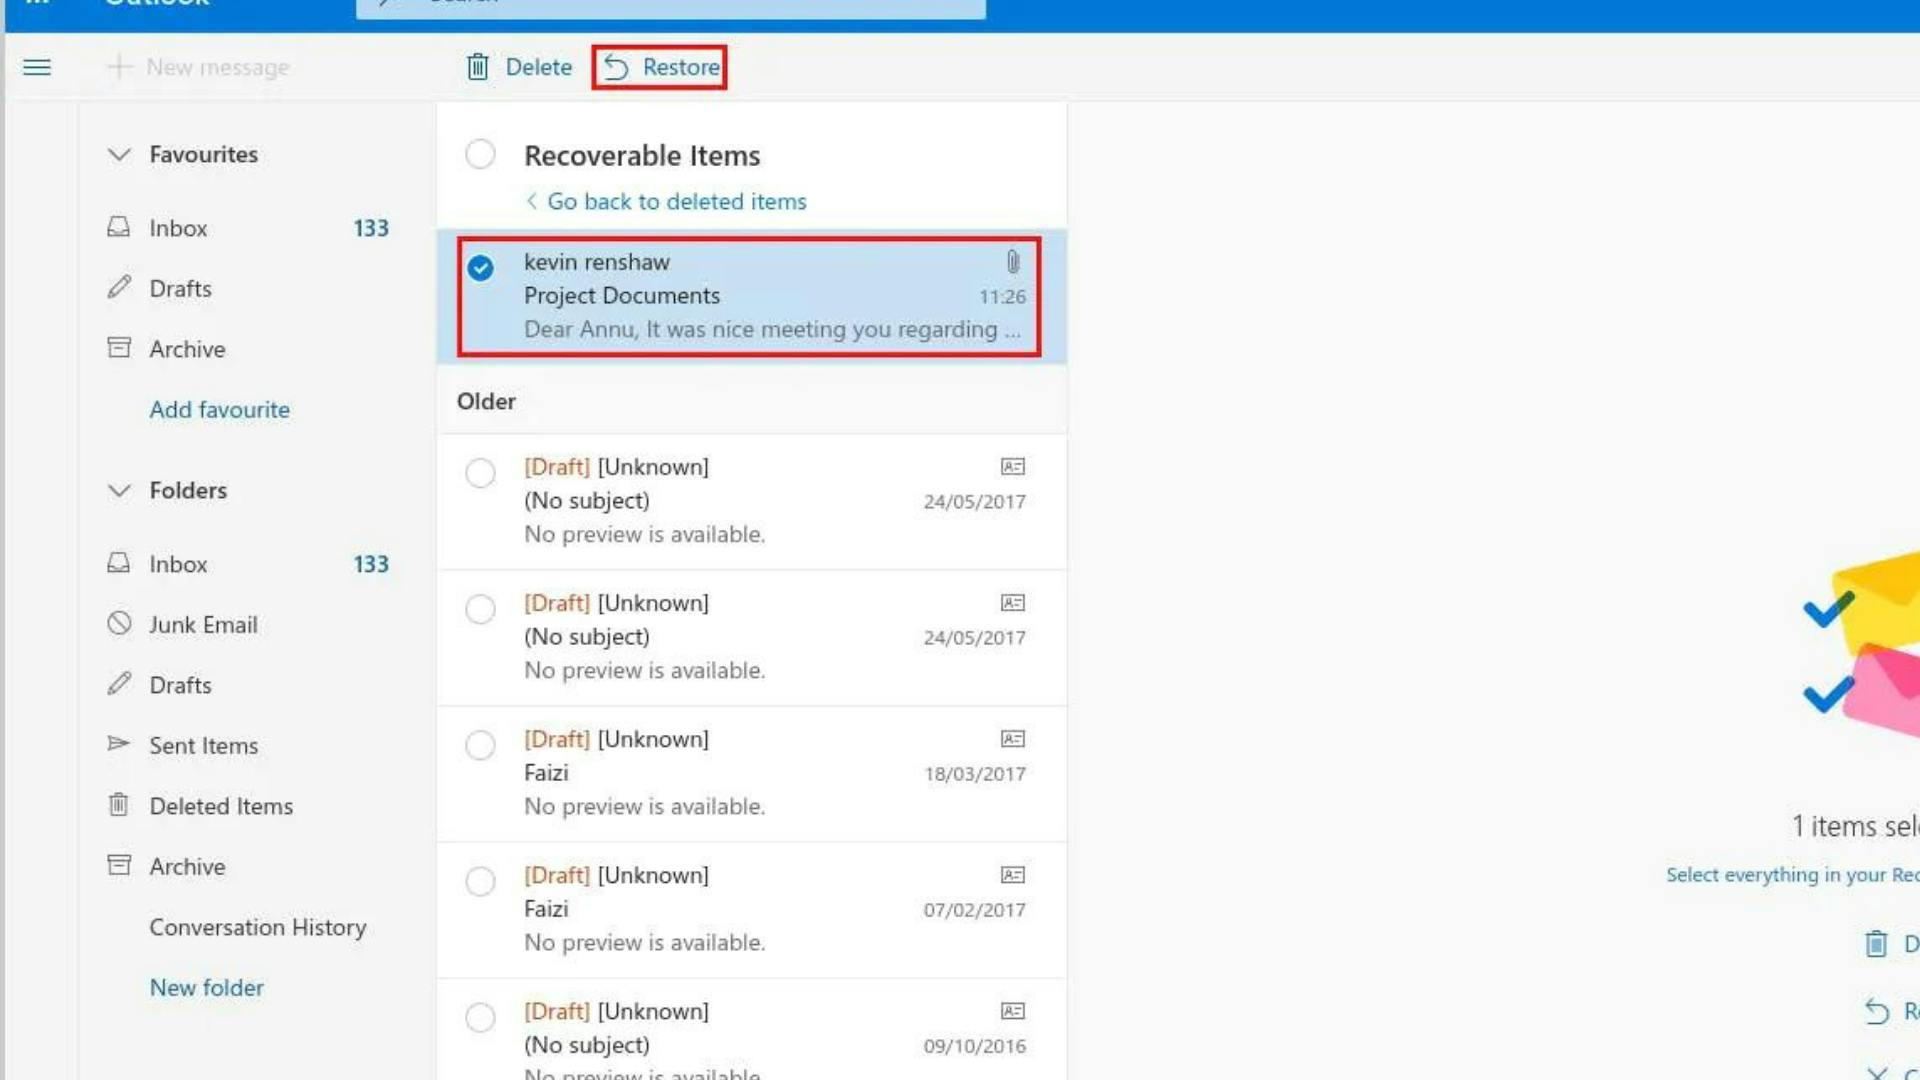
Recovering permanently deleted emails

 If the email(s) is accidentally removed from the Deleted Items folder, it can be restored from the Recoverable Items folder within 30 days of deletion.

Follow these steps to restore mail(s) that has been deleted from the Deleted Items folder: 

  • Navigate to the Deleted Items folder.

  • Click on the link Recover items deleted from this folder

  • This will take you to the Recoverable Items folder.

Note: The Recoverable Items folder cannot be directly accessed. It can only be accessed through the Deleted Items folder. 

  • Select the email that must be restored and click on the button Restore.

Recoverable items

This will restore the email back to the inbox. 

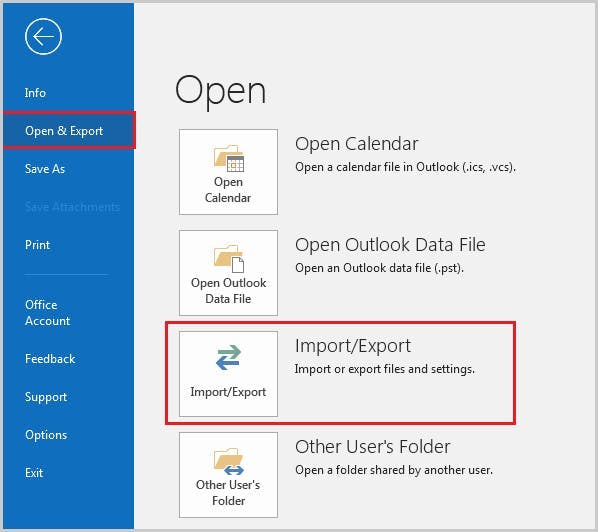
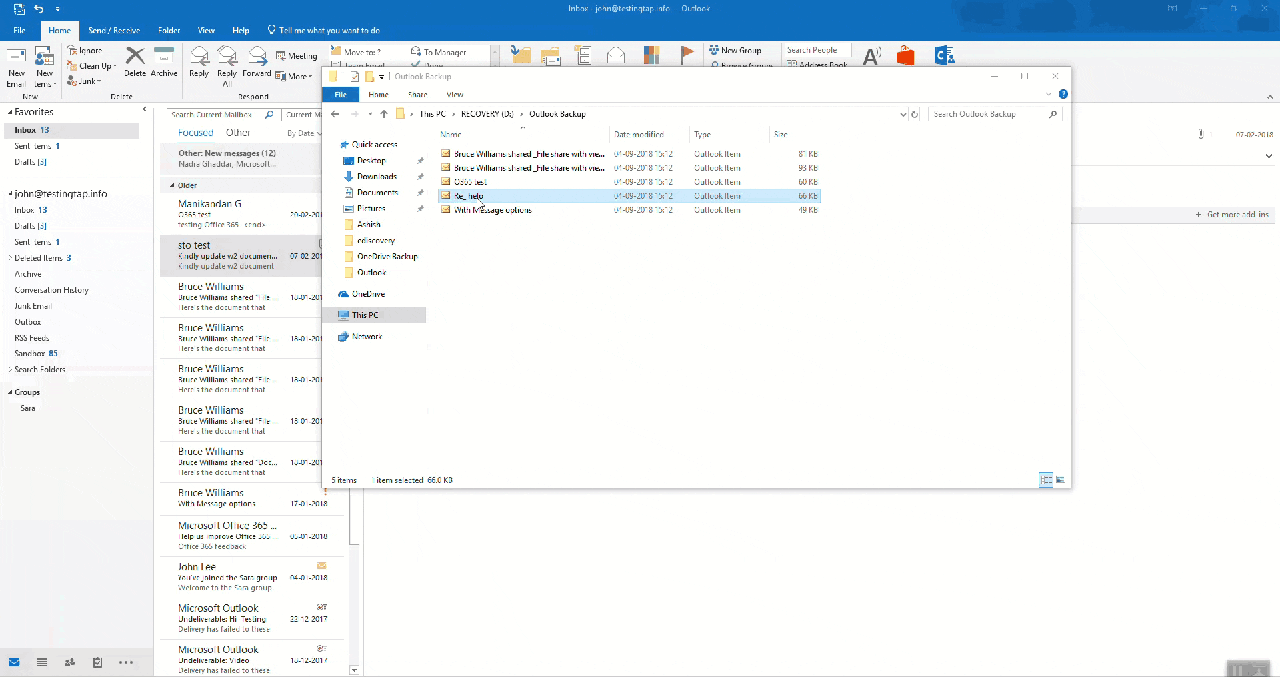
Take Outlook backup and restore using Import/Export Wizard 

With the Import/Export Wizard, individual users can manually back up their emails and store them in local storage.  
The email messages can be restored using the import feature of Outlook.

Note: This Import/Export Wizard is only available in the desktop version of Outlook and not in the web version. 

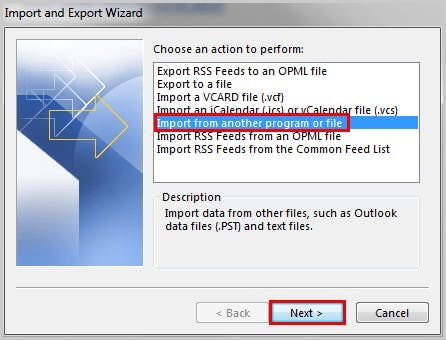
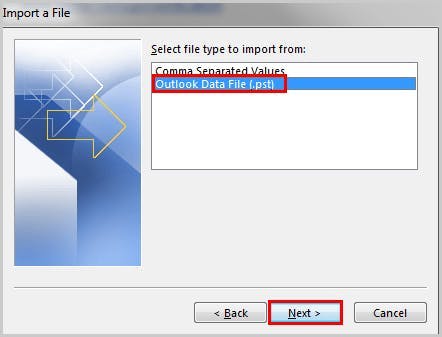
How to use the export option as an Outlook backup tool?

  • Launch Outlook desktop application

  • Select the File option in the menu bar. 

  • Navigate to Open & Export and select the option Import/Export. This will open the Import/Export wizard.

Export
  • Choose the option Export to a file and click on Next.

  • Next, select the desired folder – for example, Inbox –  that has to be exported and click on Next

  • In the next screen, click on the Browse button to choose the location in which you want to store the exported email(s). 

Export tool
  • Click on the button Finish. The selected folder –Inbox – will be exported as a pst file and will be kept in the specified location. 

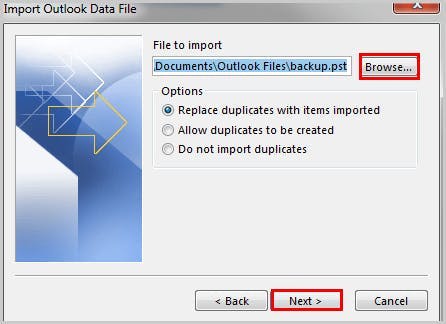
How to use the import option as a restore tool? 

Restoring emails can be done using the Import feature in the Import/Export wizard. 

  • Launch Outlook Desktop Application.

  • Click on the option File in the menu bar. 

  • Navigate to Open & Export and select the option Import/Export. This will open the Import/Export wizard. 

  • Choose the option, Import from another program or file and click on Next.

Restore tool
  • Choose the file type Outlook Data File (.pst) and click Next.

Outlook data file
  • Next, click on the Browse button to choose the location from where you want to import the already backed up emails and click on Next.

  • Choose if you want to import the entire folder or only specific sub-folders – if there are any – by clicking on the folder to be imported

  • Review the settings and click on the Finish button.

Limitations

  • You might have to regularly take manual backup to stay up-to-date with the emails. 

  • Older backups must be regularly deleted to save local storage space.

  • You cannot Export or Import individual emails using this wizard.  

Take Outlook backup & restore emails using drag and drop

  • Drag and drop to back up your emails.

  • Drag and drop individual files to a folder in your computer to take an Outlook backup. 

Note: This feature is only available in desktop Outlook. 

How to drag and drop individual emails?

  • Create a folder on your computer to store the backup emails. 

  • Launch desktop Outlook. Drag and Drop all the important emails into the previously created folder.

drag and drop

Note: This only creates a copy of the emails. The original emails will remain in your Outlook application. You can also save the emails by navigating to File → Save as. 

How to restore? 

To restore an email that was lost from Outlook, simply drag the email back to the Outlook desktop application from the Outlook backup folder.

drag and drop restore

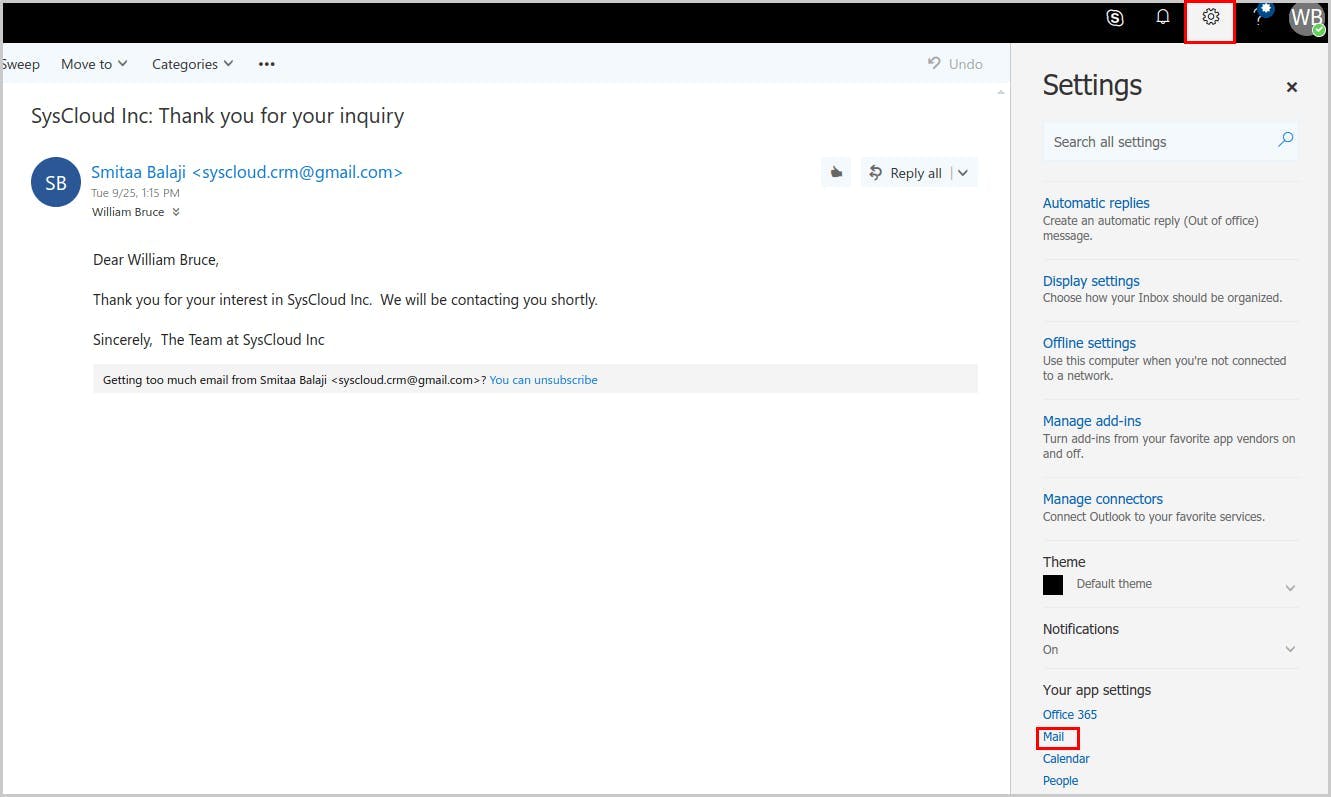
Email forwarding as an Outlook backup tool 

Another easy way of keeping a backup of your emails is to forward them to an alternate account. Once the forwarding feature is set up, even if you lose emails in one account, it will be available in the alternate account. 

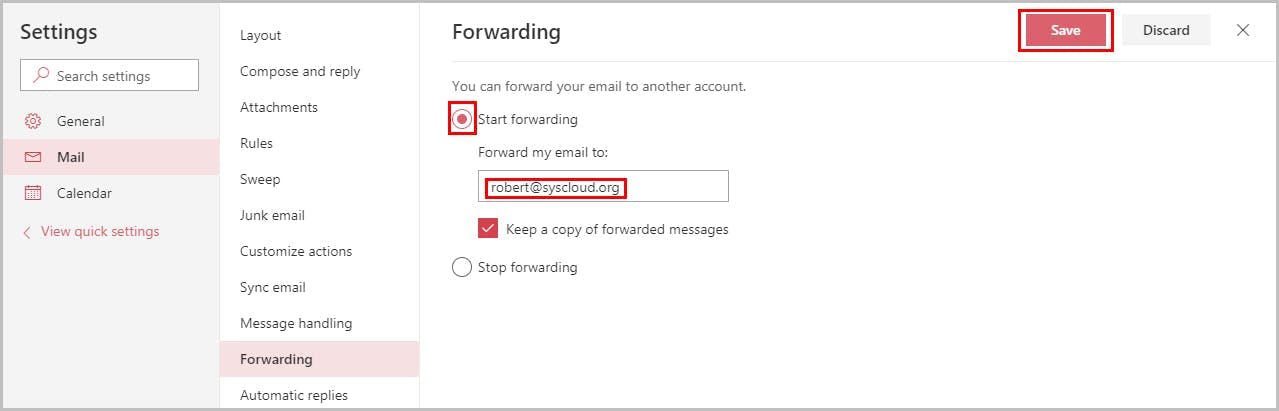
Setting up email forwarding for Outlook on the web 

  • Go to the Outlook toolbar, select Settings and click on Mail.

email forwarding
  • Navigate to Accounts → Forwarding.

  • Next, click on the radio button Start forwarding and type the email address to which a copy of your email has to be forwarded. 

  • Click the Save button.

Now all the emails you receive will be automatically forwarded to the specified email address. 

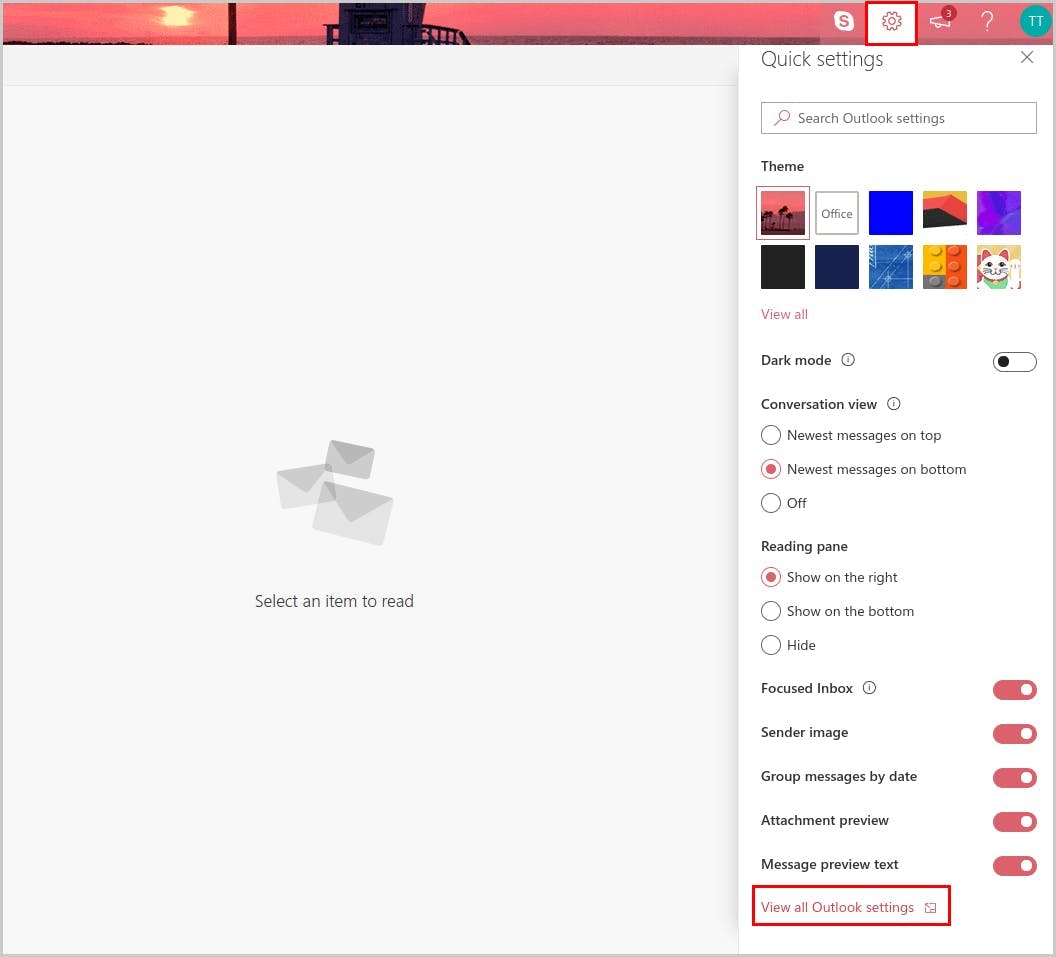
Setting up email forwarding for free Outlook 

  • Click on the Settings icon – on the top right corner – and select View all Outlook settings. This will open a new pop-up window within the application. 

email forwarding free outlook
  • Navigate to Mail and select the Forwarding option.

forwarding option
  • Click on the radio button Start forwarding and type the email address to which a copy of your email has to be forwarded

  • Check the box, keep a copy of forwarded messages to ensure that the original emails in your mailbox are not deleted after forwarding. 

  • Click on Save

Now, all the emails you receive will be automatically forwarded to the specified email address. 

Note: There is no exclusive forwarding option available in desktop Outlook. However, individuals can use the Rules and Alerts wizard to forward emails to another account. 

How to back up and restore Outlook emails- for IT administrators 

Office 365 does not have a single feature or web application to automatically backup your organization’s Outlook data. However, you can manually backup emails using some native features.  If you are an IT administrator, you have the following options to back up and restore your Outlook data: 

1. Using Outlook litigation hold  

2. Using eDiscovery  

3. Using third- party apps 

Using Outlook litigation hold as an alternative to backup 

litigation hold is a native feature in Office 365 to prevent changes or deletions of emails needed for legal reasons.

Note: The litigation hold feature is available only for Microsoft 365 Enterprise E3 plans and E5 plans. 

So, how is litigation hold related to back up? 

To keep the data safe for future reference, the administrator can put any user’s Outlook emails on hold; preserving all the mailbox content for as long as needed. 
For example, even if a user permanently deletes an email, the email will still be accessible to the administrator if his mailbox was put on litigation hold. 
Therefore, in situations like accidental or intentional deletions, you can still access your data making the litigation Hold function as an Outlook backup tool. 

Limitations 

Outlook data hold is not helpful in the event of a malware attack like ransomware or outages. It will be much more helpful if you have a third-party app like SysCloud to automatically back up your Outlook data. 

Using eDiscovery as an alternative to Outlook backup 

eDiscovery is the process of searching and locating data that could be used as potential evidence during a legal procedure. eDiscovery can also be used to retain critical business data for as long as needed. 
This tool comprises four modules: 

Case: A way to organize data and restrict the held data to a certain set of users. 

Hold: Protects important data from user modifications or deletions. 

Search: Lets the administrator search for specific emails among the held data. 

Export: Exports discovered data as a .pst file. 

Learn more about Microsoft 365 eDiscovery, here 

Limitations: 

  • Each user has limited storage available. If you delete emails to stay within the storage limit, deleted emails cannot be recovered. Also, if the user account is deleted, then the backup data is lost forever. 

  • eDiscovery feature is available only for users who have subscribed to Microsoft 365 Enterprise E3 or E5 plans. 

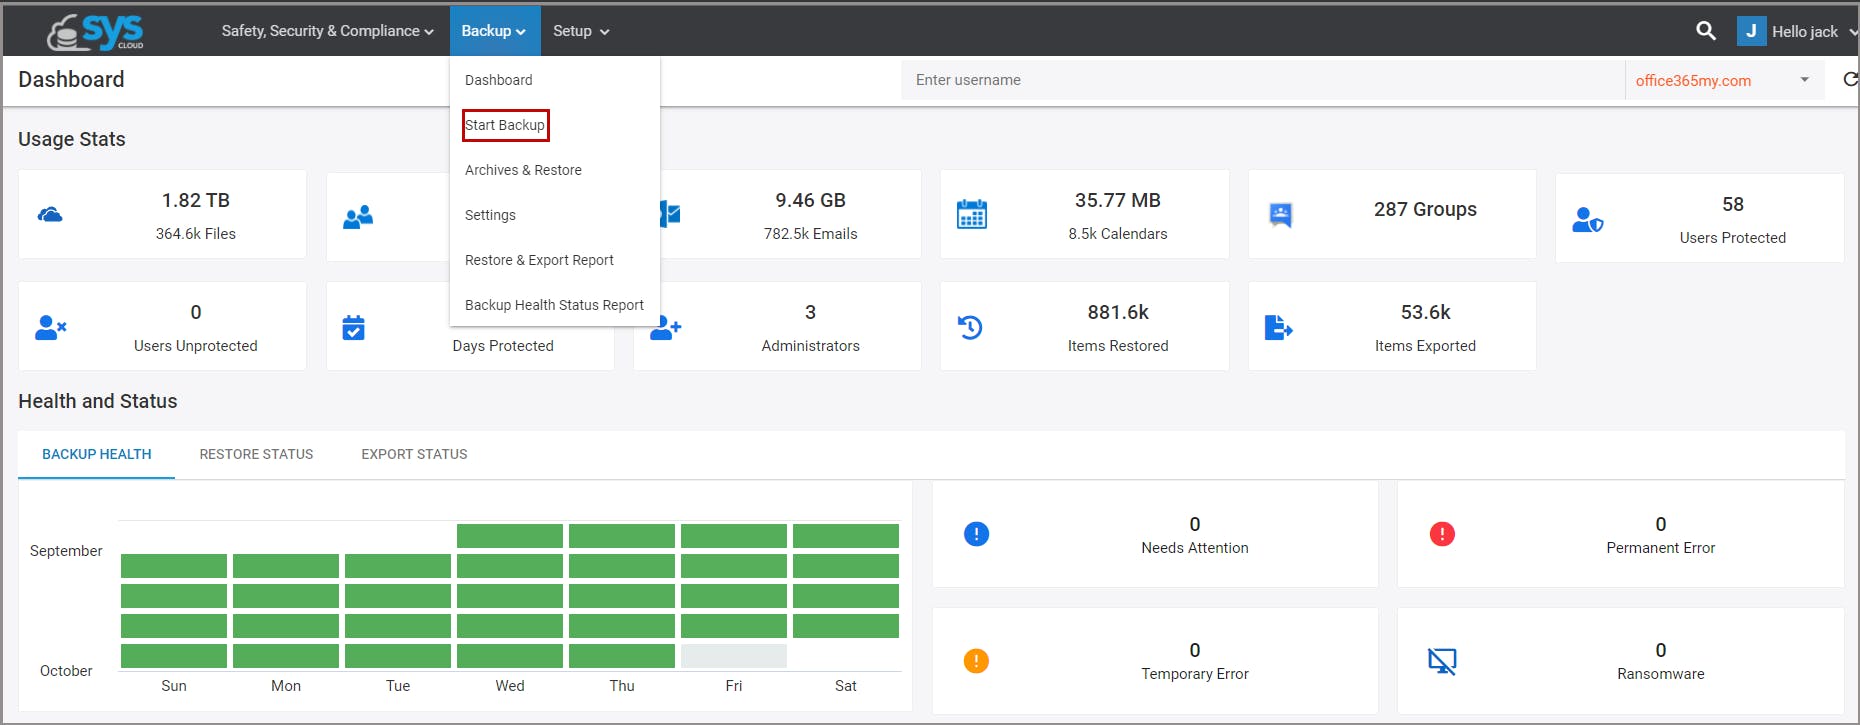
Take Outlook backup using third-party tools 

In the previous sections, we saw the native features in Office 365 that could function as an alternative to Outlook backup. But these are not programmed to exclusively backup your data or easily restore them. As a result, they are neither fully effective nor user-friendly for backup. 
So how do you take an easy and effective Outlook backup? 
There are third-party tools designed solely for backup and restore. They are easier and reliable to back up your data and effortlessly restore it. 

SysCloud offers a fully automated cloud to cloud backup and restore service. We use the top trusted web services like Amazon Web Services (AWS), Microsoft Azure, and Google Cloud Platform to store data. 

Using third-party tools like SysCloud, you can: 

  • Easily restore specific emails or all the emails to their account in just a few clicks without the trouble of importing and exporting. 

  • Retain safe copies of organizational data even after events like employee exits and account deletions; saving license costs. 

  • Take Outlook backup and restore even without any technical expertise.

  • Take faster backup even for large teams. 

  • Have more data security with increased administrator controls and secure data storage location

Here is how you can take an Outlook backup using SysCloud,

  • Launch SysCloud’s application using this link apps.syscloud.com

  • Log in to Office 365 using your admin credentials. 

  • Logging in will take you to the home page of the SysCloud application. 

  • Navigate to Backup in the menu bar and select Start Backup from the drop-down menu.

SysCloud Dashboard
  • Next, select the accounts of the users you want to backup. 

  • Click on the Add button on the right side of the screen. 

  • This will add the selected users to the backup list.

  • Click the button Start Backup to start the backup progress.

The progress can be seen on the Archive & Restore page. 
Now you have a second copy of your data safely stored on the cloud and you can retrieve it when needed. 

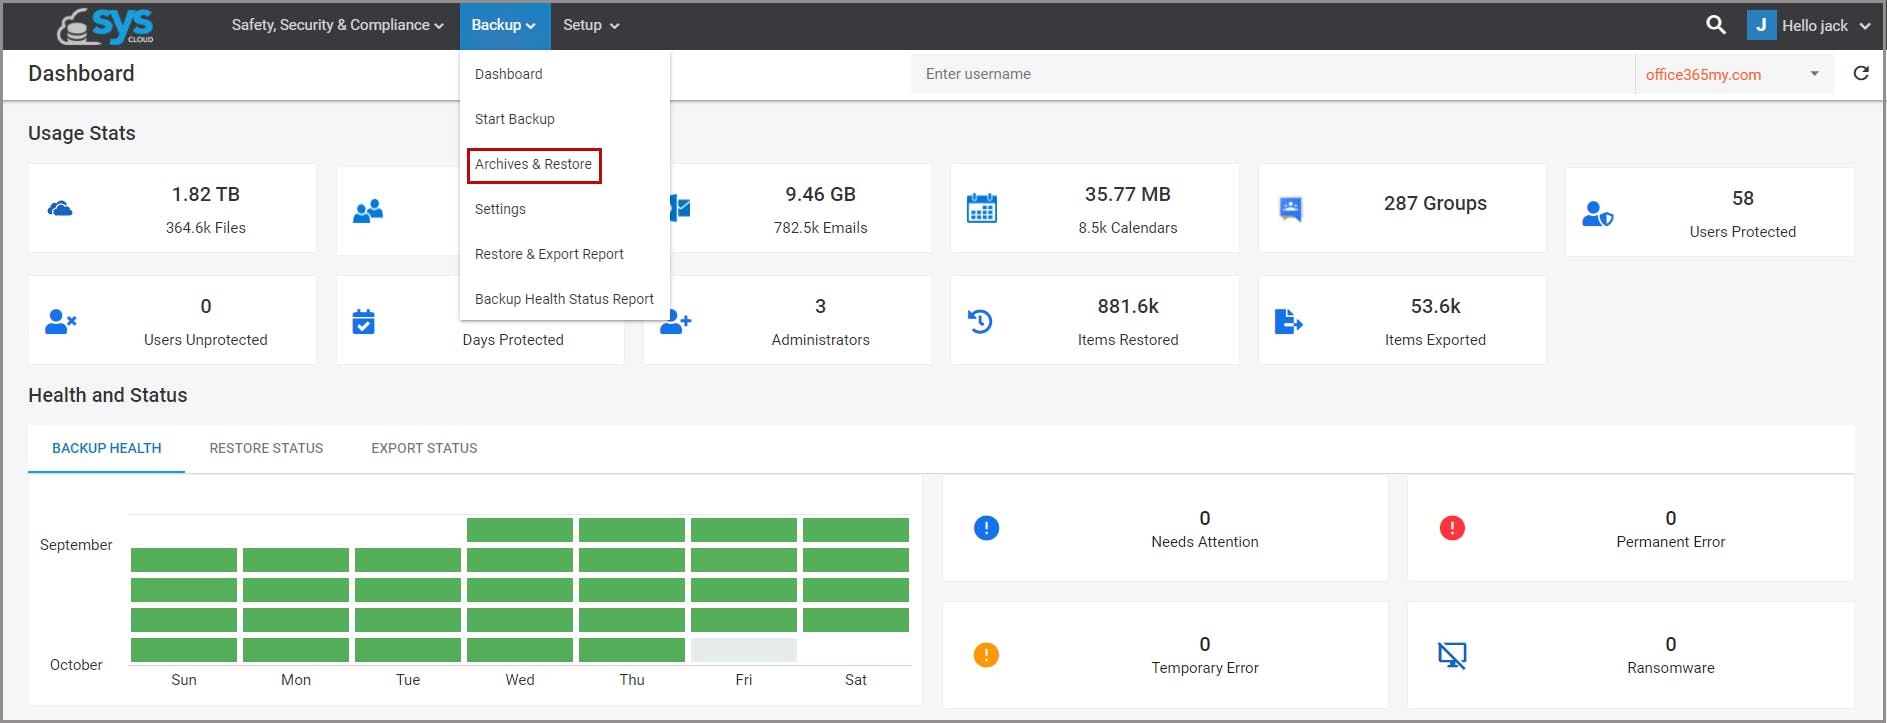
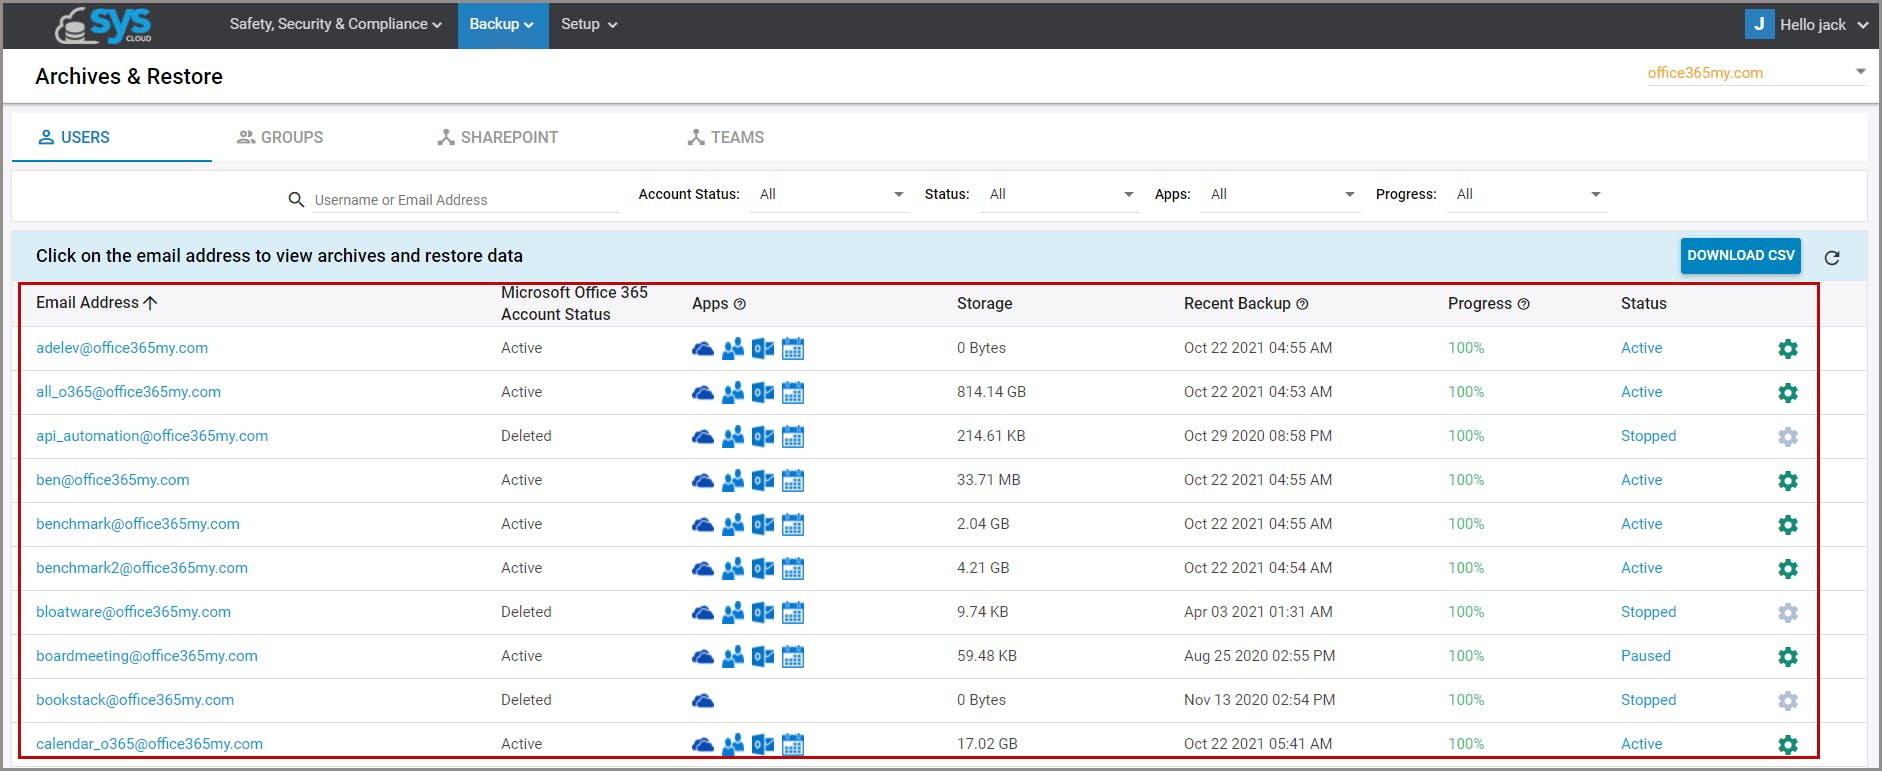
How to restore using third-party tools 

Restoring lost or deleted emails using SysCloud is easy and time-saving. Be it a specific email or the entire domain, Outlook can be restored in just a few clicks. 

Follow these steps to restore your data using SysCloud. 

  • Open the SysCloud application. 

  • Navigate to Backup on the menu bar and select Archive & Restore from the drop-down menu.

archives (1)
  • A list of users whose data has already been backed up and the daily backup progress will appear on the screen. 

  • Click on the user(s) whose data needs to be restored. 

Users
  • The page will list all the data of the user(s), including their emails that have been backed up. 

Note: SysCloud allows you to either restore all the emails or a particular email of the user.

To restore email(s) to inbox: 

  • Select the email(s) to be restored. 

  • Click on the button Restore and choose the option Selected Items – to restore selected emails – or select All option – to restore all emails. 

Outlook backup- Syscloud restore

Verify the email address and click on the Restore button to restore the email(s) to the specified inbox. 

Why should you back up Outlook?

  • Keeping a backup will help organizations and industries comply with data security and retention regulations in the event of a data loss. 

  • Backing up your emails and documents will help your organization in the event of litigation.

  • Easy Data Retrieval & Increased Business Productivity 

  • Backing up your emails and documents can help you access lost data, and therefore, it would not affect your business continuity.

  • Even if an employee permanently deletes important data deliberately or you lose your important documents due to an unforeseen disaster, having a backup can save your organization from loss. 

  • Keeping a backup of all your business data can save you in the event of a ransomware attack. 

Outlook backup best practices for IT administrators

  • Always use long passwords that have twelve or more characters containing special characters, numbers, and uppercase. 

  • Never record your password anywhere. Use a password manager that allows encryption if necessary. 

  • Enable multi-step authentication

  • Enhance your email security by authenticating your email with DKIM, authorizing senders with SPF, and preventing outgoing spam with DMARC to prevent spoofing. 

  • Schedule an automatic Outlook backup – using applications like SysCloud.

  • Take manual Outlook backup whenever required, especially during peak season or during critical project delivery. 

  • Always monitor your Outlook backup storage and make sure that you have not exceeded the backup subscription limits.

Recommended Content 

To know how to back up your OneDrive data, check out our in-depth article, OneDrive Backup: The Complete Guide for IT Administrators 2018

To know Outlook settings to prevent phishing and ransomware, click here .

In this article
  • How to back up and restore Outlook emails – individual user
  • How to back up and restore Outlook emails- for IT Administrators
twitterlinkedin