- How to Recover A Deleted Google Workspace Account from Google Admin Console?
- How to Recover A Deleted Personal Gmail Account?
- Restore Data from Google Account When You Have a Backup
- How to Recover Deleted Google Account Data Using Third-Party Applications?
Note: For business and enterprise edition users, recovering a Gmail account actually means recovering their user account as a business or enterprise Gmail account cannot exist on its own without the corresponding Google account license.
How to Recover A Deleted Google Workspace Account from Google Admin Console?
Step 1: Log in to Google Admin Console with super-admin credentials.
Step 2: Click on the option “Users”.
Step 3: Go to “Users” and click on the “+ add filter” option.
Step 4: Select the option “recently deleted” from the drop-down menu.
Step 5: Hover over the desired user and click on the “Restore” button.
Step 6: Review and click on the “Continue” button.
Step 7: Select the desired organizational unit and click “Recover”.
Note: Users whose accounts were previously suspended will be shown as “suspended”. To know more about recovering a suspended user click here.
Follow the same steps to recover the deleted user account and then give them the admin role again if you want that account to be an administrator. To know how to make a G Suite user an administrator click here.
How to Recover A Deleted Personal Gmail Account?
Step 1: Open the Google Sign-in/Account recovery page and enter your email address.
Step 2: Click on the “Next” button. (Google will show this option only if your account is recoverable. If Google says it cannot find an account with this email address, that means you cannot recover your account.)
Step 3: Enter the last password you remember using with this account. If you get this right, then you can directly sign in to your account. If not, then move on to the next step.
Step 4: You will receive a text or call on the phone number that you linked with the account during account creation. If you did not set up a phone number then move on to step 5.
Step 5: Enter the verification code that was sent to your recovery email address.
Step 6: Select the month and year in which you created the account.
Restore Data from Google Account When You Have a Backup
How to Restore Deleted Gmail Account Data Using Google Takeout?
Google Takeout is an in-built Google feature that lets you download your account data. If you had regularly downloaded your data using Google Takeout, then you can restore it to a newly created Google account in case your account was permanently deleted. Read our blog articles to know more about using Google Takeout to recover deleted Gmail emails and recover deleted Google Drive files.
If you want to know more about using Google Takeout to backup your data then read our blog post, How to Use Google Takeout for Business (Step-By-Step Guide).
Limitations of Using Google’s Native Features to Recover Google Account Data
Possible Data loss: Google Takeout requires you to regularly download the data; failing to which results in data loss.
No direct data restoration: You cannot directly recover your Google account data using Google Takeout or other native features. You will have to use additional tools and email clients to recover data.
Incomplete restoration: Native features does not restore your data with sharing permissions and folder structure intact for Drive files and emails.
How to Recover Deleted Google Account Data Using Third-Party Applications?
How to Recover a Permanently Deleted Google Account using SysCloud?
Step1: Create a new Google account for recovery if you want to recover the entire account data, or if you just want to restore specific files or folders then you can use an existing account.
Note: Don’t forget to add this account to the SysCloud application before you try cross-user restoration.
Step 2: Log in to your SysCloud account with your admin credentials.
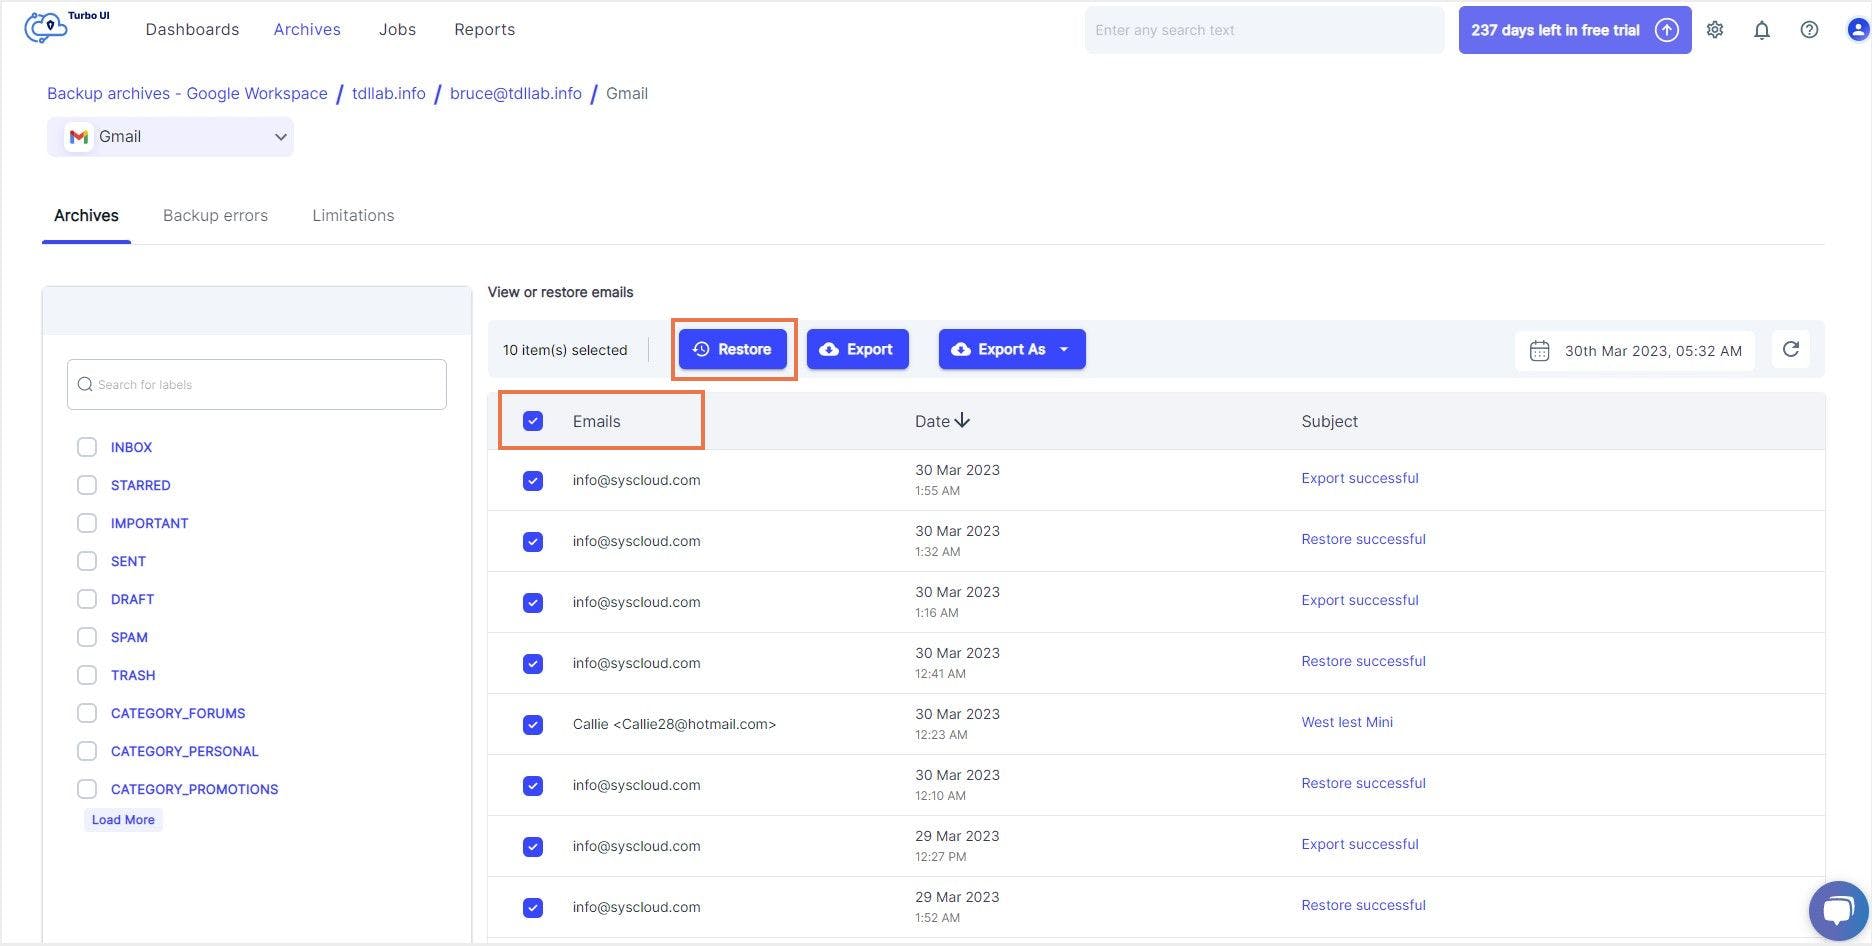
Step 3: Navigate to the “Archives” in the menu bar and select the user account from the user archives whose data you want to recover.
Step 4: Select an app that you want to recover and select all files by clicking on the checkbox next to it.
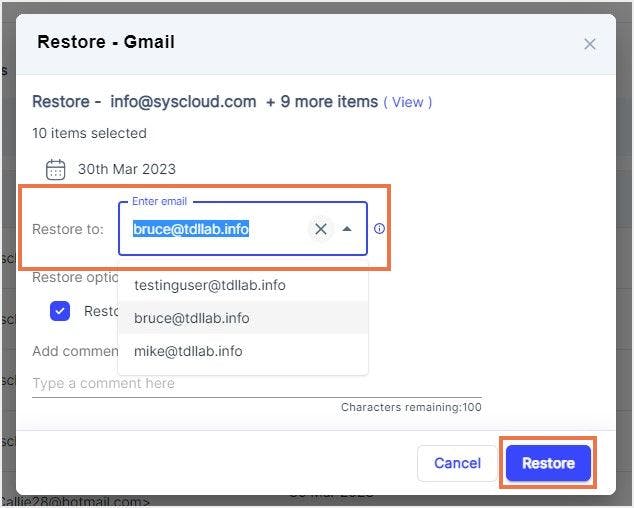
Step 5: Click on the “Restore” button to restore all the files in the app. You will now be asked to specify the account to which you want to restore the data.
Step 7: Provide the new account name and select “Restore”. All data in the selected service will now be restored to the specified Google account.
Step 8: Repeat the same steps for all the services – like Google Drive, Contacts, Calendar, and Sites – to restore entire data to the new Google account.