In this article
  • Gmail backup for individual users
  • Google backup for administrators
  • Back up Gmail emails using third-party cloud backup apps
  • Frequently asked questions

How to Backup Your Gmail Emails: A Step-By-Step Guide

18 Jun 2018
|
17 min read
|
Jeena
twitterlinkedin
Blog Articles

Gmail has over 1.8 billion users. As individuals and businesses become heavily reliant on Gmail, backing up Gmail has become important. 

That’s not all. Google is not responsible for maintaining a backup of your Gmail data. You cannot hold Google liable for the loss of your Gmail data either. Just check out the Google Terms of Service.  

Image 1

Here are a few ways through which you can back up your Gmail account and have a second copy of all your emails whenever you need it.

Image 2- flowchart

Gmail backup for individual users

How to back up Gmail using native features

Gmail backup using automated email forwarding

Individuals can create a backup of their Gmail using one of the three native features available under Gmail settings.

How to set up automated email forwarding

Step 1: Log in to your Gmail and go to “Settings”. You will find an option called “Forwarding and POP/IMAP.”

How to set up automated email forwarding- step 1

Step 2: Click the “Add a forwarding address” tab and enter your destination email id.

Step 3: Click “Proceed” on the confirmation box. A confirmation code will be sent to your destination mail.

Step 4: Copy the code from your destination email.

Step 5: Go back to the “Settings” of your primary email.

Step 6: You will see an option in the forwarding menu asking you to enter the confirmation code.

How to set up automated email forwarding- step 6

Step 7: Enter the confirmation code and click on “Verify.”

Step 8: This procedure only adds your destination email to the primary id.

Step 9: To enable forwarding, select the “Forward a copy of incoming mail” option. You can add multiple emails for forwarding and customize your options.

Step 10: If you want to forward emails received only from a specific person or the emails that contain a particular word/subject, you can do so by customizing the forwarding option.

Note: Only those emails received after enabling the “Forwarding” option will be seen in the destination email account.

Gmail backup by enabling POP

Post Office Protocol (POP) is an inbuilt Gmail feature that downloads emails to Microsoft Outlook email client. This second copy will also be available offline. 

Note: Deleting an email from your Gmail does not delete the copy downloaded to the email client.

How to enable POP settings in your Gmail account

Step 1: Navigate to “Settings” and select “Forwarding and POP/IMAP”.

Step 2: Enable POP by choosing the radio button “Enable POP for all mail” or “Enable POP for mail that arrives from now on,” according to your need.

How to Enable POP Settings in Your Gmail Account- step 2

Note: To download your emails, you need to give login permission to email clients.

Step 3: To give login permission to email clients, navigate to the My Account page and click “Security” from the menu on the left-hand side. Scroll down to “Less secure app access” and click “Turn on access”, Turn on access by clicking the toggle bar. 

Note: To enable this option, you have to disable two-factor authentication for your Gmail. This compromises the security of your Gmail account and is ideally not recommended by Google.

Step 4: After enabling POP in Gmail security settings, you can configure your email client Microsoft Outlook to download your emails.

Step 5: You can launch Outlook and select add account by clicking on the “Info” option in the File tab.

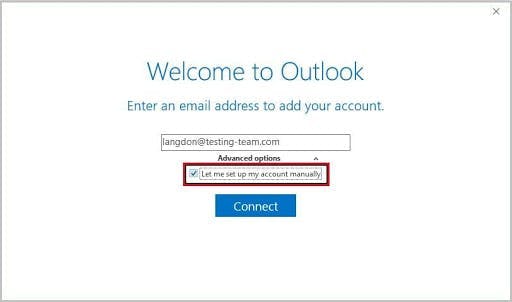
Step 6: After adding an account, Outlook will take you to the configuration wizard. Enable the checkbox “Let me set up my account manually” to configure POP.

How to Enable POP Settings in Your Gmail Account- step 6

Step 7: Select “POP” from the list of account type options that appear on the screen.

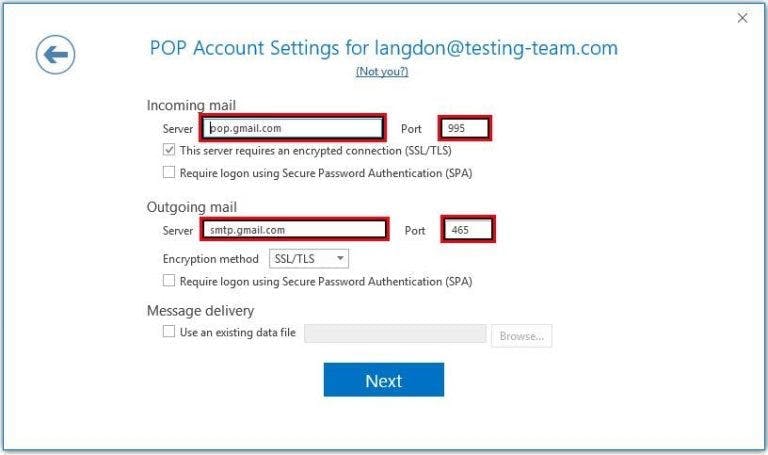
Step 8: Fill in the following details:

1. Incoming mail server: “pop.gmail.com” and its port: “995”
2. Outgoing mail server as “smtp.gmail.com,” and its port: “465. 

Step 9: Click on the “Next” option.

How to Enable POP Settings in Your Gmail Account- step 9

Step 10: Enter the password for your Gmail account.

Step 11: Now your email client account is set up.

Step 12: Click on the “Send/Receive All Folders’’ option to download all your emails.

Step 13: This will generate a second copy of your emails.

Note: Any new email that you receive in your Gmail account after enabling POP will not be automatically available in your email client. The emails should be downloaded manually during regular intervals by clicking the “Send/Receive All Folders’’ option.

Gmail backup by enabling IMAP

Enabling Internet Message Access Protocol (IMAP) is an alternative way to access emails, even when offline. Unlike POP, IMAP automatically synchronizes emails in Gmail with email clients. Changes made in Gmail will be reflected in the corresponding email client and vice versa.

How to enable IMAP settings in your Gmail account

Step 1: Navigate to “Settings” and click the “Forwarding and POP/IMAP” tab.

Step 2: Select the radio button next to “Enable IMAP” and click “Save Changes”.

How to Enable IMAP Settings in Your Gmail Account- step 2

Step 3: For your desktop email client to be able to access your Gmail account, you will have to provide access permission. Navigate to the My Account page and click “Security” from the menu on the left-hand side. Scroll down to “Less secure app access” and click “Turn on access”, Turn on access by clicking the toggle bar.Note: To enable this option, you have to disable two-factor authentication for your Gmail account. This compromises the security of your Gmail account.

How to Enable IMAP Settings in Your Gmail Account- step 3 (1)
How to Enable IMAP Settings in Your Gmail Account- step 3 (2)

Step 4: Next, enter your login credentials in your email client to sync the emails.

protipPro tip
Since IMAP is the default protocol in Gmail, it is not necessary to click on “Let me set up my account manually,” unlike POP.

Once the credentials are entered, you are good to go.
After setting up your account, all your emails will be downloaded automatically in sync with Gmail, as shown below

How to Enable IMAP Settings in Your Gmail Account- step 4

How to Set Up Auto Archiving Feature in Outlook

Step 1: Click the “File” tab and select “Options.”

Step 2: Navigate to “Advanced>AutoArchive Settings”

How to Set Up Auto Archiving Feature in Outlook- step 2

Step 3: Click “Run AutoArchive every” and select how often you want it to run. By default, it will be set for 14 days. You can change it according to your need.

Step 4: Click the “Clean out items older than” option and set a time period to move your files from Inbox to the Archive folder. 

Step 5: Click “Move old items to:” and type a file name for the archived items to be transferred to, or click Browse to select from a list.

How to Set Up Auto Archiving Feature in Outlook- step 5

Step 6: Click “OK”.

You can view the Archived emails by clicking on the “Archive” option.

How to Set Up Auto Archiving Feature in Outlook- step 6

How to back up Gmail emails using Google Takeout

Google Takeout allows Gmail users to download a second copy of their Gmail data on their computers. 

Note: Users have to manually download the data to ensure a regular backup of all the data. 

How to use Takeout

To access Takeout, you can either use this link or navigate to the page using the below four steps. 

Step 1: Log in to your Gmail account. 

Step 2: Click the waffle icon on the top right-hand side corner and select  ‘Account’. 

Step 3: Click “Data & personalization” from the menu on the left-hand side. 

Step 4: Scroll down and click “Download your data”  under “Download or delete your data”.

How to Use Takeout- step 4

Follow the below steps to download your emails.

Step 1: Check the box next to Gmail on the takeout screen. 

Step 2: All mail data is included for download, by default. You can choose what to download from your Gmail account under the Mail content options.

Step 3: After customizing your options, click “Next Step” and then select the following:

Under the “Delivery method” you can choose to add the downloaded data to your Drive, Dropbox, OneDrive, Box, or receive a link to the archive, in your email.

Under “Frequency of export” you can choose to export the files once or once every 2 months.

Under “File type & size,” you can choose between .zip or .tgz for the file type. After choosing all the options, click “Create export”.

Step 4: Click the “Create export” button.

Follow the below steps to download your emails.- step 4

Step 5: Once you click the “Create export” button, data will be organized for you to download to a storage device– computer, USB device, etc. You will receive an email once the export is complete or you can check the status on your Takeout page by selecting the “Manage exports” option.

Step 6: In the “Manage your exports” page, locate your Gmail export and the “Download” button next to the created archive. Sign-in again to verify your account. 

Verifying your account will automatically download your data to your desired hardware.

Note: The downloaded files will be available for only a week in your Takeout archive and will be automatically deleted after a week. The downloaded data will be stored in the MBox format and can be viewed using Thunderbird desktop email client. If you are using Microsoft Outlook as your email client, use a converter that converts MBox files into PST files to view your downloaded document.

To know more about Google Takeout, click here

How to back up Gmail emails using Gmvault

Gmvault is an open source command line tool to create a Gmail backup. The application can be downloaded at gmvault.org. For installation, click gmvault.org/install.html#quickstart

Note: You will need basic knowledge in command-line tools to use Gmvault.

 Launch the tool by clicking the Gmvault icon on your desktop.

How to use Gmvault

Step 1: Open the Gmvault application.

How to Use Gmvault- step 1

Step 2: You can start the backup by giving the “Gmvault sync your email id” command. For example, Gmvault sync bruce@testing-team.com\

How to Use Gmvault- step 2

Step 3: Press enter after typing out the command.

Step 4: The tool will automatically create a folder in your computer where your backups will be stored.

How to Use Gmvault- step 4

Step 5: Press enter, and you will now be redirected to the Google login page.

How to Use Gmvault- step 5

Step 6: Sign in using your credentials.

Step 7: Next, Gmvault will ask your permission to access your Gmail account.

Step 8: After giving permission, it will generate a key. Copy the authentication key from your Gmail and paste it on the Gmvault application.

Step 9: Press enter.

Gmvault will then back up all your emails and chat transcripts to the above-mentioned folder. The duration to complete this process will depend on the number of emails you have in your account. 

protipPro tip
To keep your Gmail backup up to date, you can also set Gmvault to run regularly. This regular backup can be customized based on your requirement.

Note: If you need help in using Gmvault, type the command: “gmvault – help” or click on the link: http://gmvault.org/in_depth.html.  

Google backup for administrators

How to back Up Gmail data using Google Vault

If you’ve subscribed to Google Workspace business or enterprise plans, administrators can access Google Vault to archive data. 

However, Google Vault is not a backup tool. Read more to understand why Backup and Archive are not the same. 

Note: Google Vault does not cover Google Calendar, Contacts, and Sites.

How to use Google Vault

Step 1: If you are the admin, log in using your Google Workspace credentials using this URL: ediscovery.google.com/. Once logged in, you will be taken to the homepage of Google Vault. 

Step 2: Create retention by navigating to the retention module. 

Step 3: Click on the edit option on “mail”. 

Step 4: Set your default retention rule indefinitely – or for specific days. This helps in retaining the data stored in Gmail, Hangouts, Drive, and Groups – for as long as necessary, even if a user permanently deletes them. 

Google Vault will now retain all your emails indefinitely, even when employees delete them from their inbox and trash. 

If you want to know how to create holds and matters, set retention rules, and generate reports in Google Vault, check out Google Vault: The Ultimate Guide for IT Administrators 2019. 

You can eliminate all these limitations by using third-party cloud backup tools like SysCloud to backup your Gmail data.

How to back up Gmail emails using third-party cloud backup apps

Gmail backup using SysCloud 

SysCloud provides a reliable, highly secure cloud backup solution for Google Workspace applications. SysCloud’s backup application can automatically back up all your Gmail emails, along with attachments. The emails are then available for you to restore at any time, at the click of a button. 

Click here to learn more about SysCloud.

Follow the below steps to back up your Gmail emails using Syscloud:

Step 1: Log in to your SysCloud account/Create your account.

Step 2: On the homepage, click “Start Backup” under the Backup drop-down menu.

Step 3: Initiate your backup by specifying the data to be backed up. For example, you can select either the entire domain, a set of users, or specific organizational units depending on the requirement.

Gmail Backup Using SysCloud - step 3

Step 5: To backup the entire domain, click the “Entire Domain” radio button. If you want to backup specific users, select the ‘Select Users & Teams’ radio button. Click ‘Next’.

Step 6: Choose the domain/users you want to backup by selecting the checkbox, and then click ‘Next’.

Note: By default, SysCloud’s backup solution backs up Gmail, Drive, Sites, Calendar, and Contacts

Step 7: To have only Gmail backup: uncheck the checkboxes under ‘Drive’, ‘Sites’, ‘Contacts’, and ‘Calendar’.

Gmail Backup Using SysCloud - step 7

Note: You can simply click on “Start Backup” if you want to proceed with the default settings.

Step 8: Click on the “Start Backup” button. SysCloud will now begin to back up the selected users’ data.

You can navigate to the Archives & Restore page by clicking “Archives & Restore” under the Backup drop-down to view the backup progress.
Now you have a second copy of your data safely stored in the cloud, and you can retrieve it when necessary.

Frequently asked questions

Why should I get Gmail backup?

Though Gmail is a highly secure application, the safety of your data is not fully guaranteed. Phishing attacks, deletions by malicious users, accidental deletions, data loss during domain migrations, and Gmail outages are some of the reasons why you should consider backing up your Gmail data. 

How to recover deleted Gmail emails if you don’t have a backup?

If you deleted your emails and do not have Gmail backup, read our in-depth article –  ‘How to Recover Permanently Deleted Emails from Gmail?

Does Google backup Gmail emails? 

No, Google is not responsible for backing up your Gmail emails. It is clearly stated in the Terms of Service that they are not responsible for any data loss due to the user’s negligence or any kind of malicious activity. It is recommended to take steps to ensure the security of your data. 

How do I download Gmail emails to my computer?

You can download your Gmail emails to your computer as .zip files using Google Takeout. Learn how to do this. 

Is Gmail Secure and Private?

In short, yes it is, but there are scenarios where Gmail could become vulnerable to external attacks. There are many ways through which a third-party can hack into Gmail and steal your data, and often it is through an authentic-looking email, or one if your contacts that was compromised.

Has Gmail ever been hacked?

In May 2017 a massive phishing scam spread through the internet like wildfire affecting unsuspecting Gmail users. According to The Verge, attackers sent invites to edit a Google Doc from someone they may have known. If they click on the link it would send them to a real Google page asking for permission to access their data. Once they grant access their emails and contacts were compromised.

In this article
  • Gmail backup for individual users
  • Google backup for administrators
  • Back up Gmail emails using third-party cloud backup apps
  • Frequently asked questions
twitterlinkedin