- Understanding HubSpot Pricing
- Manual deletion of irrelevant contacts
- Delete unnecessary contacts in HubSpot using workflows
- Non-Marketing Contacts Model
- Reviewing Your Current HubSpot Plan
Article at a glance
- Evaluate your HubSpot plan to ensure you're not overpaying for unused features, and consider downgrading if necessary.
- Regularly audit your contact list to remove inactive contacts and reduce costs related to contact tiers.
- Maximize efficiency without incurring extra costs by utilizing HubSpot's native tools and integration features.
What’s the solution?
- Implement cost-cutting measures and use SysCloud to back up HubSpot data, ensuring no information is lost during the optimization process.
Understanding HubSpot Pricing
HubSpot Starter plan that provides the basic tools to engage and convert leads starts at $18 per month, if billed annually ($20 per month, if billed monthly). This plan includes1000 marketing contacts. If your business has more than 1000 contacts to market to, HubSpot charges an additional $18 per month for every 1000 additional marketing contacts.
The Professional plan is a comprehensive package that starts at $800 per month, billed annually ($890 per month, if billed monthly). This plan includes 2000 marketing contacts.HubSpot charges an additional $225 per month for every 5,000 additional marketing contacts.
Note: The cost shown for the Professional plan includes a one-time Professional Onboarding fee of $3,000. This fee covers the cost of getting your team up to speed with using the HubSpot platform. Learn more
The Enterprise plan is priced at$3,600/month, billed annually. This plan includes 10,000 marketing contacts. For more than 10,000 contacts to market to, HubSpot charges an additional $100 per month for every 10,000 additional marketing contacts.
Note: The cost shown for the Professional plan includes a one-time Professional Onboarding fee of $3,000. This fee covers the cost of getting your team up to speed with using the HubSpot platform. Learn more
Plan for annual billing: HubSpot usually offers a discount for annual billing as compared to month-to-month billing. If you have the budget to pay upfront, this can result in significant savings over time.
1. Deleting irrelevant contacts
Duplicate contacts: Duplicate contacts can occur when two or more contacts have the same information. Learn how to identify duplicate contacts in HubSpot
Unengaged contacts: Contacts who have not responded to your marketing communications for a long period of time can be deleted. Learn how to filter out and delete unengaged contacts using workflows
Outdated contacts: Contacts whose information, such as job title or company, is no longer accurate can be deleted.
Bounced emails: Contacts whose emails have bounced back can be deleted as they are no longer valid. Learn how to filter out and delete contacts with bounced emails using workflows
Opted-out contacts: Contacts who have explicitly opted-out of receiving your marketing communications can be deleted. Learn how to filter out and delete opted-out contacts using workflows
Contacts with spam complaints: Contacts who have marked your emails as spam can be deleted.
Low quality leads: Contacts who have shown interest in your offerings once but are not the right fit for your business. These low-quality leads can be identified based on their engagement patterns or demographic information.
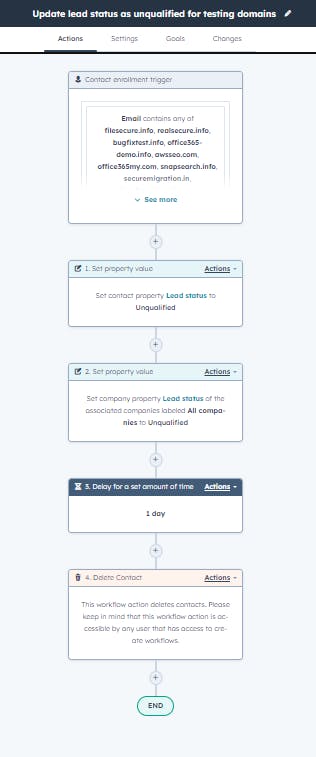
Test contacts: Contacts created for testing purposes can be deleted after the tests have been completed. Learn how to filter out and delete test contacts using workflows
1.1. Manual deletion of contacts
1.1.1. How to delete contacts in HubSpot manually
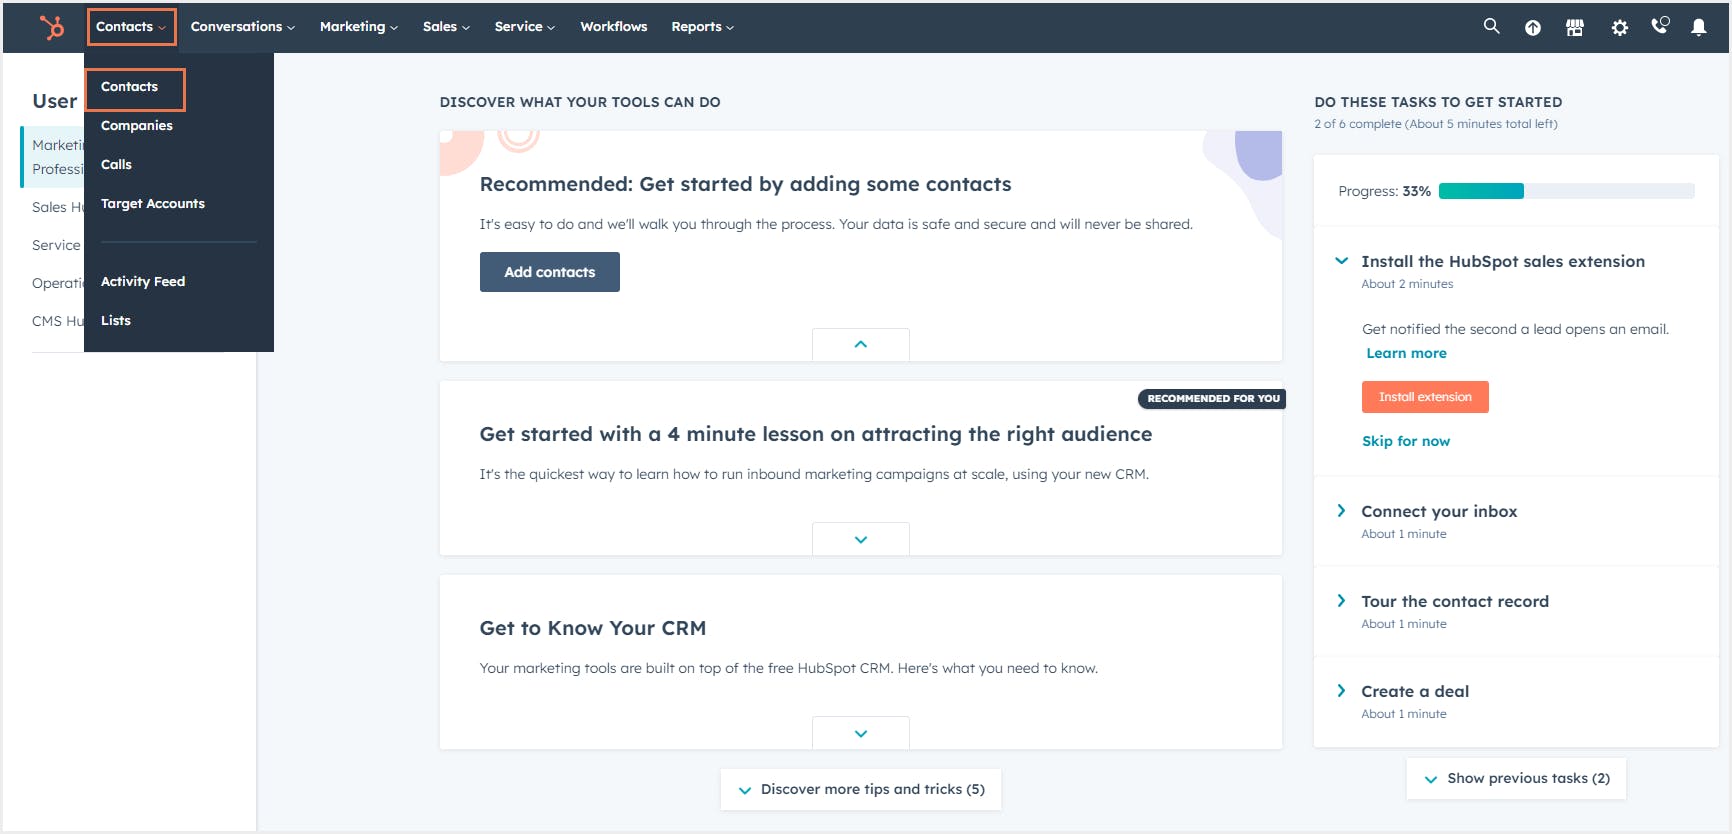
Step 1: In your HubSpot account, navigate to Contacts -> Contacts.
Step 2: Click the name of the record you want to delete. This will take you to the details page of the selected contact.
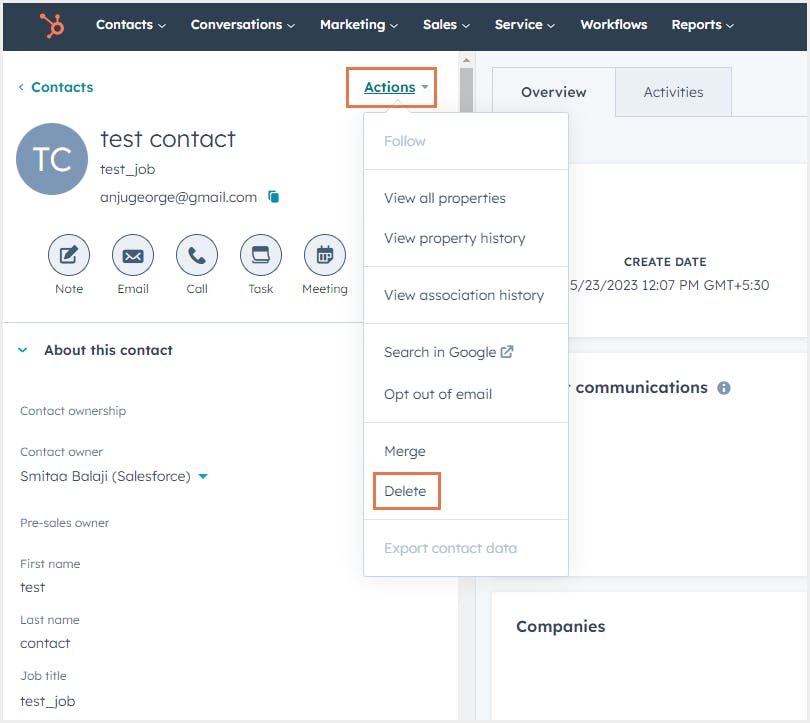
Step 3:In the left panel, click on the Actions dropdown menu, then click Delete.
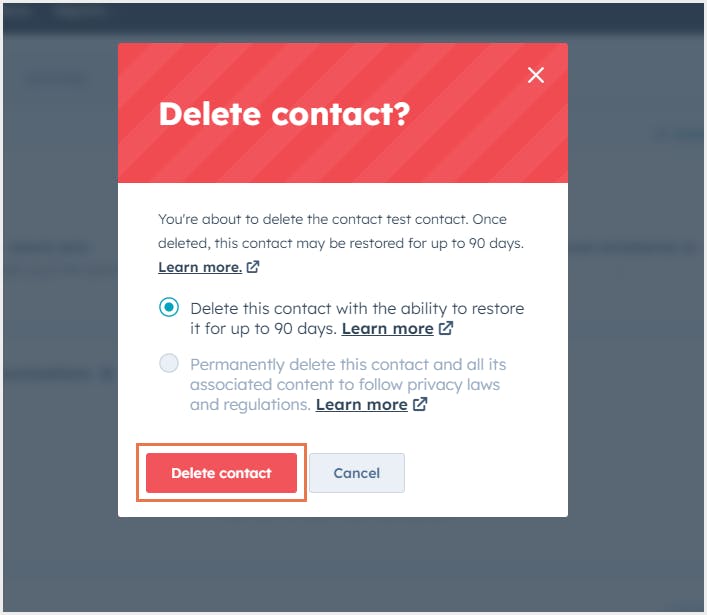
Step 4: In the confirmation dialogue box that appears, select if you want to delete the contact with the ability to restore it(within 90 days) or delete it permanently.
1.2. Delete contacts in HubSpot using workflows
1.2.1. Delete unengaged contacts
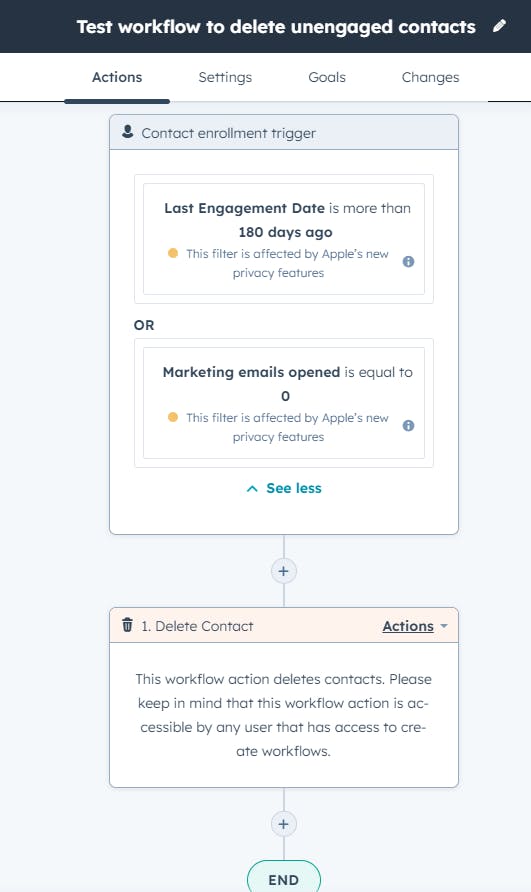
- To delete unengaged contacts, you can create a workflow and set the enrolment triggers to identify these contacts based on their engagement level. For example, you could include conditions such as “Last engagement data is more than 6 months” OR "Contact has not opened any marketing email in the last 6 months."
- Once you have set the enrolment conditions, you can add an action in the workflow to either delete these contacts or add these contacts to a static list. You can then review the list and delete the list if the contacts are no longer needed.
1.2.2. Delete contacts with bounced emails
- To delete contacts whose emails have bounced, you can create a workflow with the enrolment trigger including conditions such as " Marketing emails bounced is greater than 0 " OR “Email hard bounce reason is any of Other, Policy, Mailbox full, Content, Spam, or Unknown user” or any other conditions according to your business requirements.
- Once you have set the enrolment conditions, you can add an action in the workflow to either delete these contacts or add these contacts to a static list. You can then review the list and delete the list if the contacts are no longer needed.
1.2.3. Delete contacts who have opted out of marketing communications
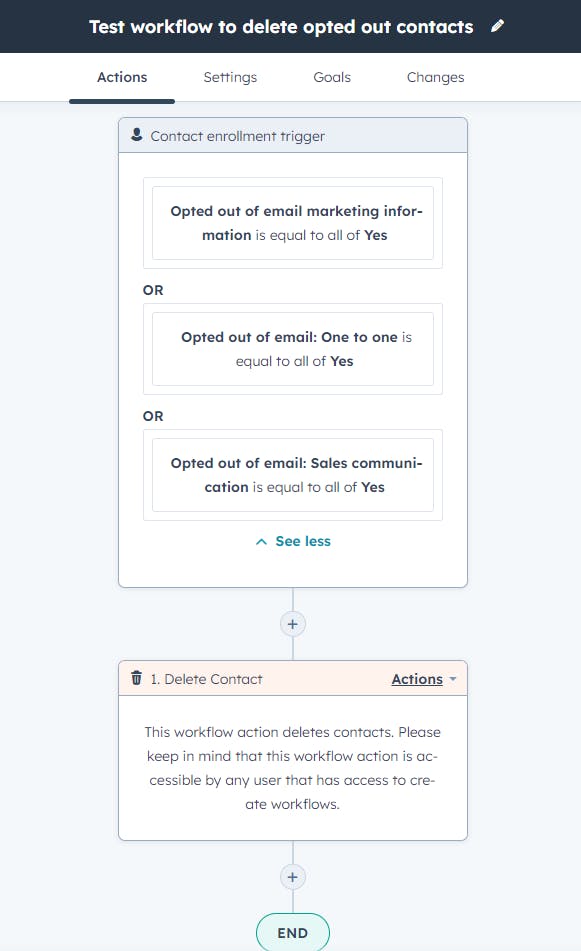
- To delete contacts who have explicitly opted out of your marketing communications, you can create a workflow and set the enrolment triggers to identify these contacts. For example, you could include conditions such as “Opted out of email marketing information is equal to Yes” OR " Opted out of email: One to one is equal to Yes" OR “Opted out of email: One to one is equal to Yes.”
- Once you have set the enrolment conditions, you can add an action in the workflow to either delete these contacts or add these contacts to a static list. You can then review the list and delete the list if the contacts are no longer needed.
1.2.4. Delete test contacts
To delete contacts who have explicitly opted out of your marketing communications, you can create a workflow to filter out all the testing emails your organization uses. For example, you could include a condition such as “Email contains any of
” - Once you have set the enrolment conditions, you can add an action in the workflow to either delete these contacts or add these contacts to a static list. You can then review the list and delete the list if the contacts are no longer needed
1.2.5. Manage duplicate contacts in HubSpot
Permissions required:
To use the tool, users must have either Edit access set to Everything for Contacts and Companies or Data quality tools access permissions.
Step 1: Navigate to Contacts -> Contacts.
Step 2: In the upper right, click the Actions dropdown menu and select Manage duplicates.
This will give a list of potential duplicate contact pairs for your review. You can also see when the next duplicate check is scheduled.
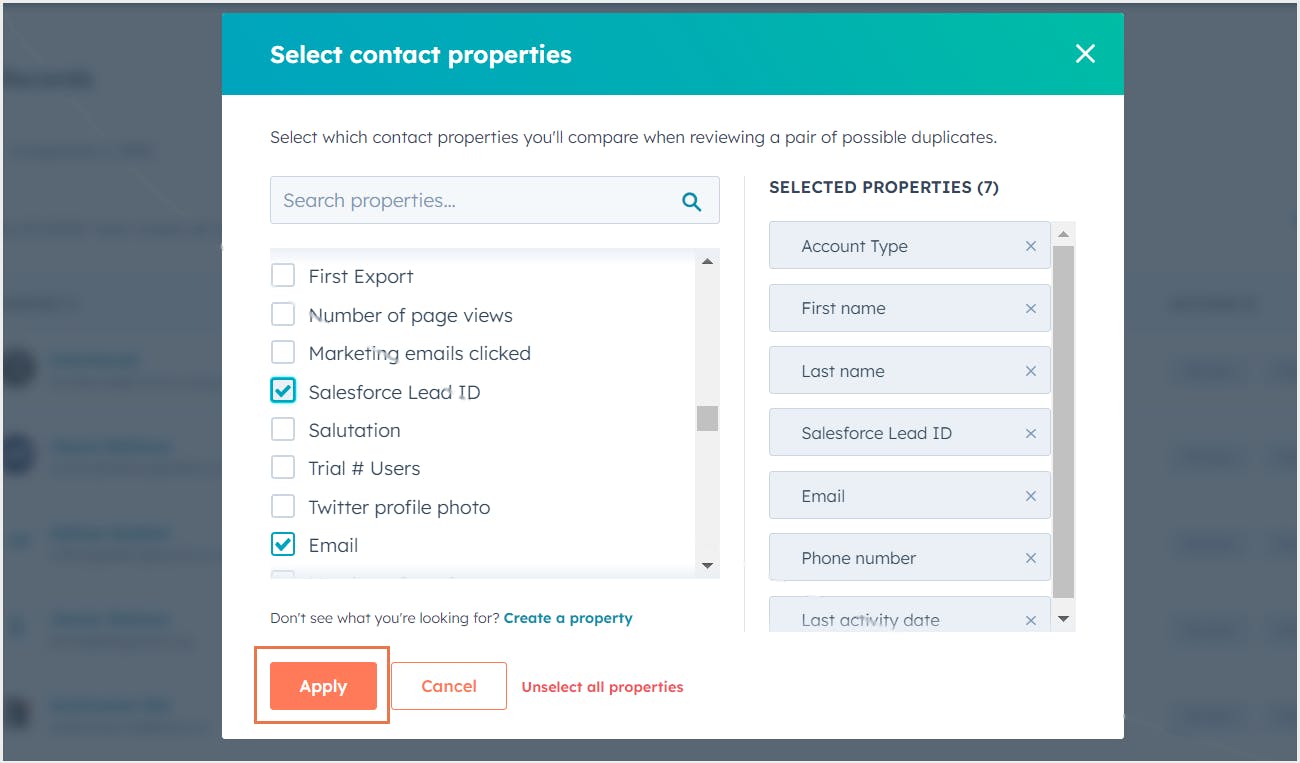
Step 3: You can customize which properties are displayed when comparing records by clicking Select properties to review above the table. This option is only visible if there are potential duplicates in the list.
To remove a property from display, click the X next to it in the Selected properties section.
To add a property to the display, tick the checkbox next to the property.Click Apply once you've made your selections.
Note: The properties you choose to display are for context only and do not affect how duplicates are identified.
Step 4: To examine a pair of potential duplicates, click Review next to a pair.
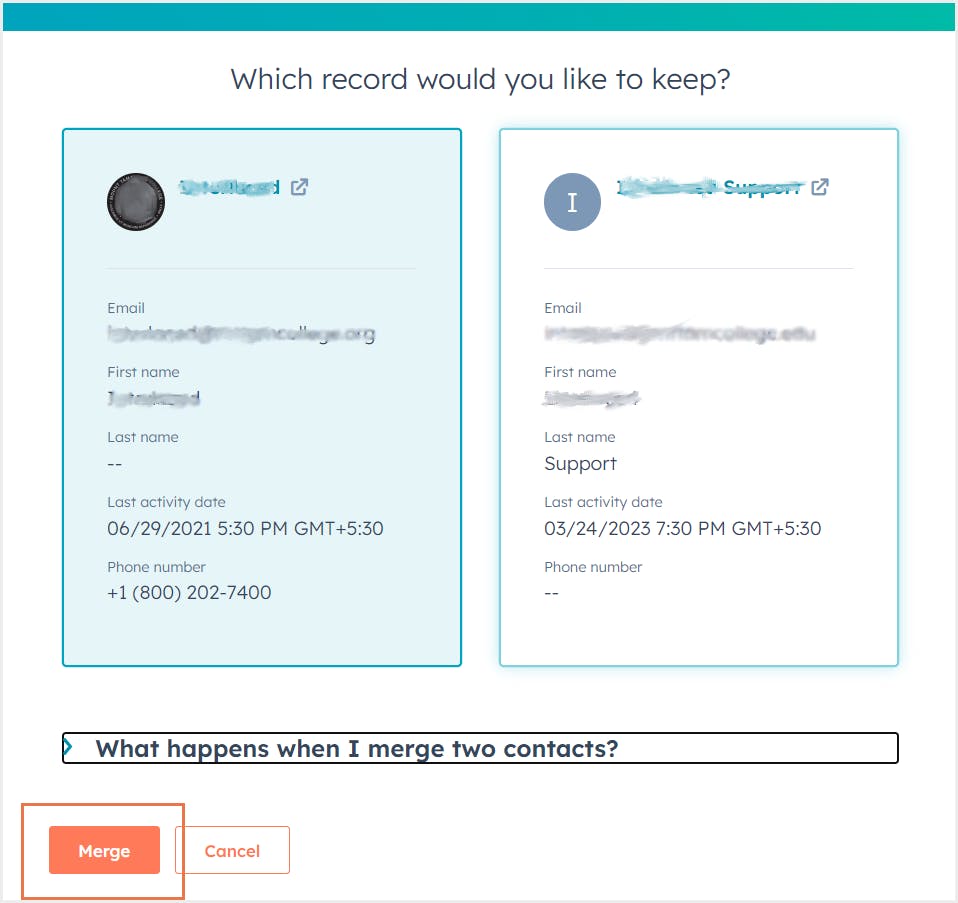
In the dialog box, you can compare the properties of the records and choose which to keep. To merge the records, select the contact you wish to retain and click Merge.
If the records are not duplicates, click Cancel in the dialog box. Then, in the table, click Reject to remove the pair from the 'Manage duplicates' dashboard. Rejected pairs will not appear in future suggestions.
If you want to bulk merge or bulk reject duplicates, go to the next steps. ((only available with Operations Hub Professional and Enterprise)
Step 5: For bulk merging of duplicates or bulk rejection of suggestions, select the checkboxes next to the records.
To reject a pair, click Reject at the top of the table. These records will be removed from the dashboard and will not be suggested as duplicates in the future.
To compare the records, click Review at the top of the table.
Step 6: In the dialog box, click the Merge criteria dropdown menu and choose the criterion that will determine how the records are merged:
Most recent engagement: All selected records will be merged into the record with the most recent 'Last Engagement date' value.
Oldest engagement: All selected records will be merged into the record with the oldest 'Last Engagement date' value.
Created first: All selected records will be merged into the oldest record according to the 'Create date'.
Created last: All selected records will be merged into the newest record according to the 'Create date'.
Most recently updated: All selected records will be merged into the record with the most recent property value update.
Step 7: Finally, click Merge all.
1.3 Pros and cons of optimization by deleting contacts
Pros |
---|
Data accuracy: Regularly reviewing and deleting outdated or incorrect contact information can enhance the accuracy of your database, leading to better segmentation and more effective targeting. |
Improved marketing efficiency: Removing unengaged or irrelevant contacts can improve your marketing efforts. By focusing on engaged contacts, you can increase open rates, click-through rates, and conversion rates. |
Reduced spam complaints: Removing contacts who have marked your emails as spam or who have opted out of your communications can help reduce spam complaints. |
Cons |
---|
Time-consuming: Manually reviewing and deleting contacts can be a time-consuming process, especially for businesses with many contacts. |
Potential loss of opportunities: You might delete contacts who may become engaged or valuable in the future. A contact that hasn't interacted with your content recently may still do so in the future. |
Legal compliance: Depending on your location and industry, there may be regulations about when and how you can delete contact data. It's crucial to ensure you're compliant with all relevant laws and regulations when deleting contacts. |
2. Non-Marketing Contacts Model
2.1. Set existing contacts as non-marketing from the Usage and Limits page
Step 1: In your HubSpot account, select your account name in the top right corner, and select Account & Billing.
Step 2: Click Usage & Limits -> Manage marketing contacts.
Step 3: Click Start.
Step 4: In the Unengaged contacts step, contacts that have bounced or unsubscribed are automatically selected. It's advisable to categorize these contacts as non-marketing since they haven’t engaged with your marketing campaigns. Click Next if you want to set these as non-marketing, otherwise, choose Skip.
Step 5: In the Filters & lists step, you can set contacts as non-marketing using either a filter or a list.
- Using a filter: Select the criteria for the contacts you wish to categorize as non-marketing by clicking on it. Learn more about selecting criteria
- Using a list: Select the lists for the contacts you want to set as non-marketing. These lists can be created prior to managing marketing contacts. Learn how to create lists
Step 6: Once you’ve selected your non-marketing contacts, click Next. If you have no selections, click Skip.
Step 7: In the Review & update step, verify the number of marketing and non-marketing contacts.
Step 8: After reviewing, click on Update Contacts.
2.2. Set contacts as non-marketing on the contacts index page
Step 1: In your HubSpot account, navigate to Contacts > Contacts.
Step 2: Select the contacts you want to set as non-marketing. You can use a saved view to help you select the correct contacts.
Step 3: Click the More dropdown menu at the top of the table and select Set as non-marketing contacts.
Step 4: In the dialog box, click Set as non-marketing to confirm. For any current marketing contacts, the non-marketing status will take effect on the next update date.
2.3. Automatically set contacts as non-marketing using workflows
Step 1: Login to your HubSpot account, navigate to Automation > Workflows.
Step 2: To edit an existing workflow, hover over the workflow, then click Edit. Learn how to create a new contact-based workflow.
Step 3: In the workflow editor, click the + plus icon to add an action.
Step 4: Select the Set marketing contact status action in the right panel, then click the Value dropdown menu, and select Set as non-marketing.
Step 5: Once you've turned on your workflow, contacts who meet your enrolment triggers will be set as non-marketing contacts when they pass through the “Set marketing contact” status action. This will also set the “Marketing contact until next update” property to “Yes,” which means on the next update date, the contacts’ “Marketing contact status” property will be updated to “Non-marketing contact.”
Pros and cons of non-marketing contacts model
Pros |
---|
Only pays for contacts who are more likely to become customers |
You get 1 million non-marketing contacts free |
Separates marketing and non-marketing related contacts |
Cons | |
---|---|
Requires effort to set up workflows to change properties that indicate whether a contact is marketing or nonmarketing. | |
Advanced features like lead rotation, login for customer portal do not work with non-marketing contacts, thus limiting the capabilities of the CRM tool. If you are someone who uses these tools and have a lot of unengaged contacts but necessary contacts, then try an archiving solution instead. | |
May require additional time and effort to manage the different types of contacts. | |
Show More |
3. Reviewing Your Current HubSpot Plan
- Assess your usage
- Analyze feature requirements
- Understand your contacts
- Consult with HubSpot’s support team
3.1. Assess your usage
3.2. Analyze Feature Requirements
3.3. Understand Your Contacts
3.4. Consult with HubSpot’s support team
Pros and cons of reviewing HubSpot plan
Pros | |
---|---|
Cost optimization: Possible cost reduction by eliminating unnecessary features. | |
Feature utilization: Potential for better usage of existing features. | |
Better understanding: Improved knowledge of HubSpot's features and their relevance to your business. | |
Show More |
Cons | |
---|---|
Time-consuming: The review process can be time-consuming. | |
Risk of losing essential features: Downgrading could lead to loss of important features. | |
Operational disruption: Changing plans could cause temporary operational disruptions. | |
Show More |