- Organizational structure overview
- Building the organizational structure
- Organizational units and permissions
- Organizational units vs. access groups
- Admin role for an OU
- Data retention management
- Best practices
- FAQs
Article at a glance
- OUs allow for customized access to apps, services, and device management based on specific roles and departments.
- Data retention policies can be applied at the OU level using Google Vault, ensuring compliance and security.
- Access groups offer flexibility in managing service access without altering the OU structure.
What is the solution?
1. An introduction to organizational units in the Google Admin console
1.1. Why organizational units?
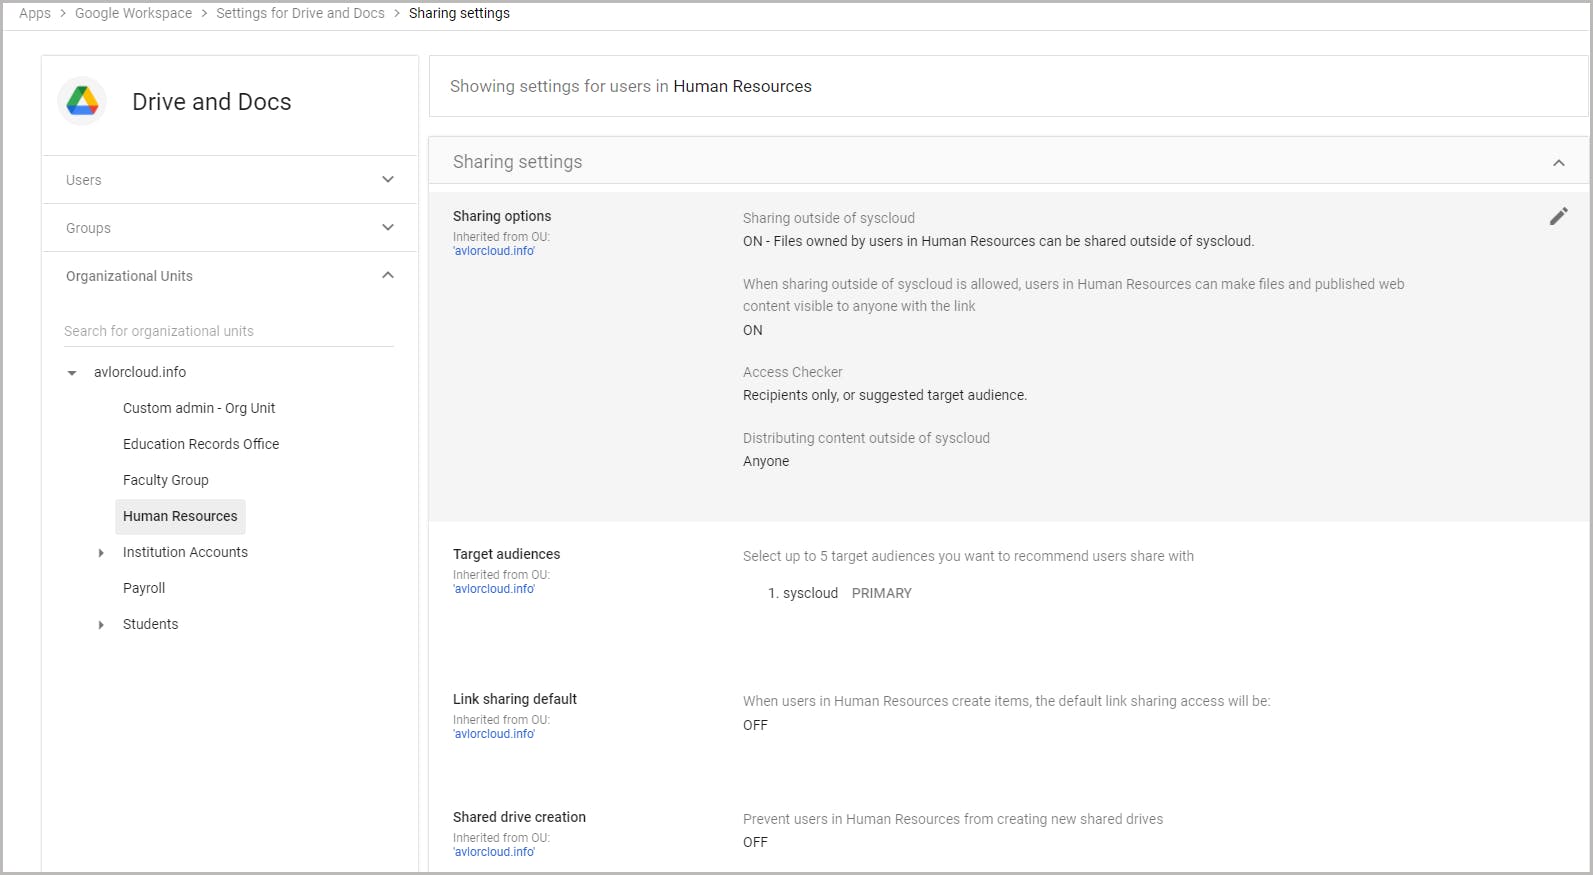
- In Google Workspace, by default, every person has access to the same set of apps, with the same configuration. When an administrator adds or enables an app, access to the app is enabled for everyone. But most organizations are comprised of many smaller units or teams that focus on specific tasks or projects. Administrators might therefore be required to apply different settings to a specific group of users. This can be done by using organizational units in the Google Admin console.
- In most organizations, people with different roles need different levels of access. For example, the Sales team needs access to a CRM service, or the Finance team needs access to an accounting app, while another department might not need access to these services at all. As data protection laws become tighter, it is important that only specific personnel have access to sensitive data. Google Workspace organizational units ensure that everyone in the organization has access only to the data and apps they need to do their jobs.
- Turn Google services on and off for specific groups of users
- Configure service settings differently for specific groups of users
- Configure settings for Chrome OS devices if you have added those devices to an Organizational Unit
2. Organizational structure overview
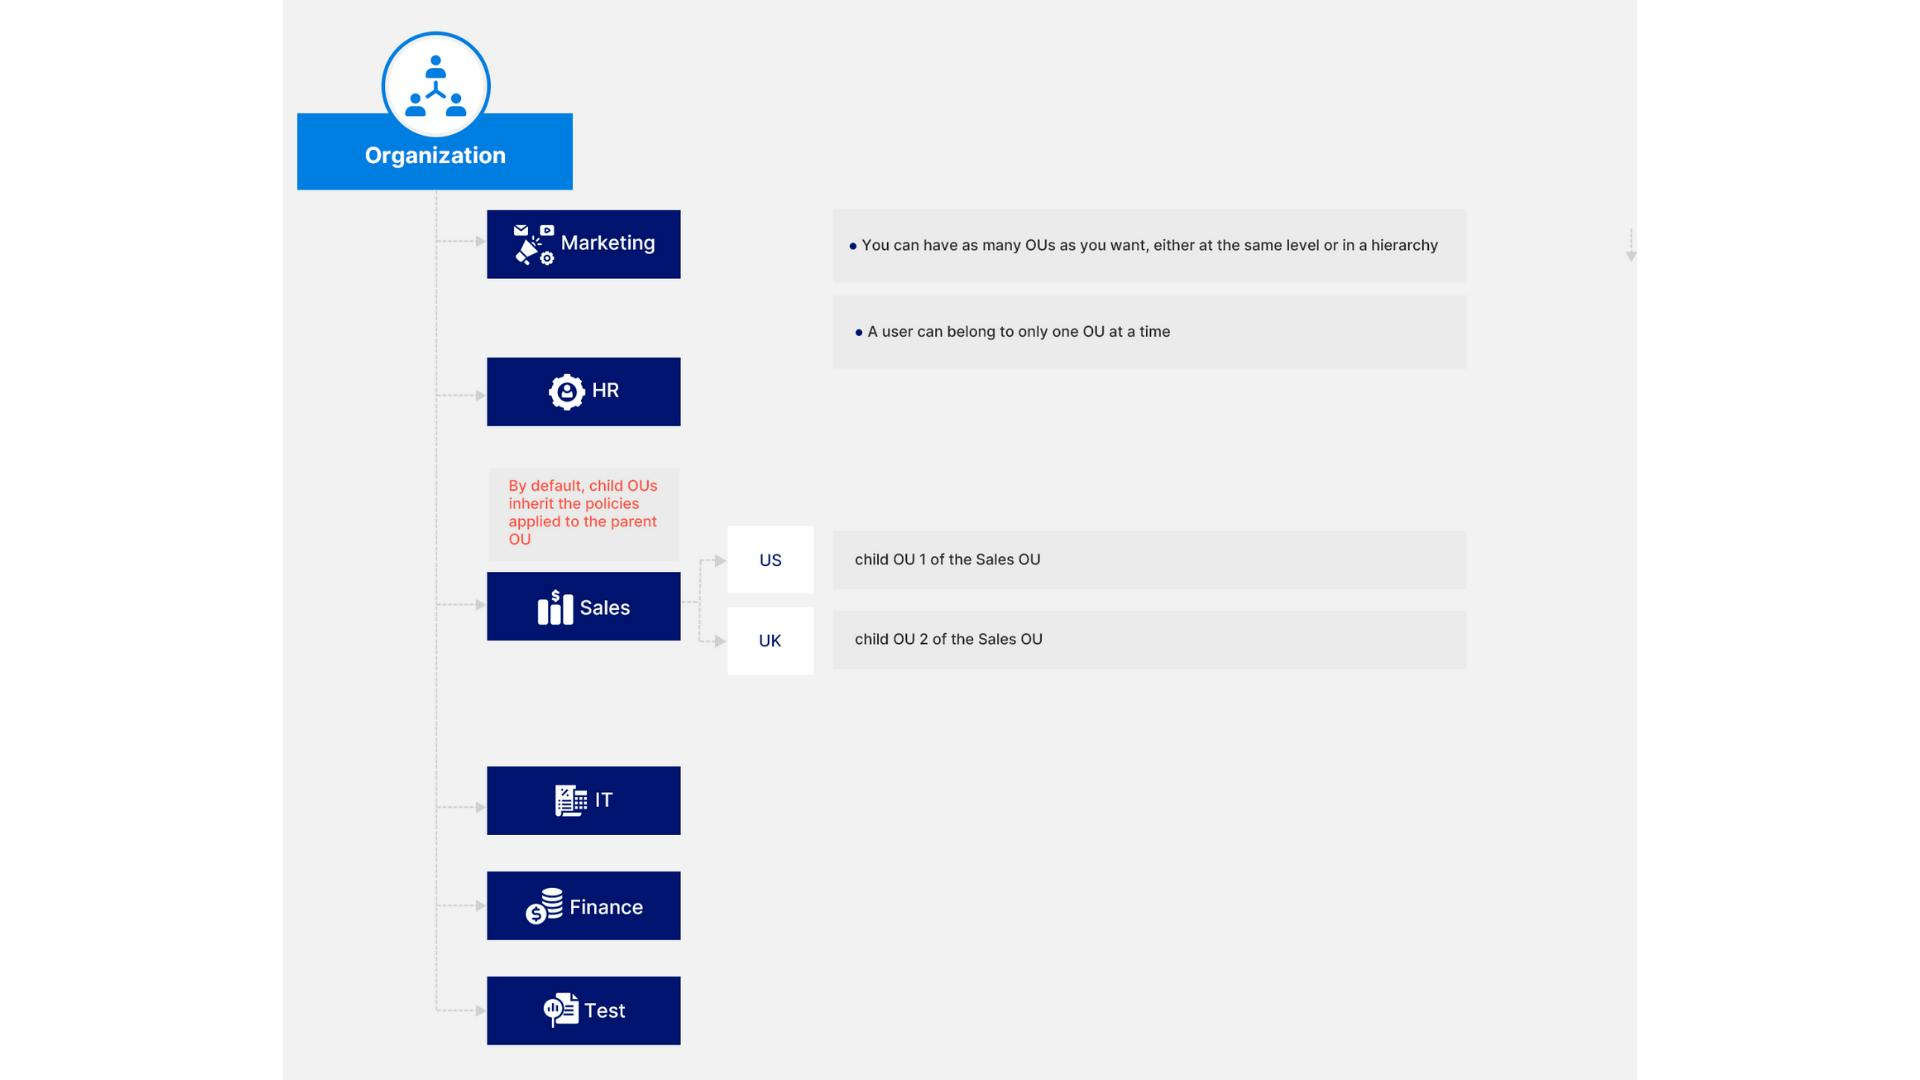
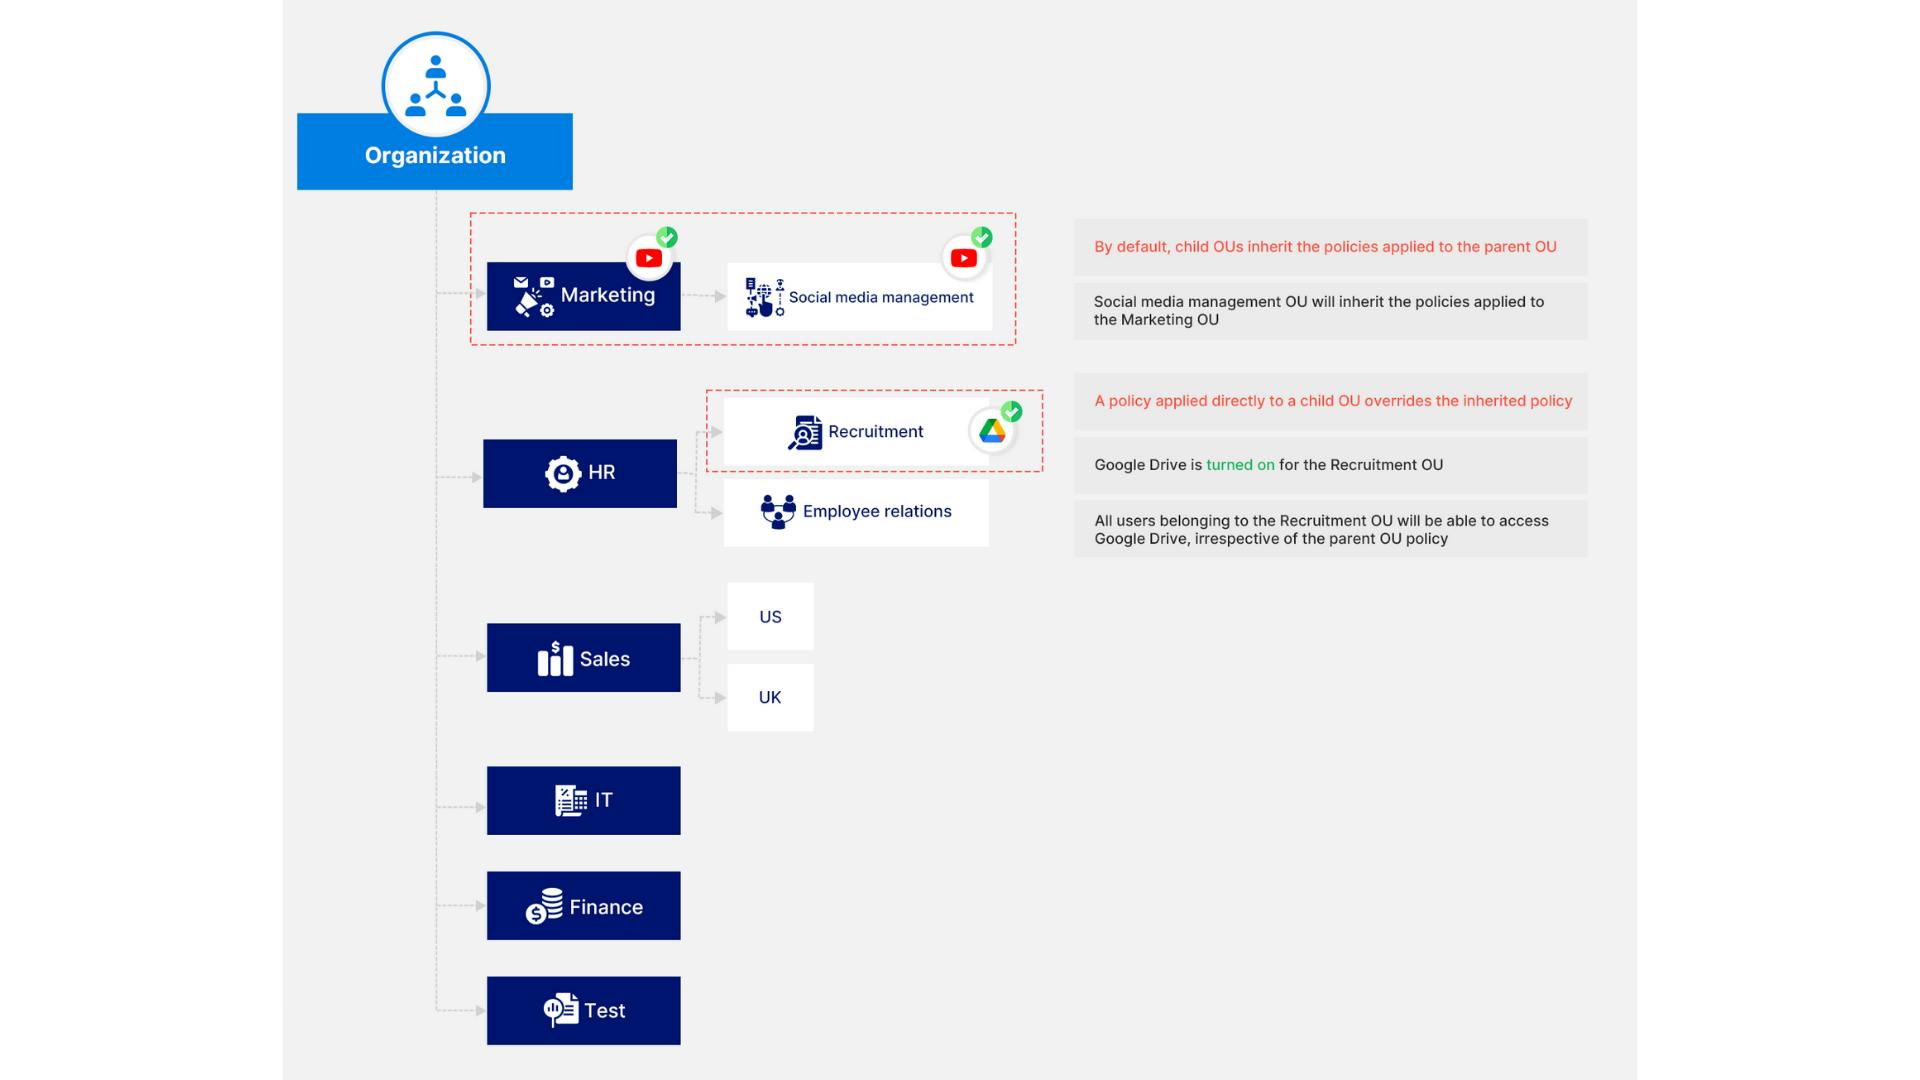
Note: When you change any setting for the parent organizational units, the settings for child units will also change by default, unless custom settings have been applied.
3. Building the organizational structure
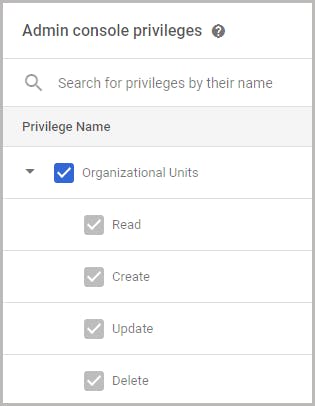
Note: To manage the organizational structure, one needs to have Organizational Units privilege assigned to them in the Google Admin console. A Super administrator, by default, has all the admin privileges assigned to them.
3.1. Create a new organizational unit
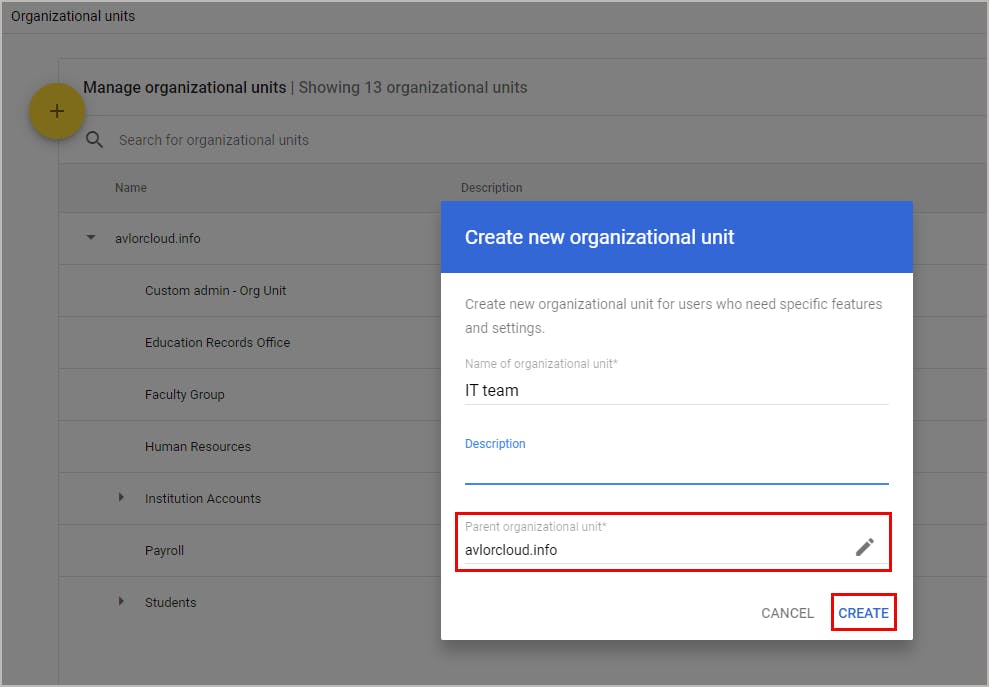
Step 1: Go to the Google Admin Console and navigate to the Organizational Units section on the Admin Console home page.
Step 2: Click on Create organizational unit.
Step 3: Add a name and description for the organizational unit. Choose the parent organizational unit under which you want to place the new organizational unit. By default, a newly created organizational unit will be placed under the top-level organizational unit.
Note: The organizational unit's name may not be unique within the organization hierarchy but its name is unique amongst its sibling organizational units. Also, an organizational unit's name is case insensitive.
Step 4: Click Create.
Note: You can also directly create a new organizational unit under an existing organizational unit by using the ‘+’ icon next to it.
3.2. Move users to an organizational unit
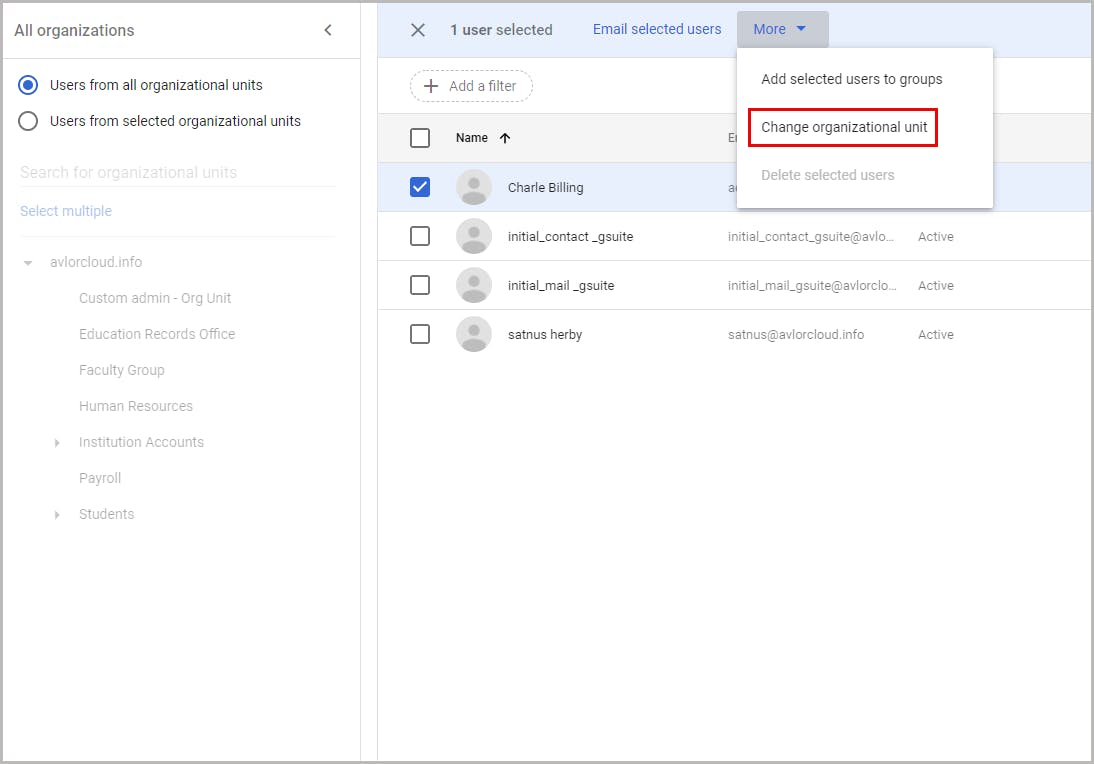
Step 1: From the Google Admin Console home page, select the Users tab.
Step 2: Under the All organizations section on the left side of the page, choose whether you want to view Users from all organizational units or Users from selected organizational units, and select the required organizational unit from the list.
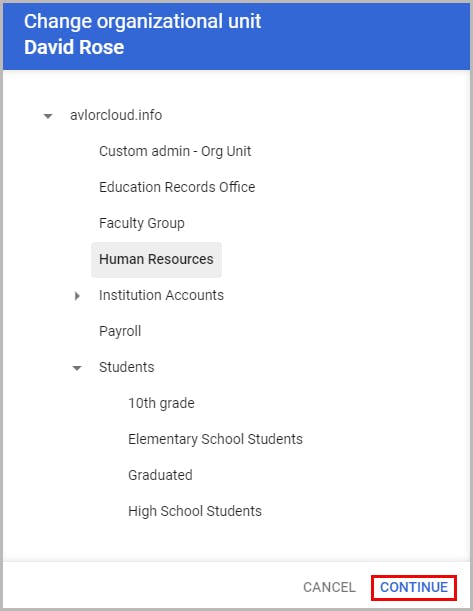
Step 3: Select the user(s) that you want to move to another organizational unit. Click More options-> Change organizational unit.
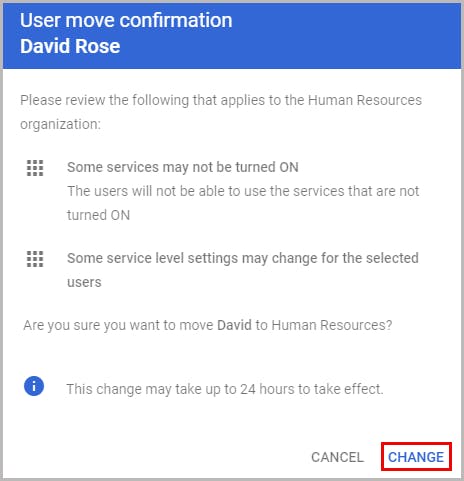
Step 4: Choose the organizational unit to which the user has to be moved. Review the settings and click on Change.
3.3. Add a Chrome device to an organizational unit
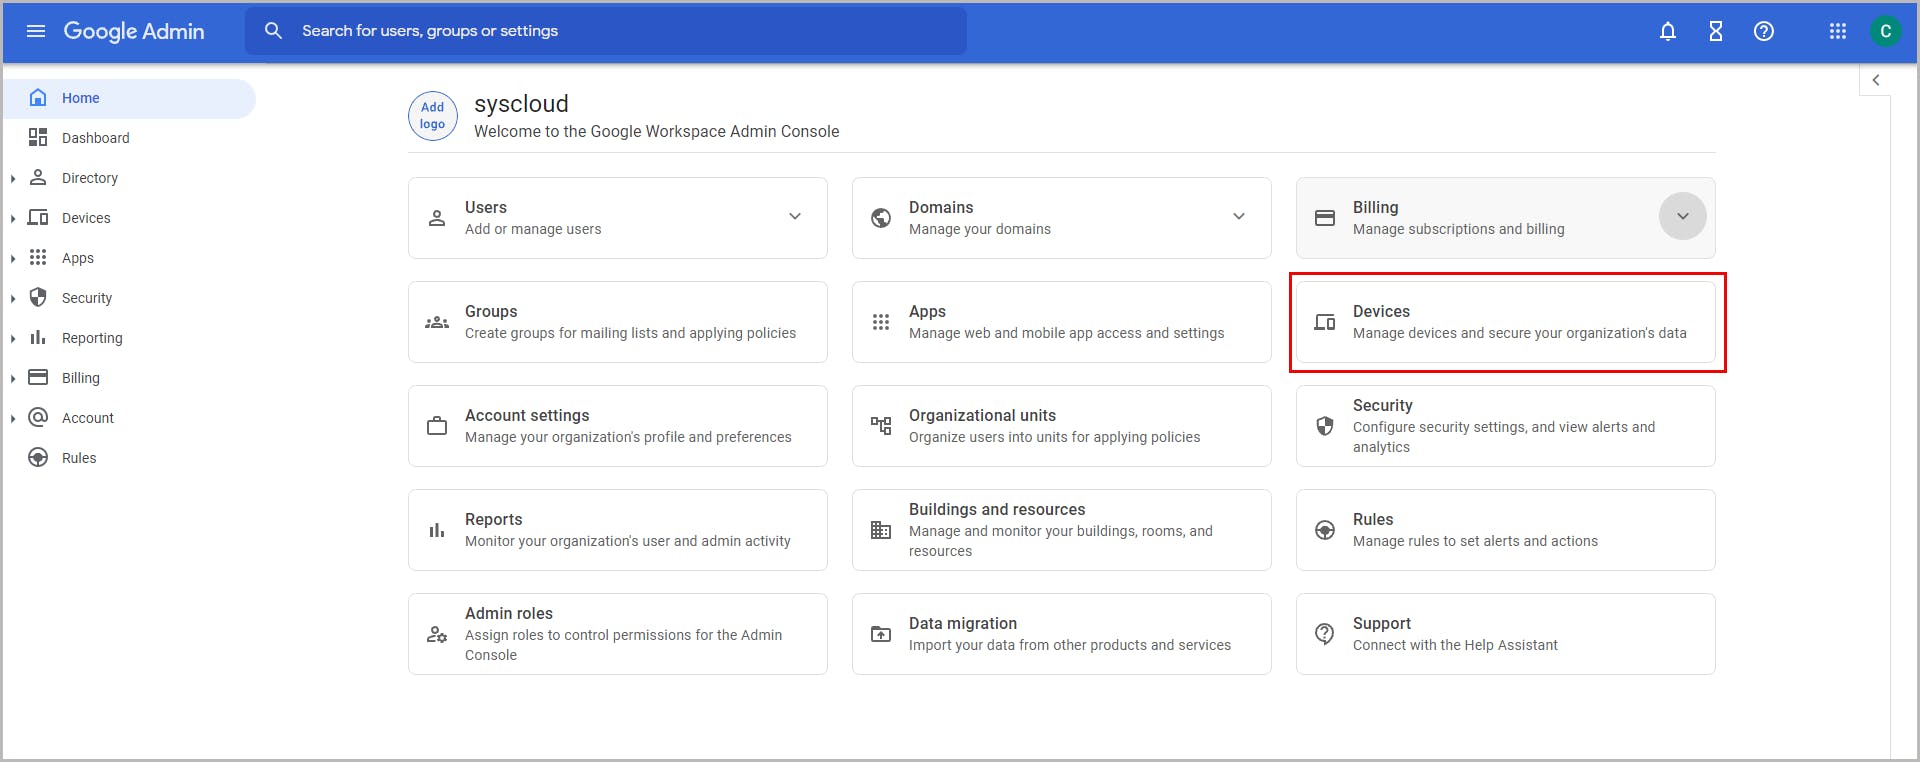
Step 1: Go to Devices in the Google Admin Console.
Step 2: Navigate to Chrome OS Devices.
Step 3: From the left panel on the page, select the organizational unit the device is part of. (You can also search for a particular device using its serial number)
Step 4: Select the device you want to move and click the Move option at the top of the page.
Step 5: Choose the organizational unit that you want to move the device to and click Move.
4. Organizational units and permissions
4.1. Turn app services on or off for users
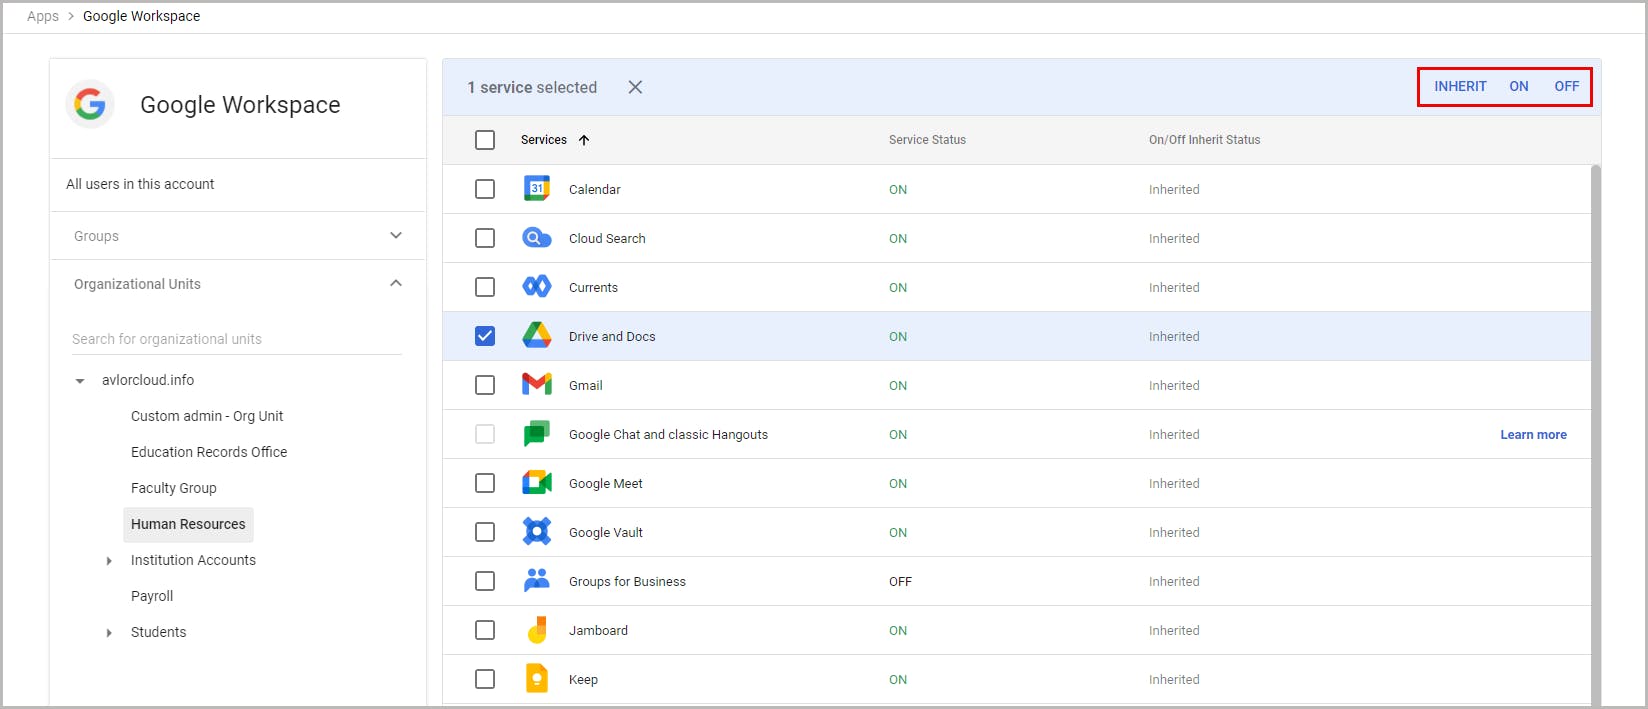
Step 1: In the Google Admin Console home page, go to the Apps section.
Step 2: Click on the tab Google Workspace.
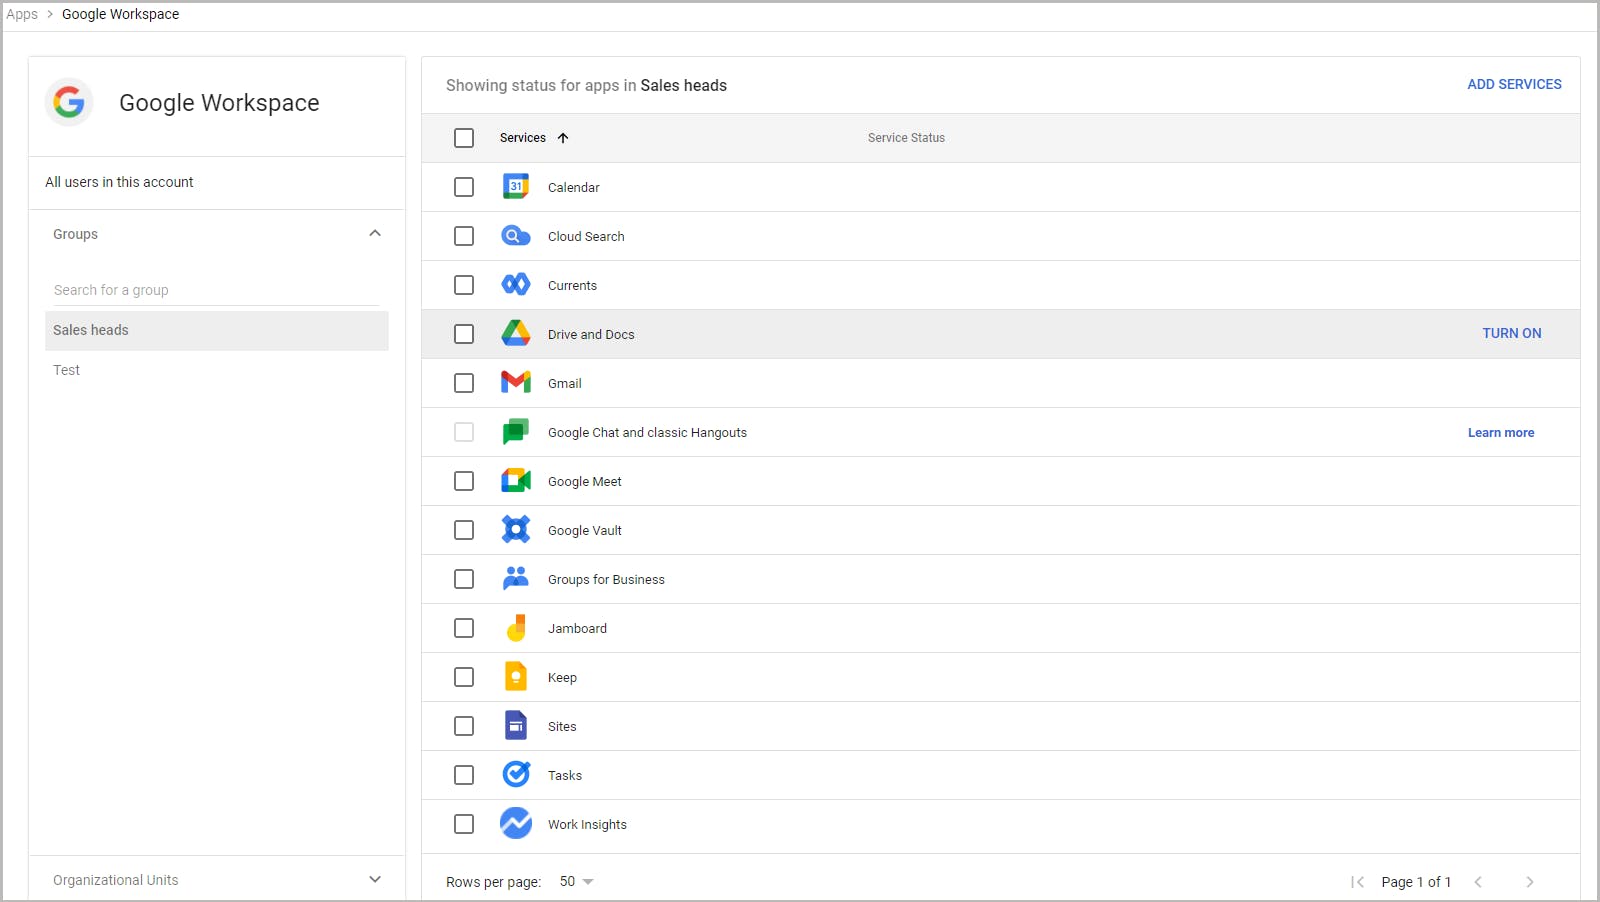
Step 3: On the left side, you can see all the organizational units listed. Select the organizational unit that contains the users for which you want to set up app services. This will show the status of all the apps for the selected organizational unit.
Step 4: Check the box next to the service you want to turn on or off. On the top of the page, choose whether you want to keep the service On or OFF for the selected organizational unit. For child organizational units, you can also choose the Inherit option, to directly inherit the settings the corresponding parent unit has for the selected service.
For detailed steps on how this can be done for each Google service, see the table provided in the Google support page.
To learn more about access groups, refer to this Google support documentation.
4.2. Change service settings for users
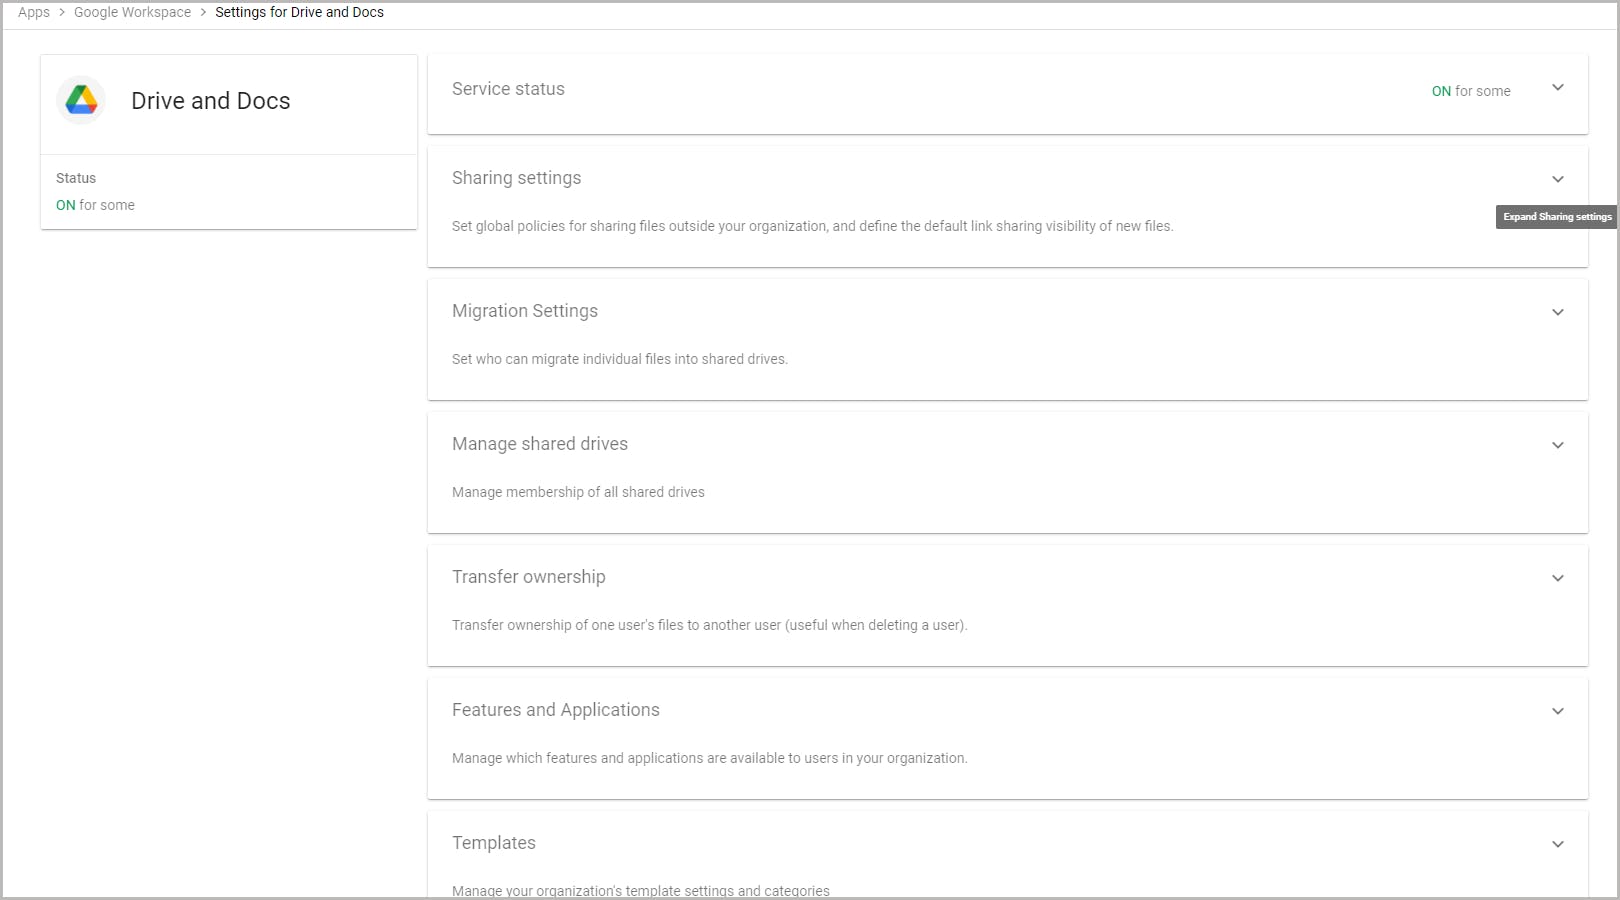
Step 1: Log in to the Google Admin Console. Go to Apps -> Google Workspace.
Step 2: From the list of Google Workspace apps, click on the app whose settings you need to customize. You will be taken to the app settings page.
Step 3: Click on a setting panel to expand that setting. Select the organizational unit that has the users for which you want to change the settings.
Step 4: Configure the settings and choose one of the following options:
a. Override: Overrides the inherited setting with a new value. b. Inherit: Reverts to the parent's setting if a custom value was previously set. (Click Save if it is the top-level organizational unit).
4.3. Change settings for Chrome devices
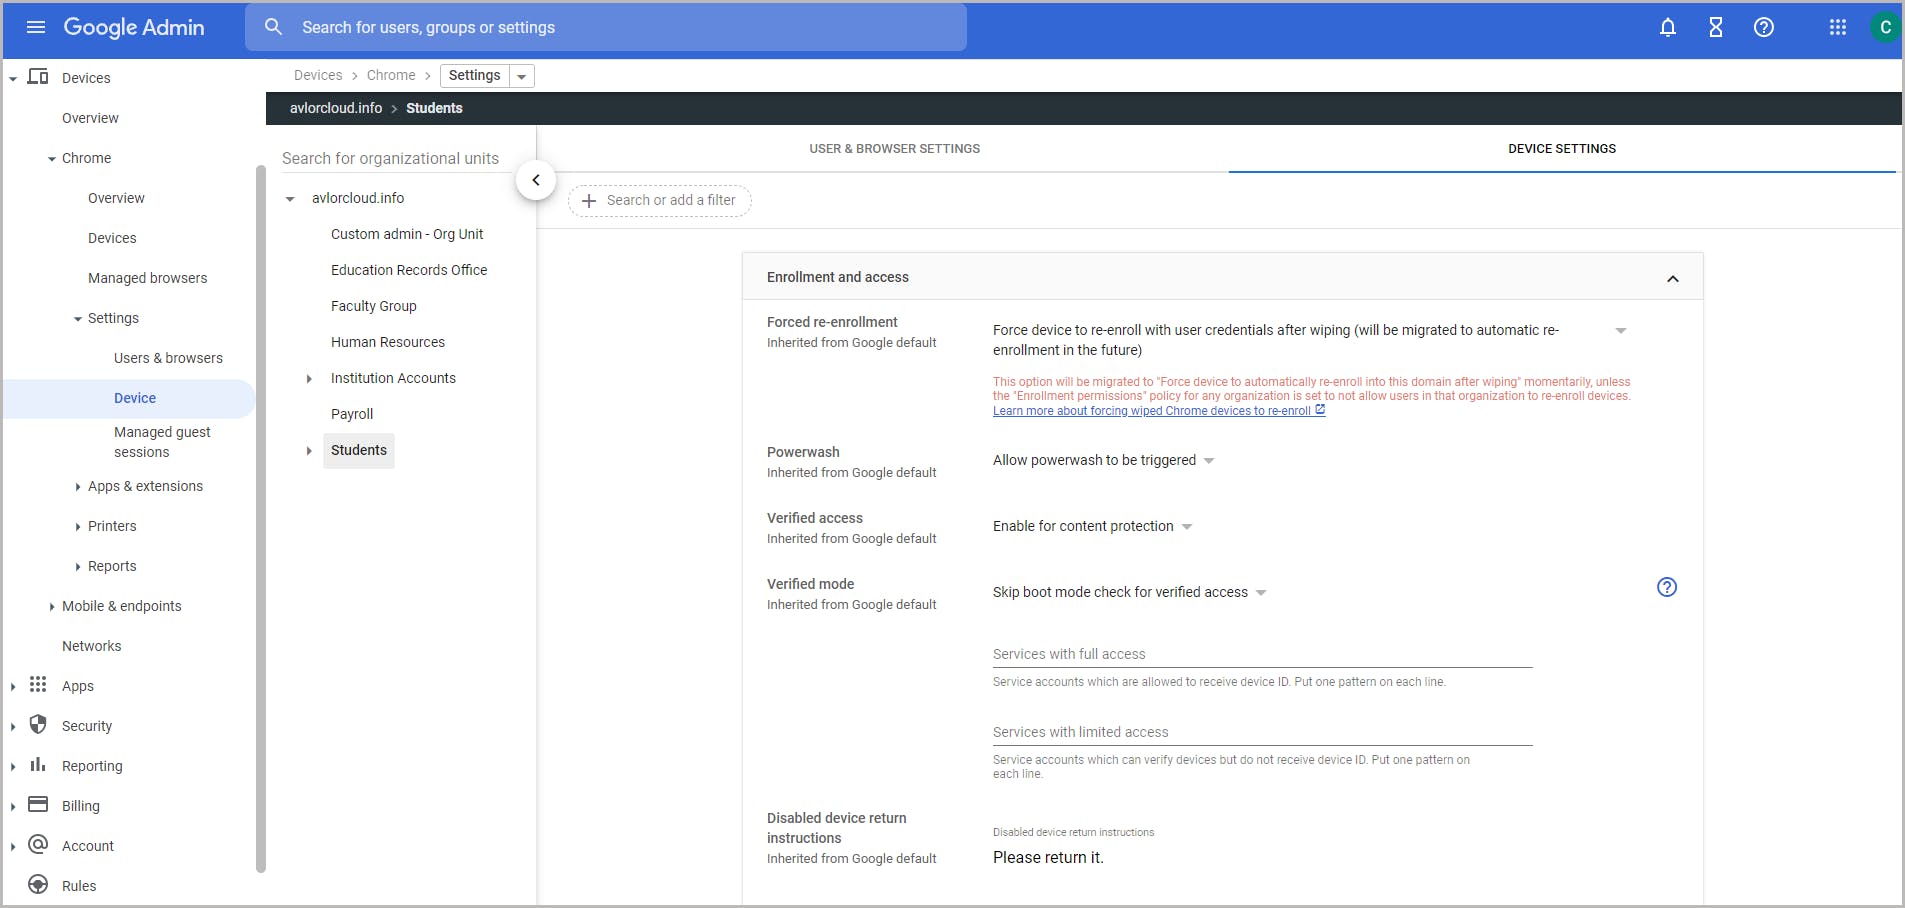
Note: You need to be a Chrome Enterprise Upgrade or Chrome Education Upgrade customer to perform this.
Step 1: From the Admin console Home page, go to Menu -> Devices -> Chrome -> Settings -> Device settings.
Step 2: Navigate to Settings -> Device.
Step 3: Select the organizational unit which contains all the devices for which you need to change the setting. To apply the setting to all devices, leave the top organizational unit selected. Apply the settings you want. To learn about each setting in detail, refer the Google support page.
Note: You can quickly find a setting using the Search or add a filter option at the top.
Step 4: Click Save. It might take up to 24 hours to apply for the settings to apply to everyone.
5. Google organizational units vs. access groups
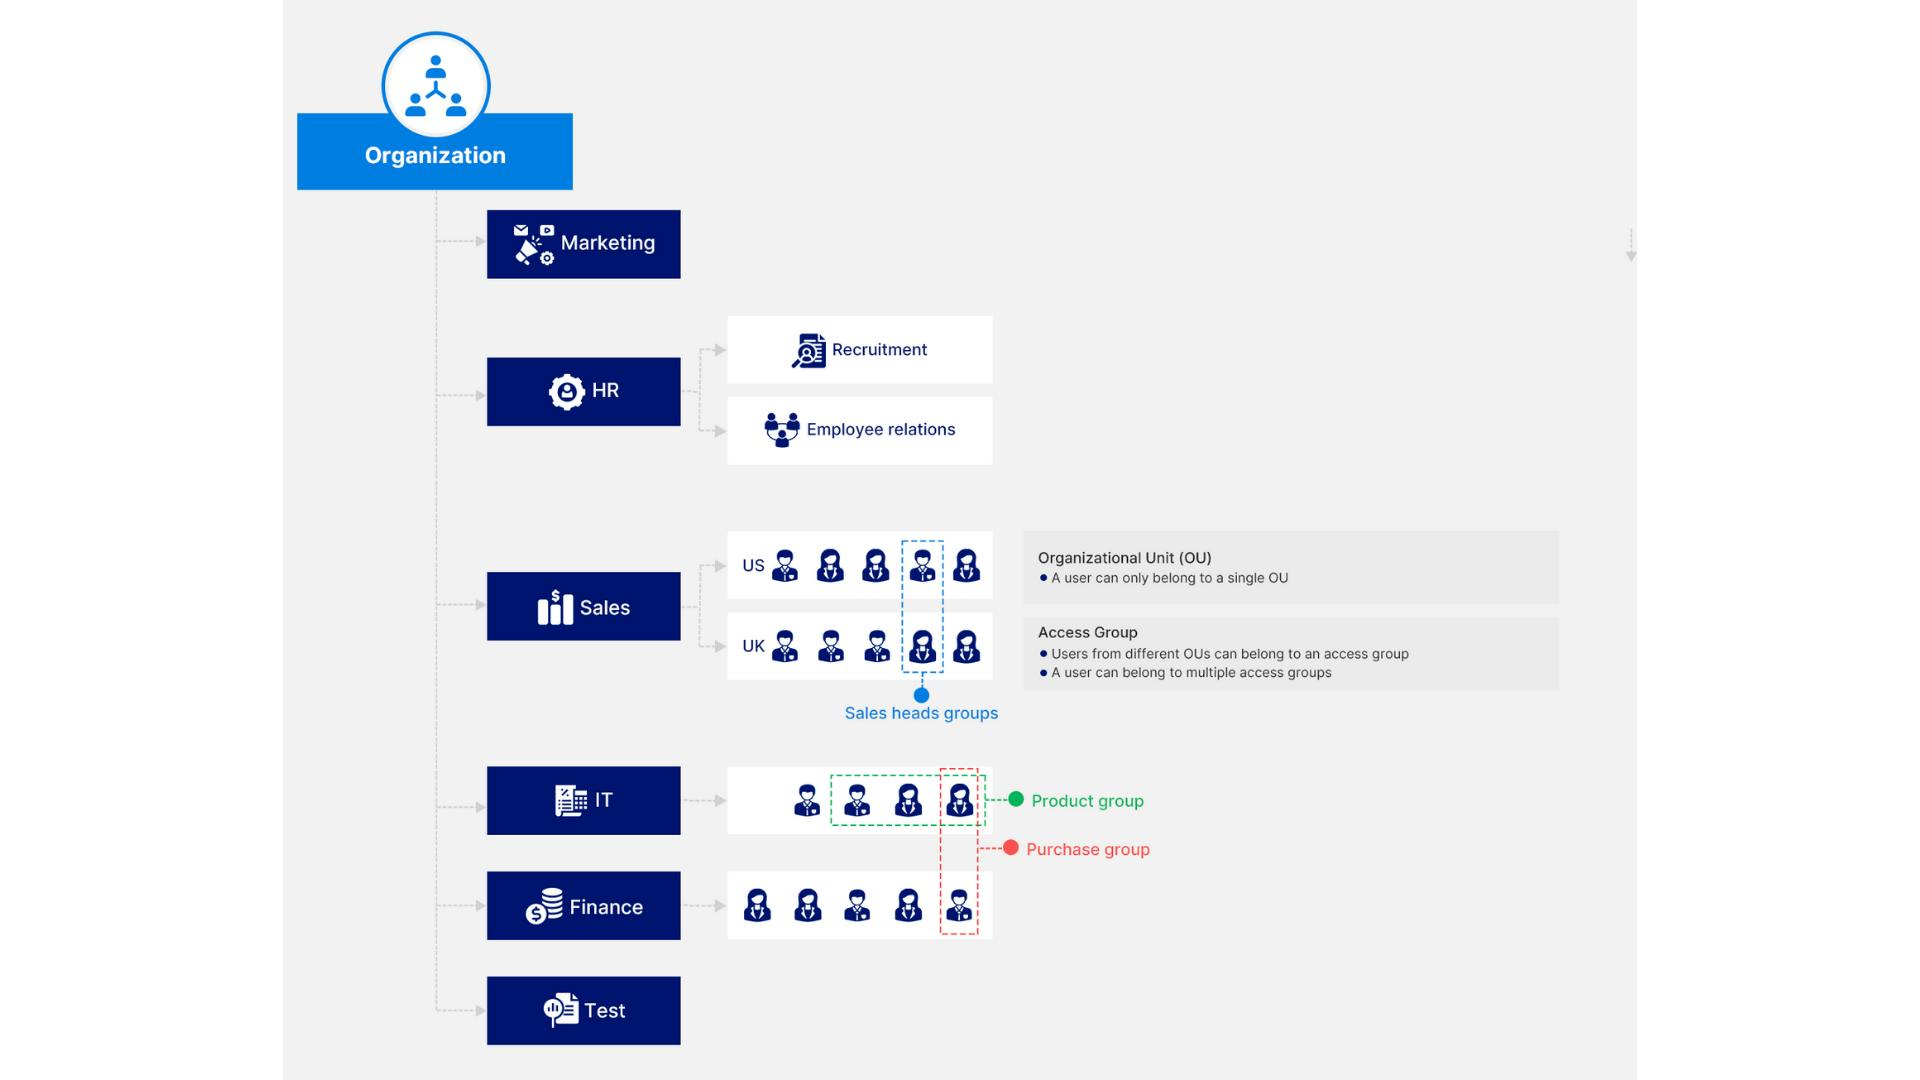
Note: Access groups can only be created from the Google Admin Console, Google Cloud Directory Sync, or Directory API. A group created with Google Groups, or a dynamic group cannot be used as access groups.
5.1. Customize service access using access groups
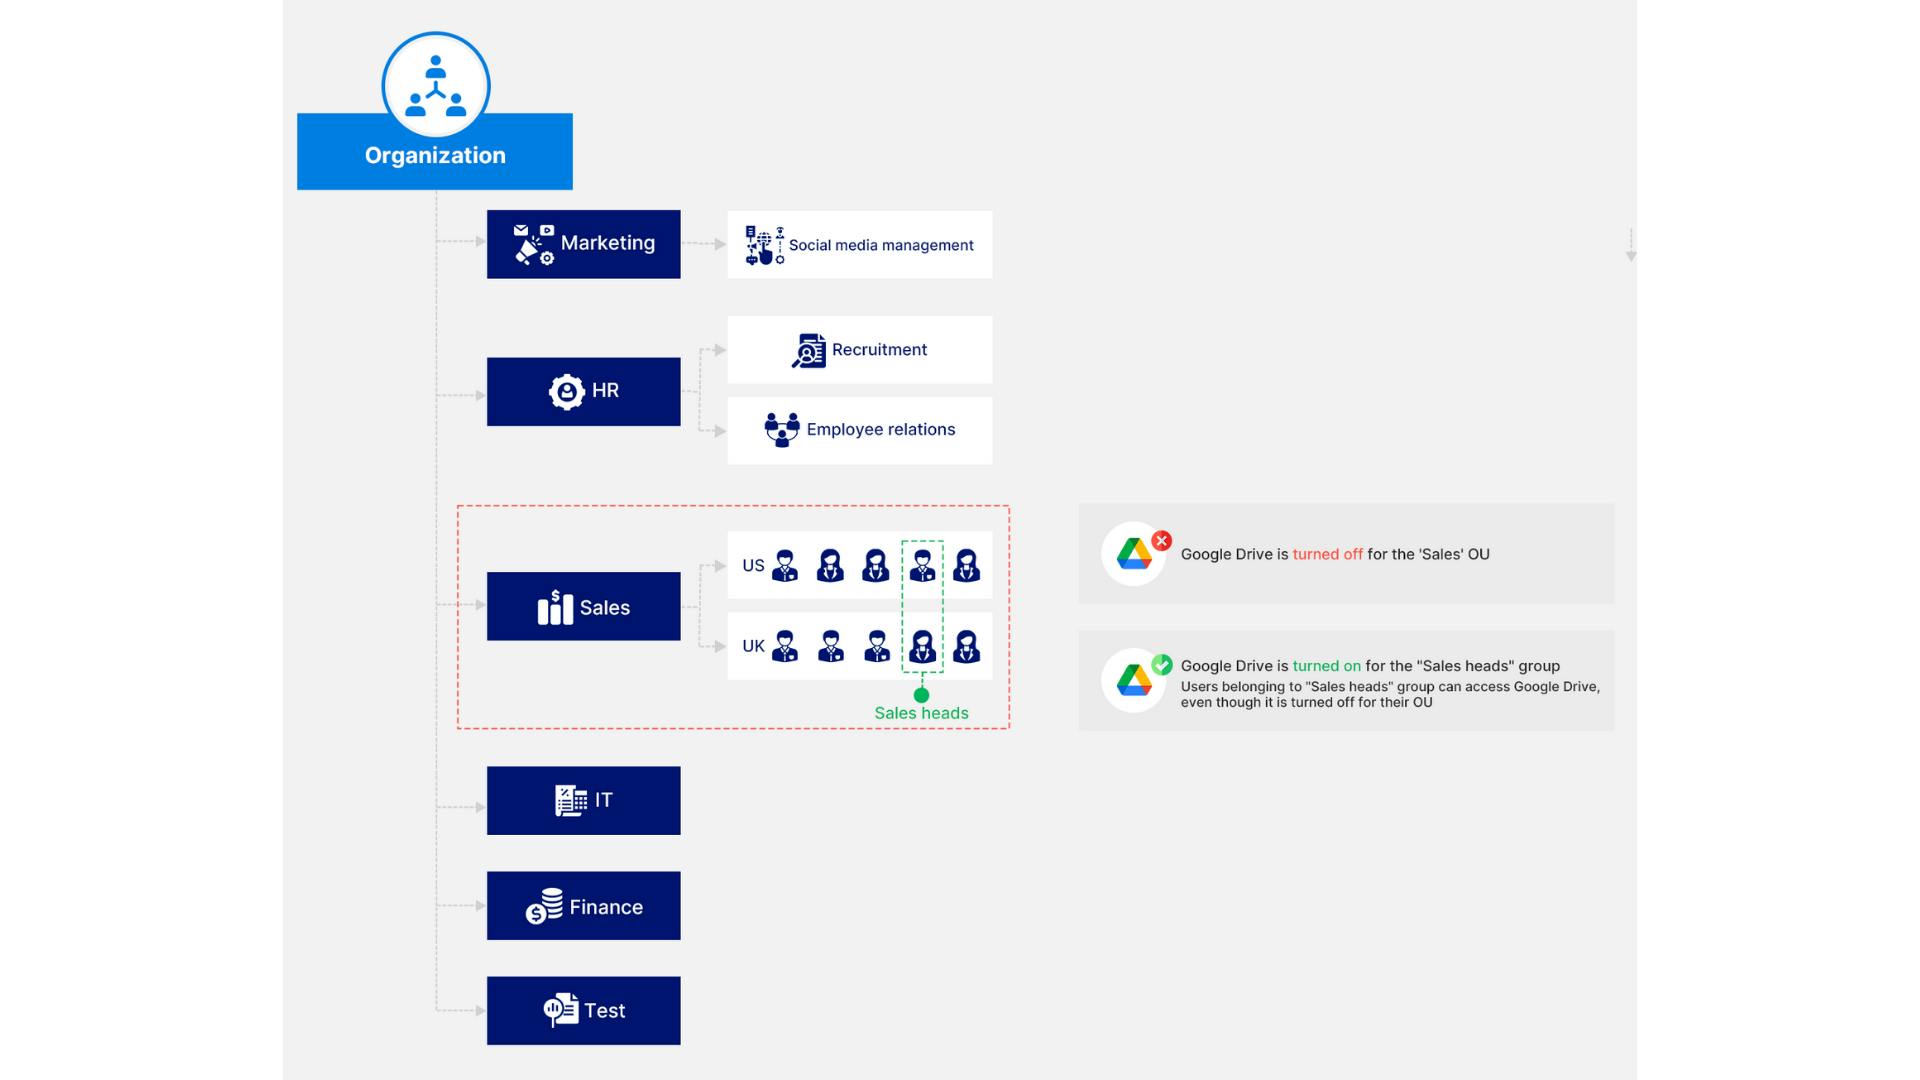
Note:
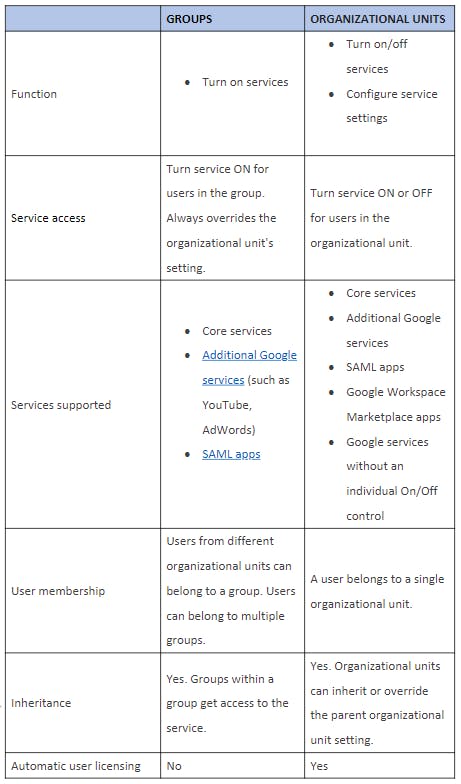
The following table gives the differences between an access group and an organizational unit:
Table Source: Google Support page
5.2. How to create an access group
As mentioned before, only groups created using the Admin console, Directory API, or Google Cloud Directory Sync can be used as access groups. You cannot use a group created with Google Groups, at groups.google.com, or a dynamic group as an access group.
5.3. Customize service settings using configuration groups
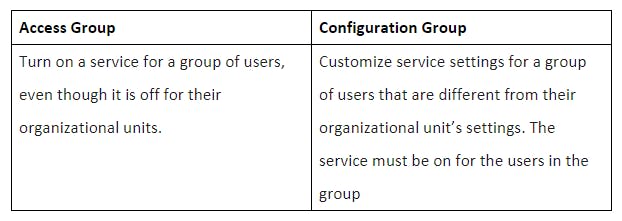
To learn more, read Customize service settings with configuration groups
6. Admin role for an organizational unit
In the Google Admin console, a Super Administrator can share the responsibility of managing the organizational account by assigning administrator roles to users in the organization. This gives the users access to the Google Admin console. An admin can assign the user a pre-built role available in the console to perform common business functions, or they can create a custom role to be assigned to the user. Learn more about administrator roles in the Google Admin console
6.1. Administrator privileges required
- Organizational Units
- Users
- Mobile Device Management (beta)
- Chrome Management
- User Security Management
- Shared device settings
- Manage Matters
- Manage Holds
- Manage Searches
- Manage Exports
6.2. How to create a custom administrator role for an organizational unit
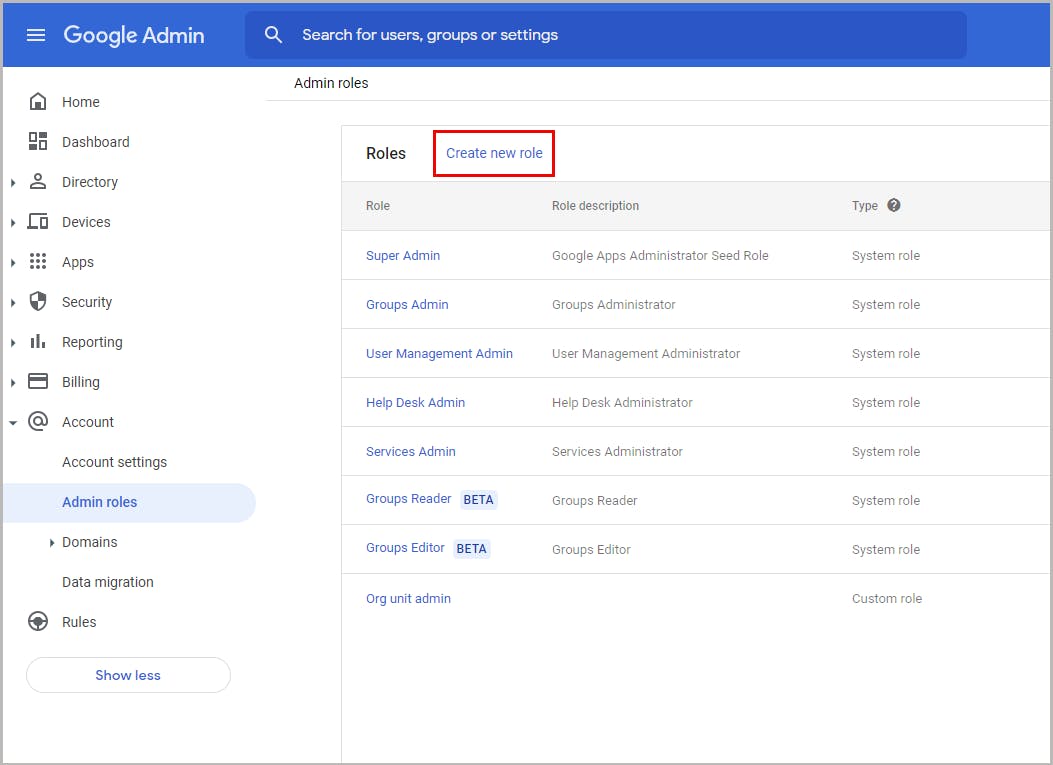
Step 1: In the Google Admin console Home page, go to Admin roles and click Create new role.
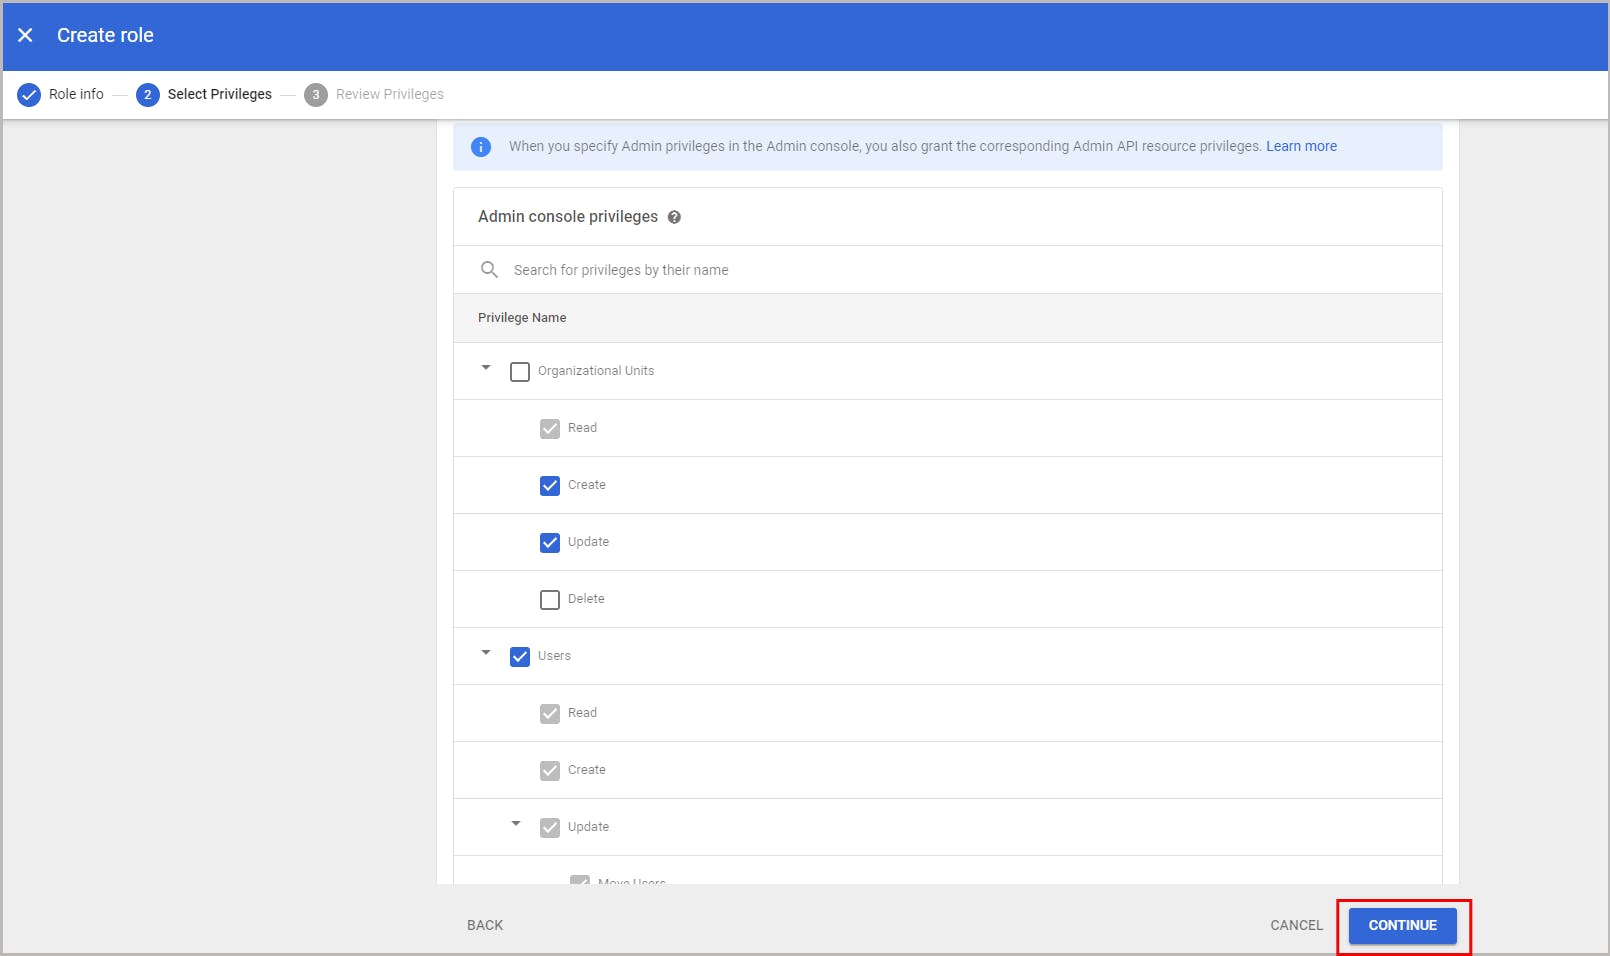
Step 2: Enter a name and description, and click Continue. From the list of privileges, select the privileges that you want to assign to the user, and click Continue. Make sure to check only those privileges that apply to organizational units. (See Administrator Privileges Required)
Step 3: Review the privileges and click CREATE ROLE to create the custom administrator role with selected privileges. Click Assign members.
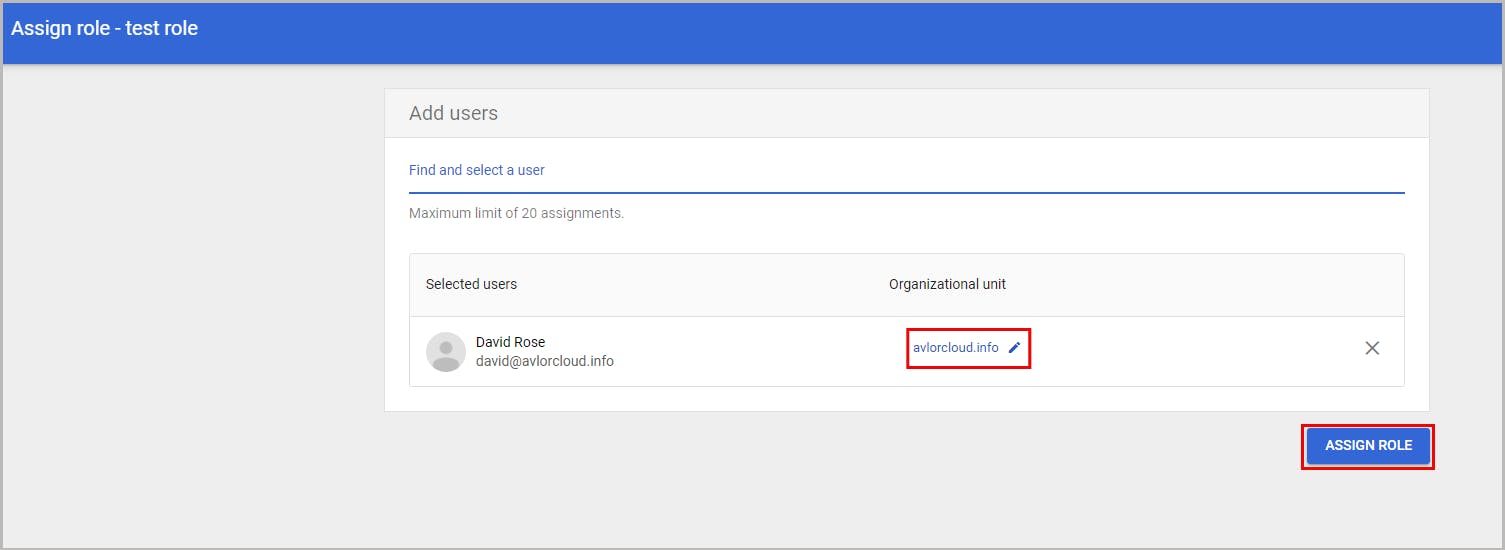
Step 4: Enter the user to whom you want to assign the role. Choose the organizational unit to which you want to limit the role.
Step 5: Click ASSIGN ROLE. The assigned admin will now be able to manage specific management tasks for the users belonging to the selected organizational unit.
7. Data retention management for Google organizational units
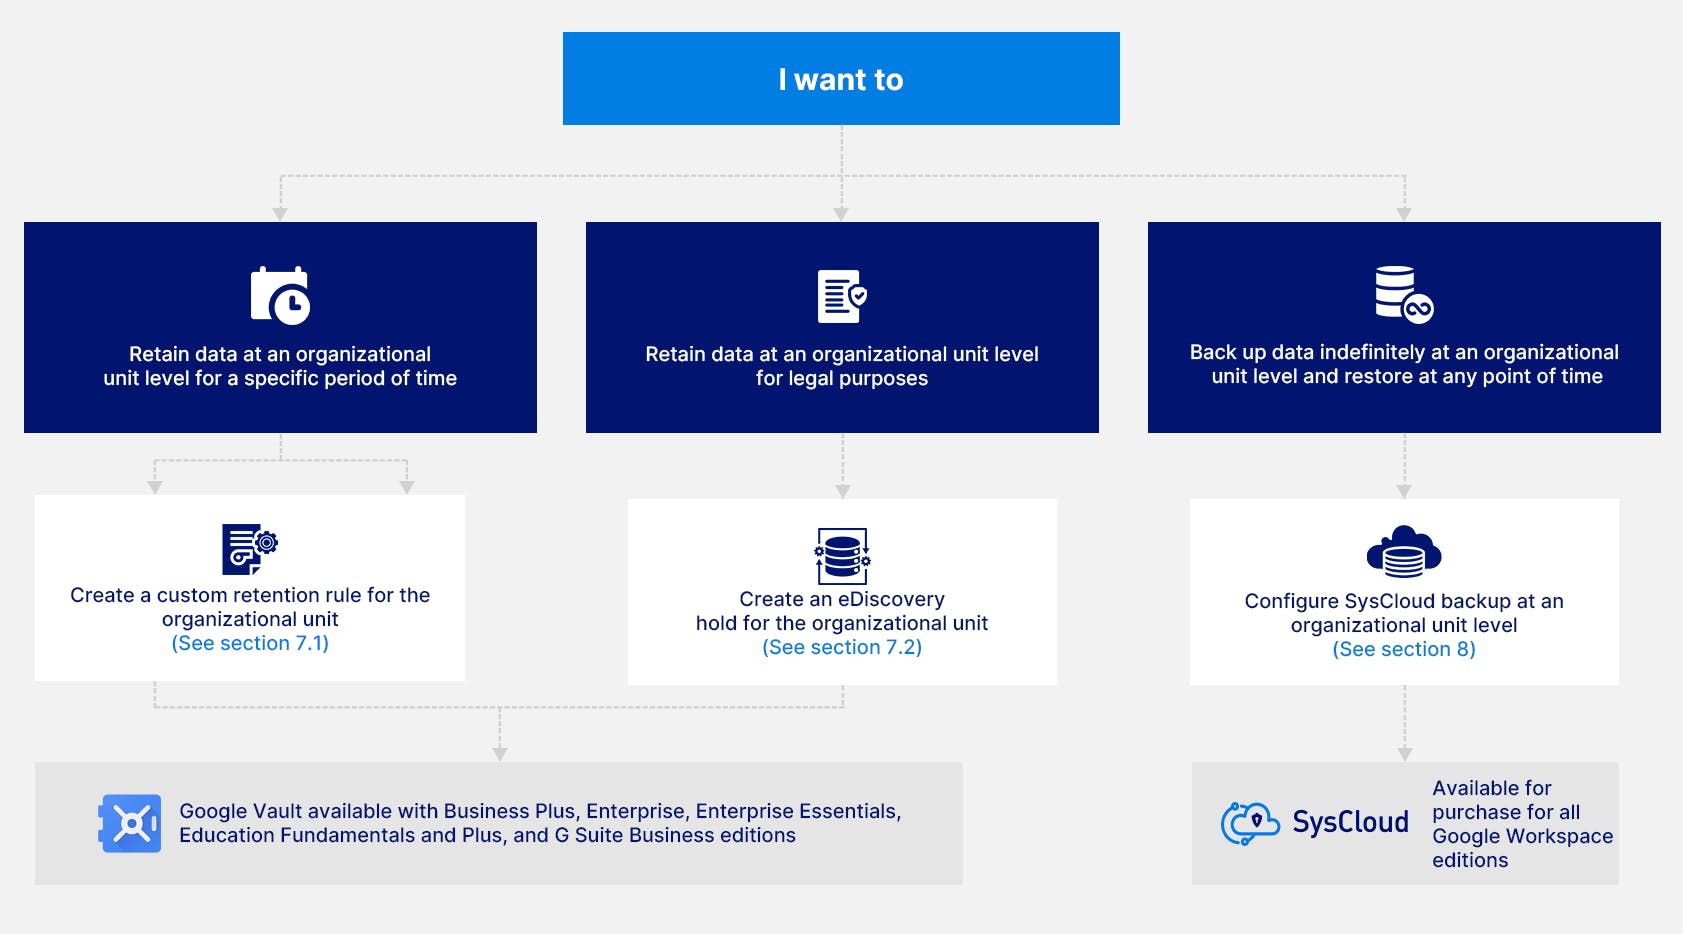
To retain data using retention rules or holds, one needs access to Google Vault. Learn how to get Google Vault for your organization.
To learn more about Google Vault, read this article.
7.1. Retain data at an organizational unit level using retention rules
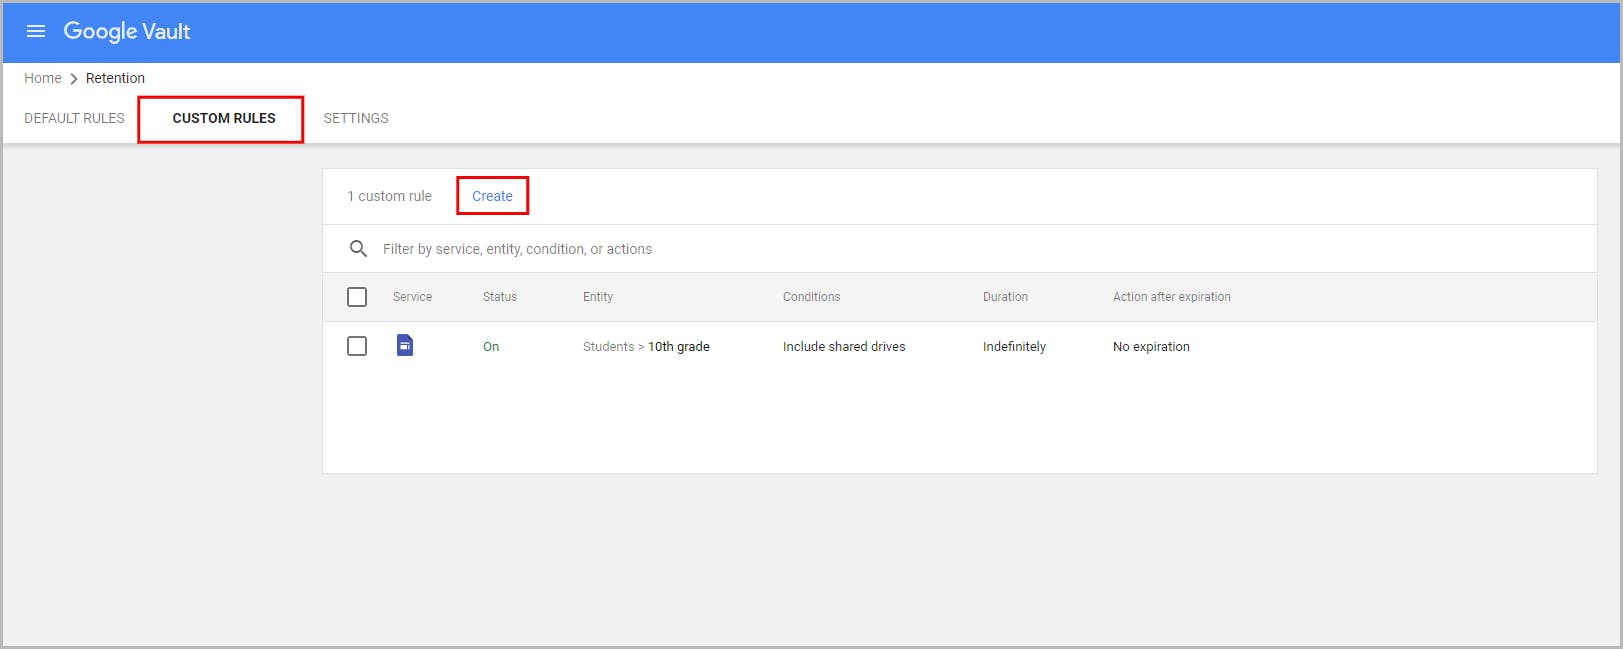
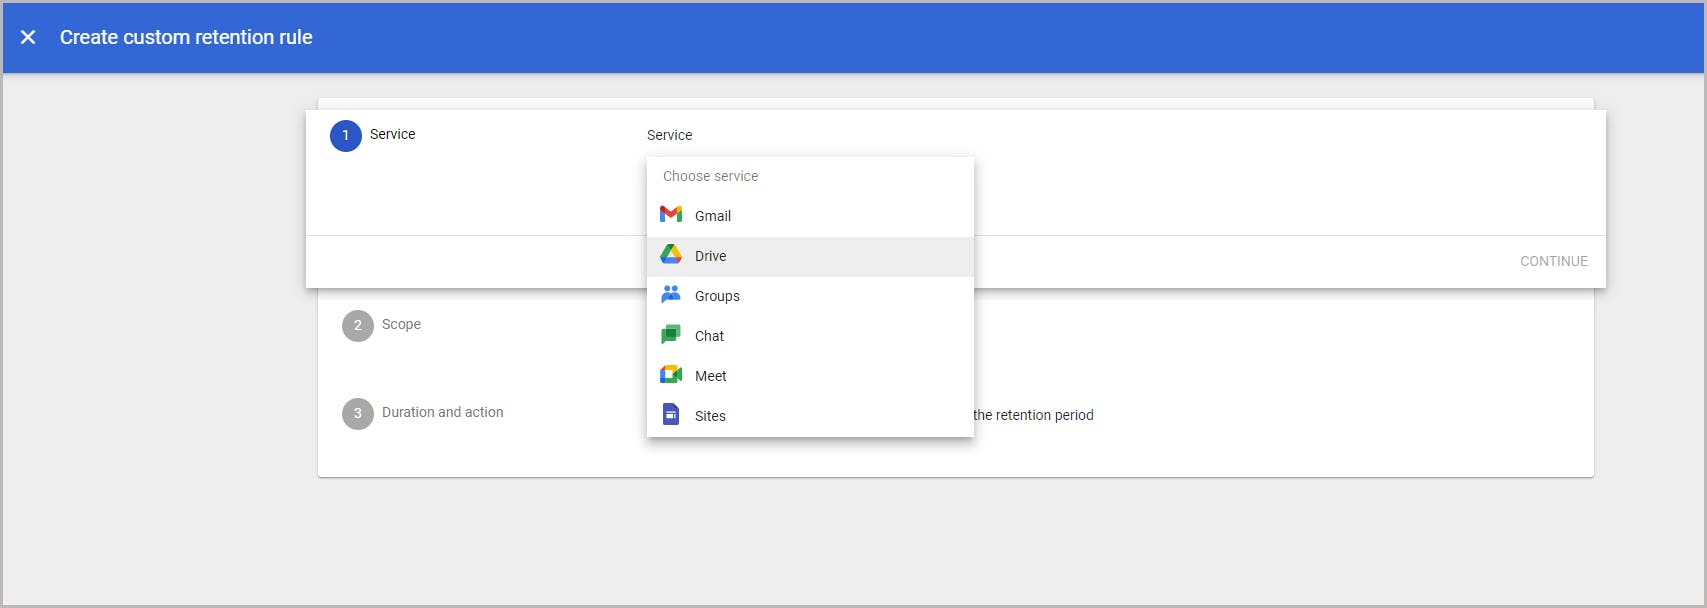
Step 1: Sign in to Google Vault. Click Retention -> CUSTOM RULES -> Create.
Step 2: Under Service, select the service to which you want to apply the rule and click Continue. A separate retention rule needs to be created for each service for which you need to retain data.
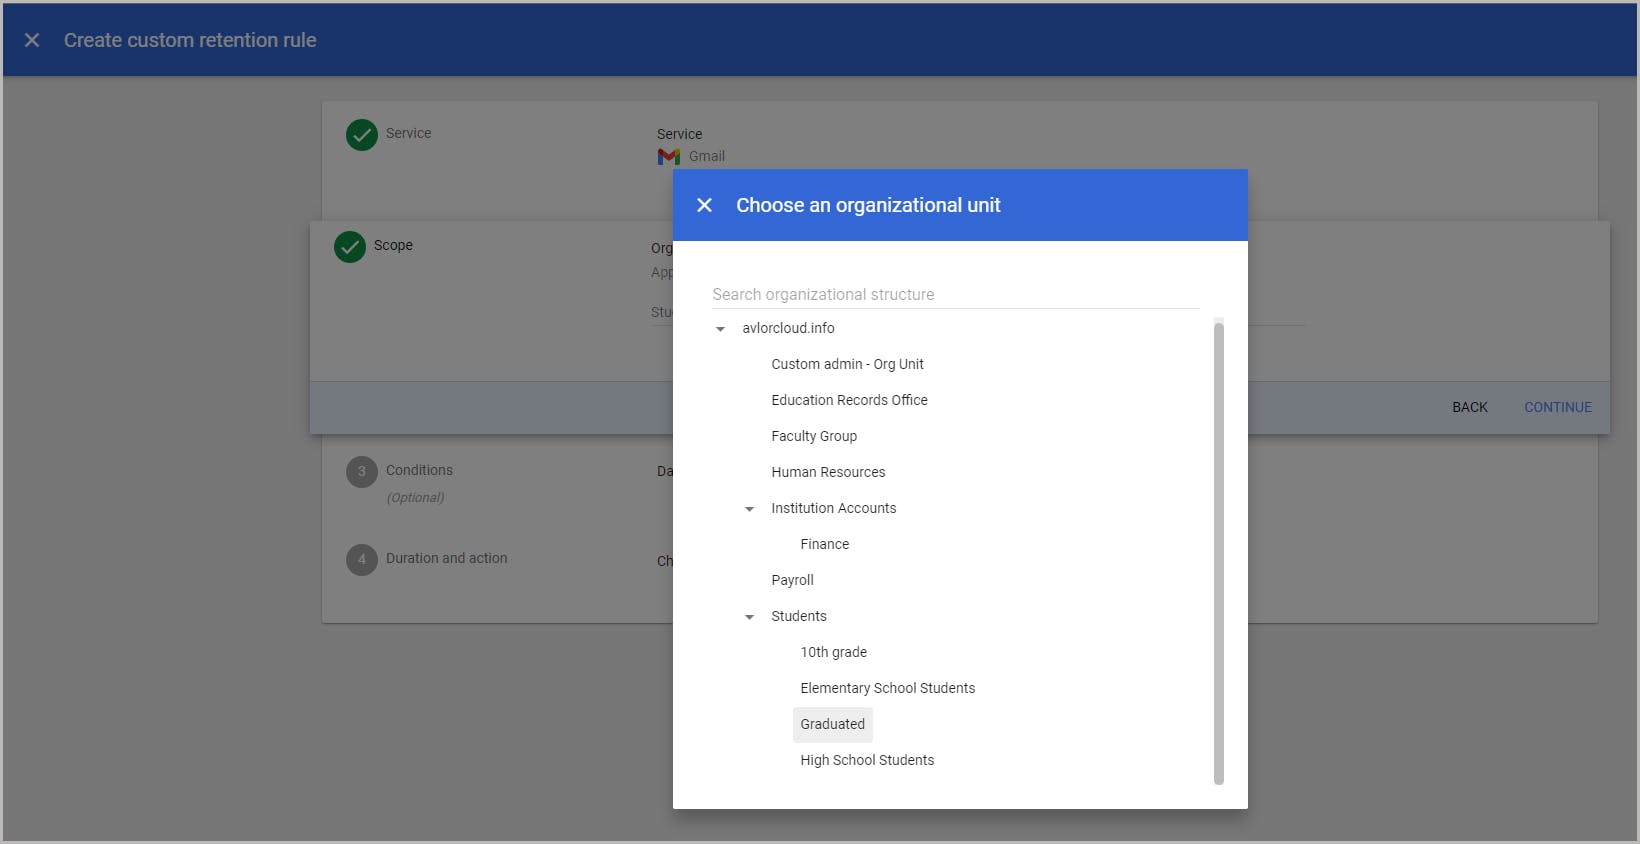
Step 3: Under Scope, choose the organizational unit for which you need to retain data, and click Continue.
Step 4: (optional) Choose the conditions that must be met for data to be covered by this rule, and click Continue. This step can be skipped if you want to retain the entire data.
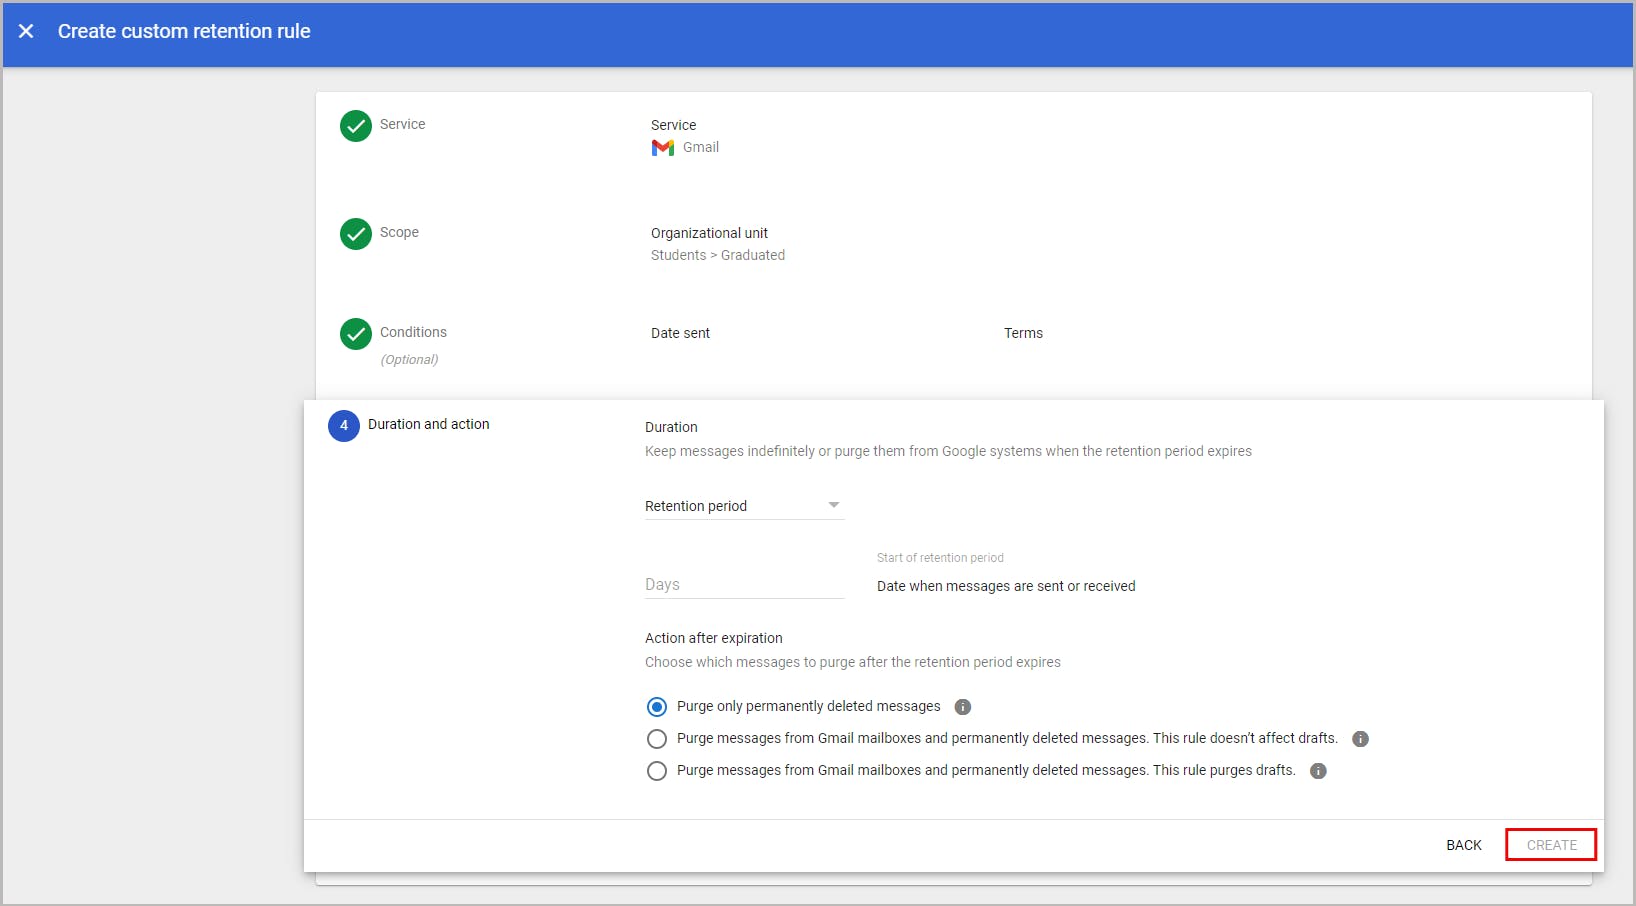
Step 5: Choose how long to keep the data:
1) To permanently retain messages covered by this rule, choose Indefinitely.
2) To retain data for a specific period, and remove it once the retention period expires, choose Retention period, and enter the number of days (from 1 to 36,500).
Step 6: If you selected Retention period in the previous step, specify the action to be taken when the retention period ends. Click Create.
Learn more about how retention works in Google Vault
7.2. Retain data at an organizational unit level using holds
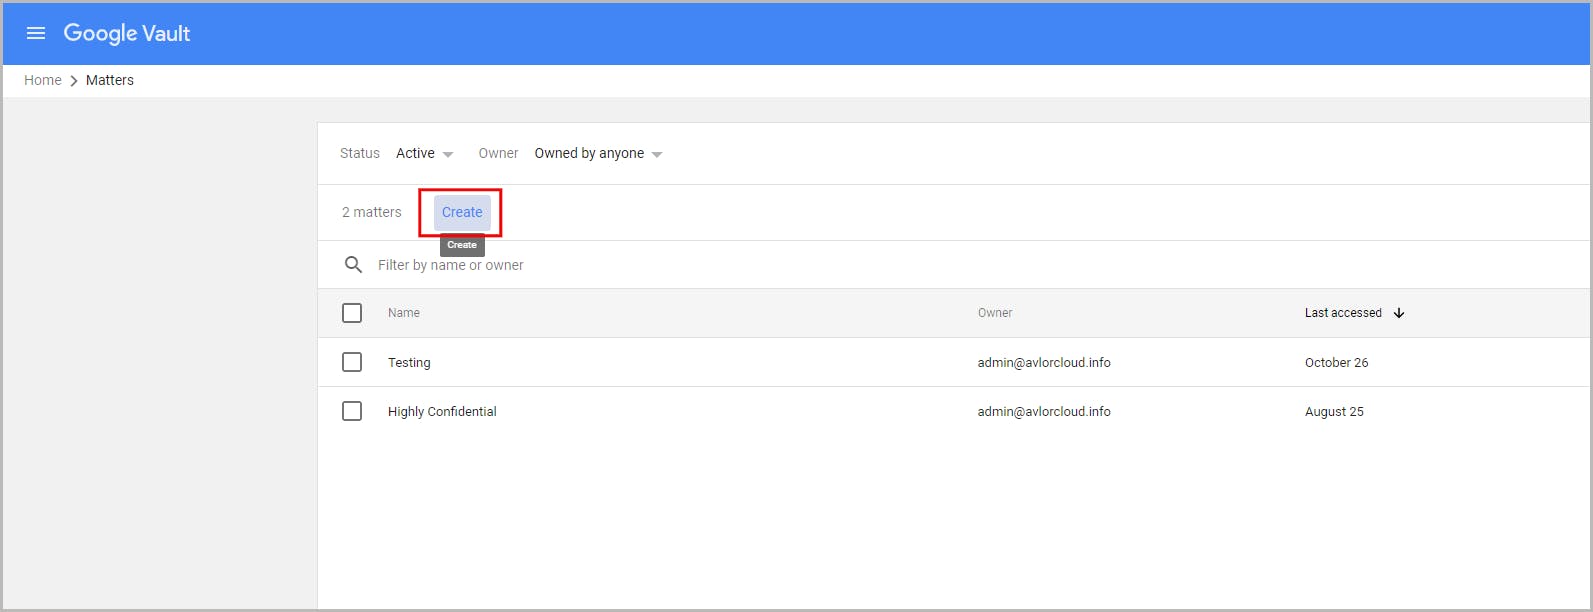
Step 1: Sign in to Google Vault and select Matters.
Step 2: If the matter already exists, click it to open it. Otherwise, click on Create to create a new matter. Enter the matter name and description.
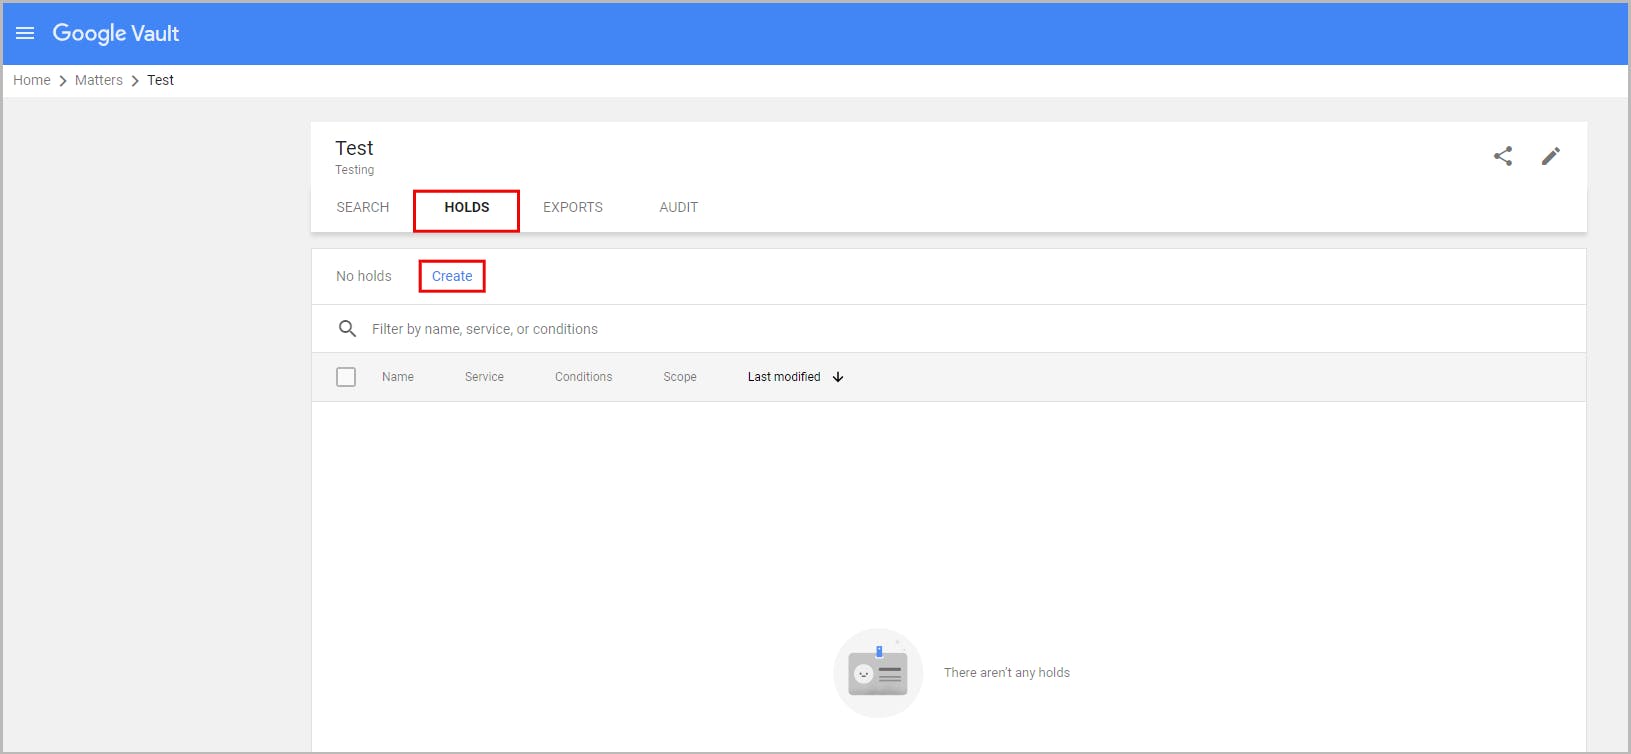
Step 3: Open the matter you created and navigate to HOLDS -> Create.
Step 4: Enter the hold name. Under Service, select the service for which you want to place data on hold, and click Continue.
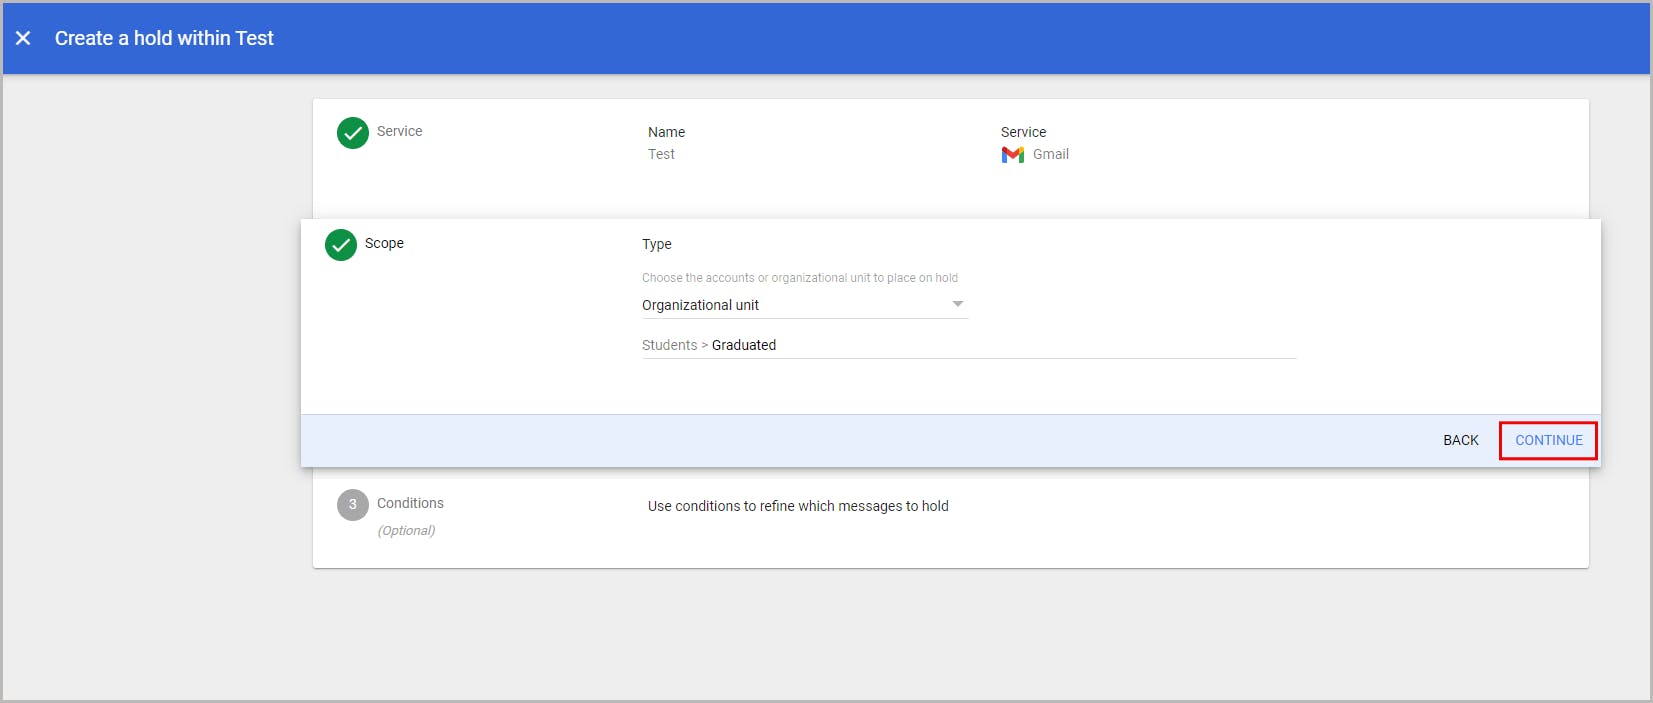
Step 5: Under Scope, choose the organizational unit you need to retain data for, and click Continue. (You might have to perform an additional step here depending on the service you choose. For example, if you have selected Drive in step 4, you need to choose whether to include items in shared drives as well)
Step 6: (optional) Set the conditions for the hold to be applied, and click Create. This step can be skipped if you want to retain the entire data. (This step is applicable only if you have selected Gmail or Groups in step 4. For other Google services, you can directly create the hold in Step 4)
To learn more about holds in Google Vault, click here.
7.3. Limitations of using retention rules and holds as a backup solution
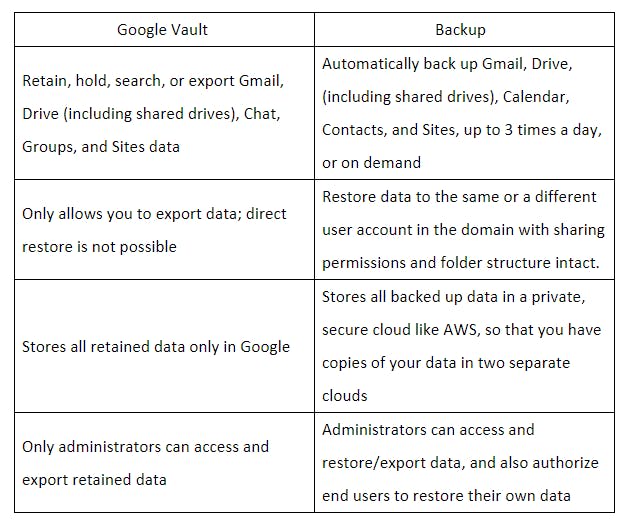
Even though retention rules and holds in Google Vault can be used to retain data at an organizational unit level, they are not designed for the purpose of backup and restore, and therefore, have serious limitations as a backup solution. Click here to view all the limitations associated with using Google Vault as a backup solution
Third-party cloud backup applications like SysCloud are better options to back up your Google Workspace data.
8. SysCloud backup for Google Workspace
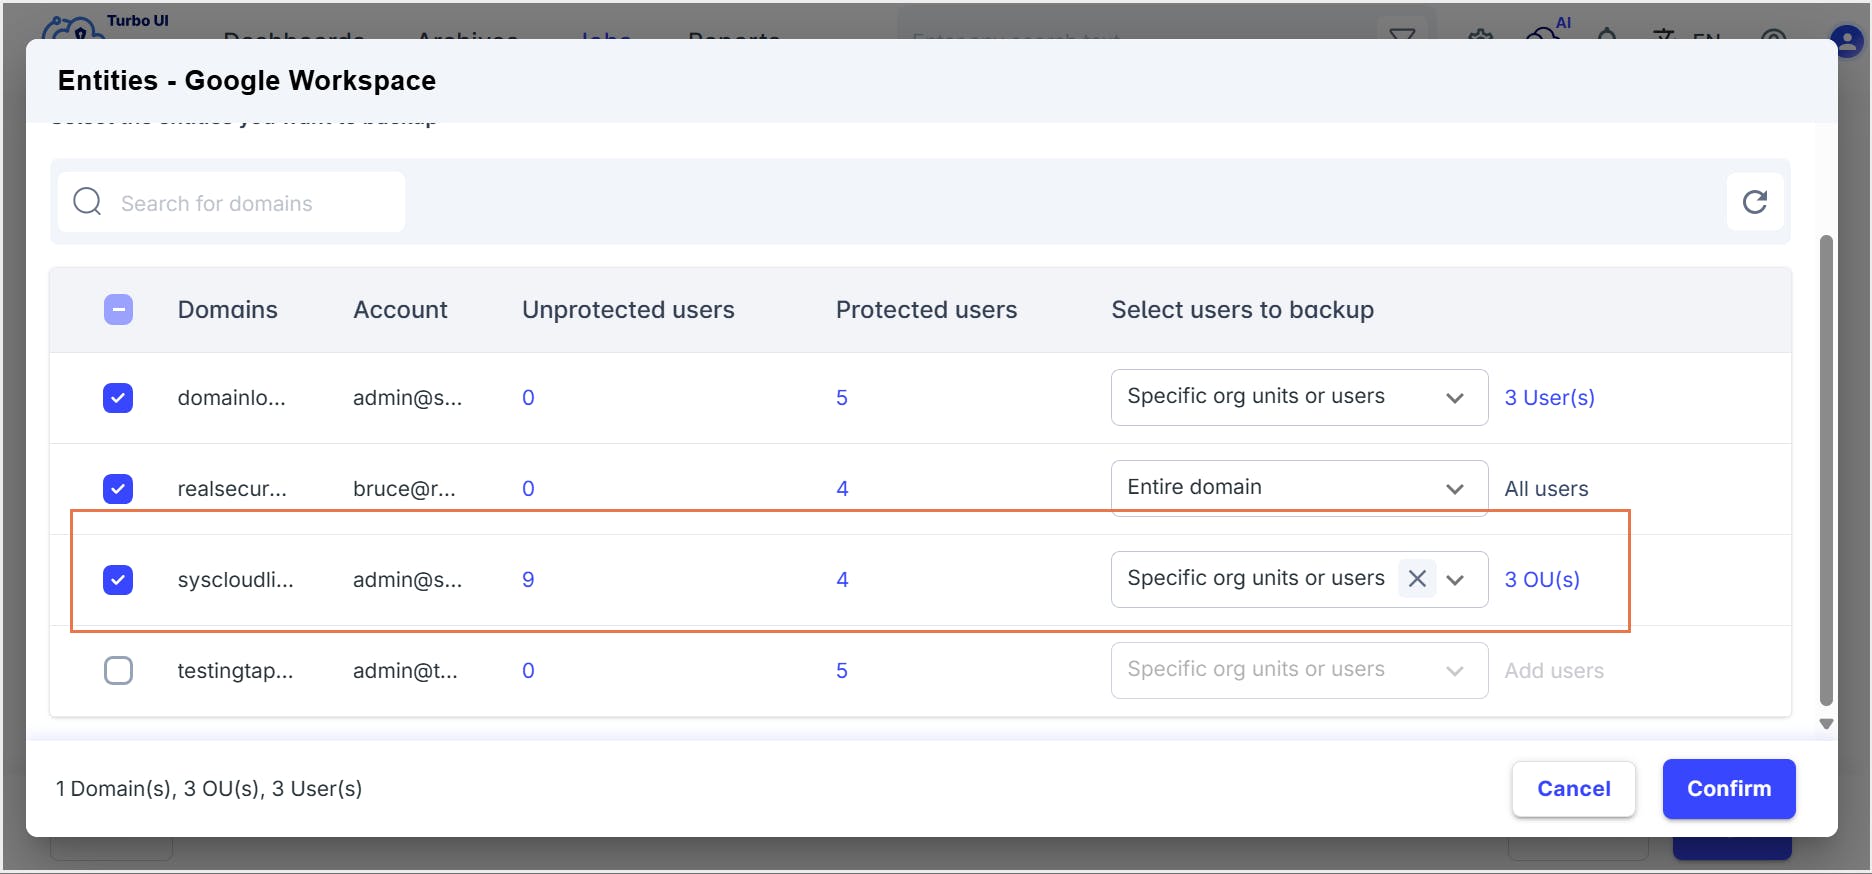
SysCloud backup for Google Workspace provides administrators the option to set up and configure backup at an organizational unit level, with different retention settings for each Google organizational unit.
9. Google organizational units best practices
Keep it simple: Create organizational units (OUs) only when you need to customize service access or settings for specific users or devices. Avoid creating unnecessary OUs if users can share the same access and settings.
Avoid over-organizing: It may be tempting to meticulously categorize users, but this gives you more work when it is time to assign new policies. Create OUs only when they serve a clear purpose.
For example, in a school, students and staff might belong to separate OUs due to their differing settings and restrictions. However, placing students in separate OUs for each grade level is unnecessary unless explicitly required.Understand inheritance when moving OUs: Modifying your organizational structure requires careful planning. When you move an OU to a new parent, check for locally applied settings, as these will remain in effect in the new location. However, inherited settings will adjust to reflect the new parent OU’s policies.
Understanding where custom settings are applied and how inheritance hierarchies function is crucial for maintaining effective configurations.Choose a restructuring method based on your needs: If maintaining existing settings isn’t required, start fresh by creating a new OU structure. If preserving current configurations is critical, move OUs with their locally applied settings and rename them as needed.
There might be situations where a hybrid solution works better - moving and renaming some organizational units (that have locally applied settings that are too tedious to be configured again) and then creating new organizational units for which you want the settings to be fully inherited.Utilize access and configuration groups: For scenarios where specific users across different organizational units require unique service access or settings, consider using access groups or configuration groups. This approach allows for customization without altering the organizational structure.
See the section Organizational units vs. access groups
Regularly review and audit organizational units: Periodically assess your organizational structure to ensure it aligns with current operational needs and that settings are appropriately applied. Regular audits help maintain an efficient and effective organizational hierarchy.
10. Frequently asked questions on Google organizational units
1. Are organizational units related to domains?
- You can have multiple domains within a single Google Workspace enterprise account. By default, all user accounts across all the domains will be part of the top-level organizational unit. If you want to apply different policies to users in a particular domain, you can place those users in their own organizational unit.
- An organizational unit can contain users from different domains. Also, users in a domain can be distributed across any number of organizational units.
2. Can settings be customized for a single user using an organizational unit?
3. How do I change my Google organizational unit?
An administrator can move a user to another organizational unit in the Google Admin console. Click here to know how.
4. Does organizational structure impact the rate at which users are added to a Google Workspace account?
5. How are organizational units different from access groups?
Click here to read the differences between organizational units and access groups.