In this article
  • Back up SharePoint Online manually
  • Back up SharePoint using native Microsoft 365 features
  • Back up SharePoint Online using third-party apps
  • Why you should back up Microsoft 365 SharePoint Sites
  • Frequently asked questions

How to Back up Microsoft 365 SharePoint Online

16 Aug 2021
|
18 min read
|
Devisri
twitterlinkedin
Blog Articles

According to Microsoft, over 2,50,000 organizations use SharePoint, including 85% of Fortune 500 companies. Widespread adoption of SharePoint by businesses also means there is an increase in risk of data loss due to a wide variety of reasons.

Microsoft’s terms of service clearly states that Microsoft is not responsible for backing up your SharePoint data. Don’t take our word for it; here is an extract from their terms of service.

WE STRIVE TO KEEP THE SERVICES UP AND RUNNING; HOWEVER, ALL ONLINE SERVICES SUFFER OCCASIONAL DISRUPTIONS AND OUTAGES, AND MICROSOFT IS NOT LIABLE FOR ANY DISRUPTION OR LOSS YOU MAY SUFFER AS A RESULT. IN THE EVENT OF AN OUTAGE, YOU MAY NOT BE ABLE TO RETRIEVE YOUR CONTENT OR DATA THAT YOU’VE STORED. WE RECOMMEND THAT YOU REGULARLY BACKUP YOUR CONTENT AND DATA THAT YOU STORE ON THE SERVICES OR STORE USING THIRD-PARTY APPS AND SERVICES.

How to back up SharePoint Online

flowchart

How to back up SharePoint Online manually

It is possible to manually back up your SharePoint files to your computer or an external drive to keep them secure in case your Microsoft 365 account is compromised. To back up SharePoint manually, follow the below steps:

  • Step 1: Open your SharePoint Site in a web browser.

  • Step 2: Go to SharePoint Online files library and click on Documents. Select the files you need to back up, right click and choose the Download option. This will download the selected files to your device.

manual backup
  • Step 3: Save the files to a portable disk that can be used to store your Microsoft SharePoint backup.

Limitations of SharePoint backup using manual method

  • Time consuming, since all actions are manual

  • Since it’s completely manual, there is a high possibility that you might forget to download new or updated data.

  • Backup will be lost if something happens to the computer/external drive

  • In case of a data loss incident, restoring SharePoint data is going to be a tedious process.

How to back up SharePoint using native Microsoft 365 features

Microsoft doesn’t have any features specifically designed for the purpose of SharePoint backup; however, the following three options can be used to take a backup of your SharePoint data.

  • Option 1 : Backup Microsoft 365 SharePoint Online using OneDrive Sync Client

  • Option 2 : Backup Microsoft 365 SharePoint Online using eDiscovery Feature

  • Option 3 : Backup Microsoft 365 SharePoint Online using Compliance Retention Policies

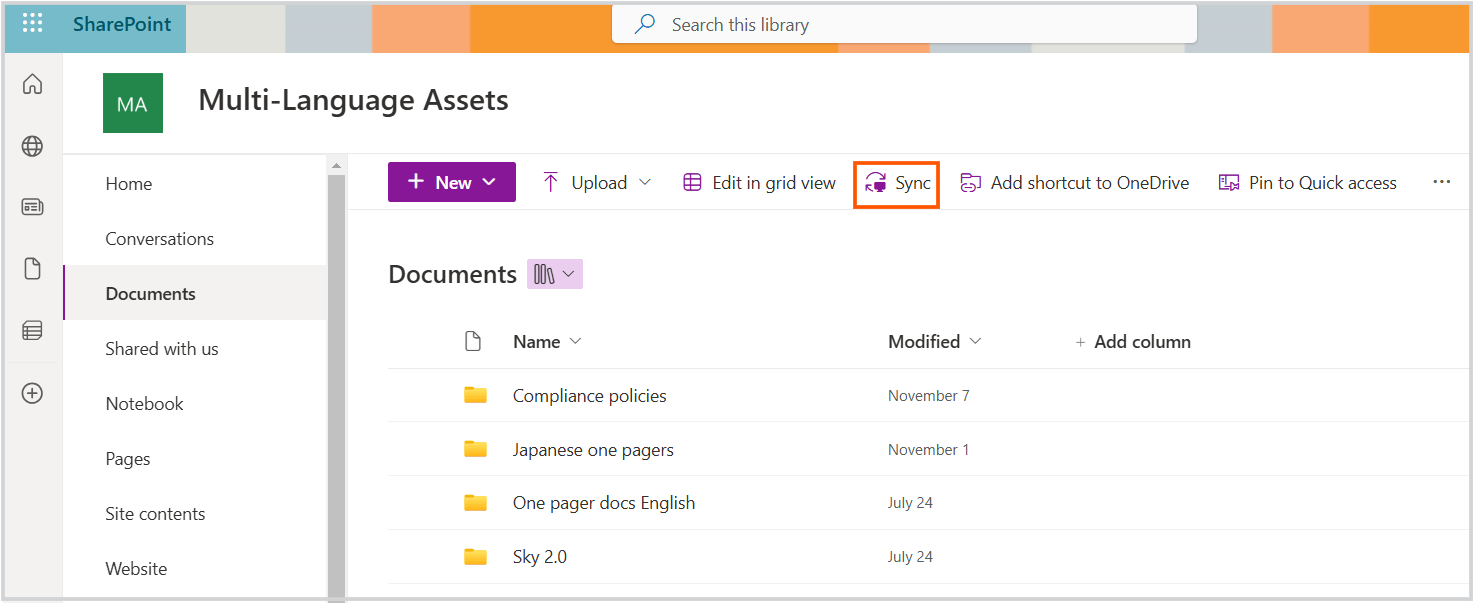
Option 1 : How to back up SharePoint Online using OneDrive sync client

With OneDrive sync client, you can sync SharePoint Online files to your desktop so that these files are available offline. This can also be used as a backup to create a copy of your SharePoint data. Here is how you can backup SharePoint Online data using OneDrive sync client:

  • Step 1: Login to SharePoint and open the Site which needs to be synced with OneDrive desktop application.

  • Step 2: Navigate to the module Documents.

Documents
  • Step 3: Click on Sync to download the documents to the OneDrive folder on your desktop.  This will prompt you to open the OneDrive folder for confirmation.

Sync
  • Step 4: Click on Open Microsoft OneDrive.

Open Microsoft OneDrive

All the selected files will be available on your desktop. However, the files will be in sync with SharePoint, and therefore, any deletion in SharePoint will be reflected in the desktop, erasing the backed up data.
To create a backup, copy all the downloaded files to another folder on the desktop or to an external hard drive.
Though the OneDrive Sync Client can be used as a backup, relying on it completely could be risky, as local machines are prone to crashes or malware attacks.

Note : In order to perform this action, you should install Microsoft OneDrive desktop application on your device. Click here to download it.

Limitations of SharePoint backup using OneDrive sync client

  • Infrequent Backups: Since the process of taking the backup is manual, creating consistent, regular backups will become a challenge

  • Limited Storage: To manage your storage space, you will be forced to delete older files that are of less importance at the moment

  • Responsibility on End User: This approach is applicable only if individual users take responsibility for backing up their data. An administrator cannot manage backup for individual users.

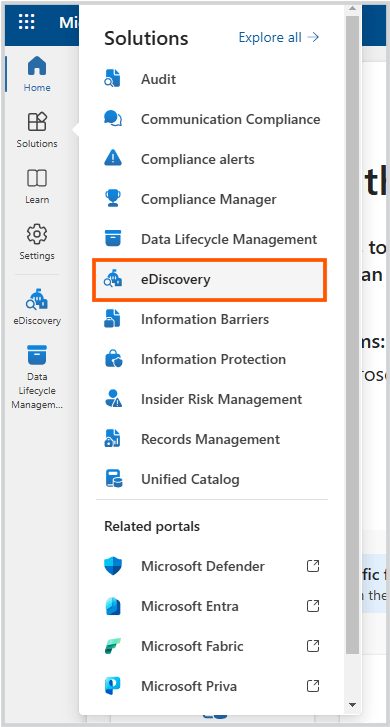
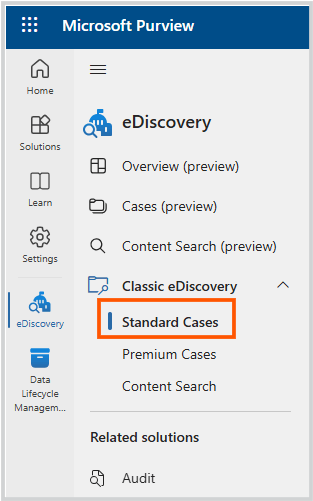
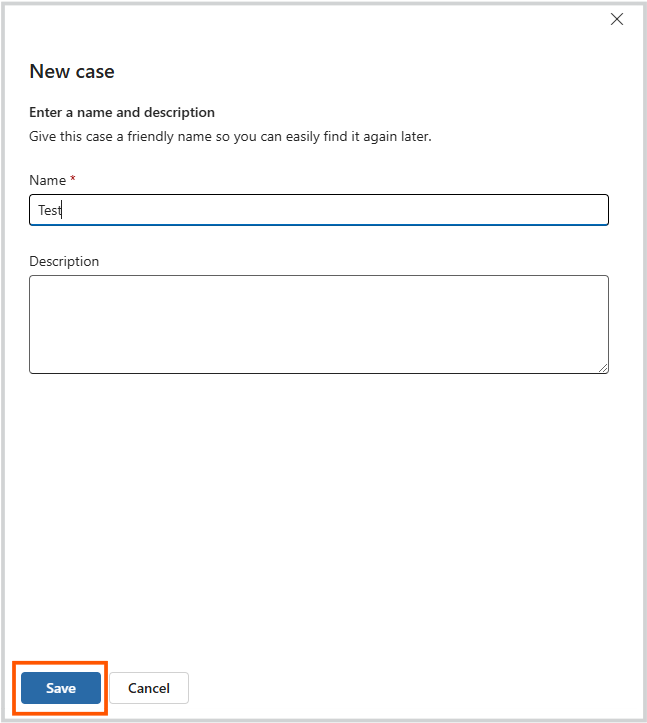
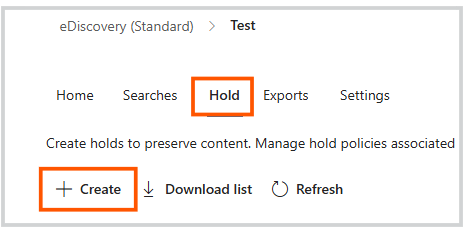
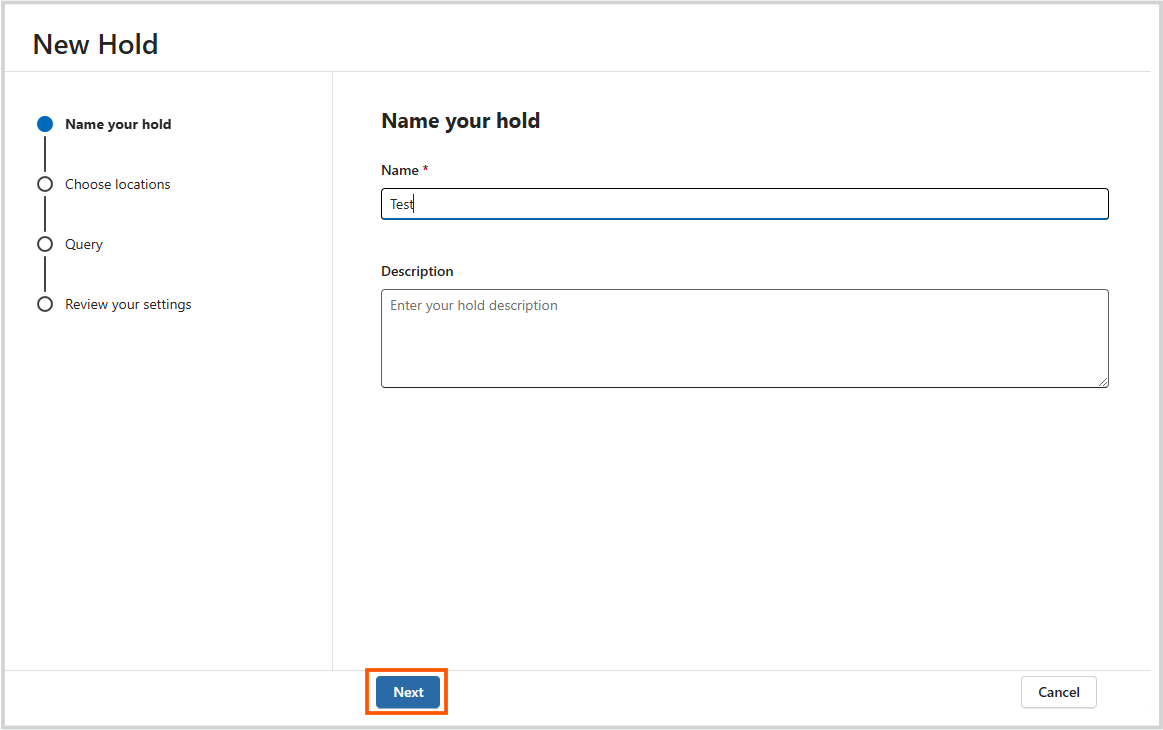
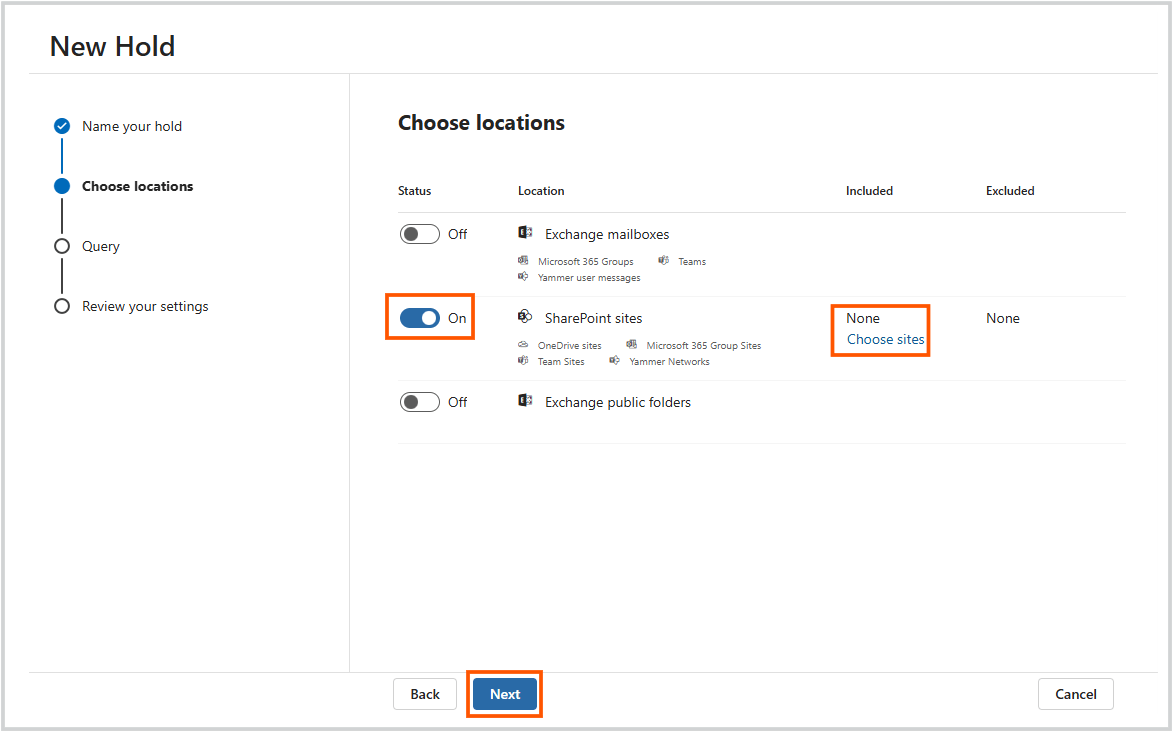
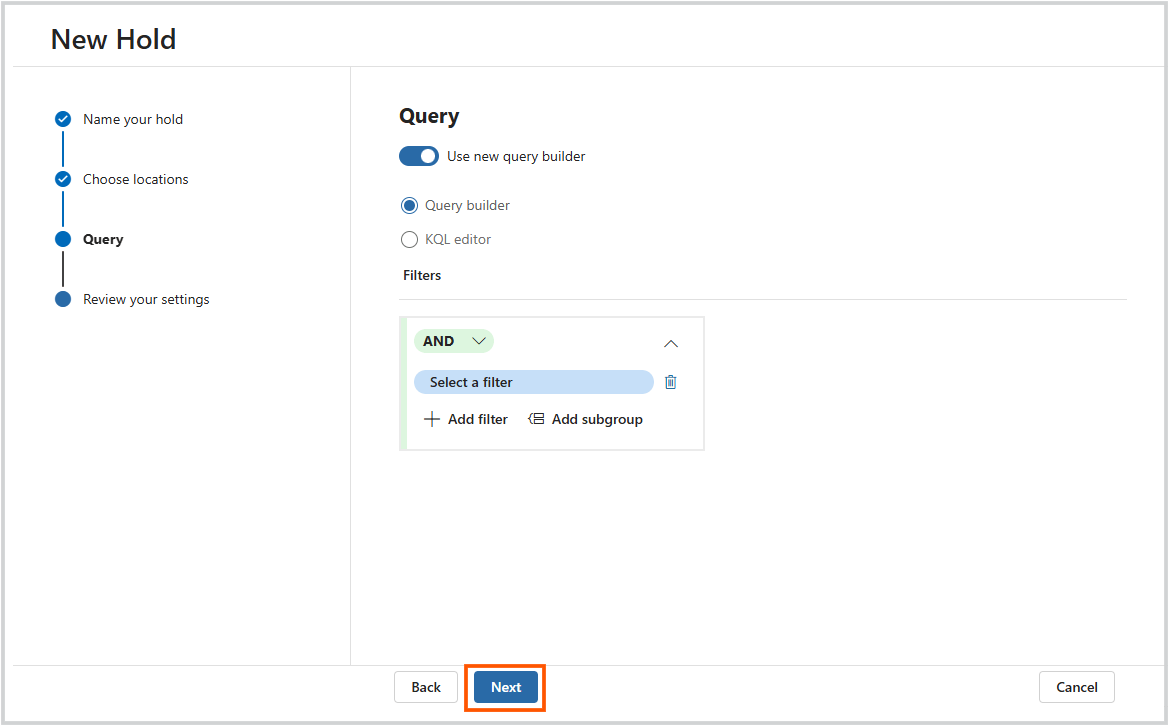
Option 2 : How to back up SharePoint Online using eDiscovery feature

eDiscovery tool helps in retaining critical business data for any period of time. This helps in locating data that could be used as a potential evidence during a legal procedure.

Note : You will need to subscribe to Microsoft 365 Enterprise E3 and E5 plans to access the eDiscovery tool.

The eDiscovery tool comprises four modules:

Case : A way to organize data and restrict the held data to a certain set of users.

Hold : Protects important data from user modifications or deletions.

Search : Lets the administrator search for specific data.

Export : Exports the discovered data as a .pst file.

Case and Hold options are used to back up your SharePoint data while Search and Export options are used to search and export the data held by the user.

Here is how you can backup SharePoint Online data using eDiscovery feature

  • Step 1:  Log in to Microsoft 365 admin center.

  • Step 2: Navigate to Admin centers -> Security.

navigate to Security
  • Step 3: You will be redirected to the  Admin Center page for Security and Compliance. Navigate to eDiscovery and select the eDiscovery option from the drop-down menu.

Navigate to eDiscovery
  • Step 4: Next, click on the button. Create a case to hold the user data.

Create a case
  • Step 5: Enter the Case name and Description. Click Save.

Enter case name and description
  • Step 6: Next, click on the Open button, to go to the case created.

Open the case

This will redirect you to a new tab with settings specific to the case selected.
The next step is to create a Hold.

How to create a hold in eDiscovery

  • Step 7: In the redirected page, navigate to Holds in the toolbar and click on Create.

Create a hold
  • Step 8: Enter the Hold name and description and click on Next. This will take you to the Choose locations option.

Enter hold name and description
  • Step 9: Click on Choose sites option.

Choose sites
  • Step 10: In the next window, select the site that needs to be added and click on the button Choose > Done. This will take you back to the Create a New Hold page. Click Next.

  • Step 11: Click on Add Conditions options to filter data according to the date, sender name, size, subject, and so on. Click Next.

Add conditions
  • Step 12: Review your hold settings and click on the button Create this hold to complete the process.

Limitations of SharePoint backup using eDiscovery feature

  • Each user has a limited storage available. If you delete files to stay within the storage limit, the deleted files cannot be recovered. Also, if the user account is deleted, then the backup data is lost forever.

  • eDiscovery feature is available only for organizations with Microsoft 365 Enterprise E3 or E5 plans.

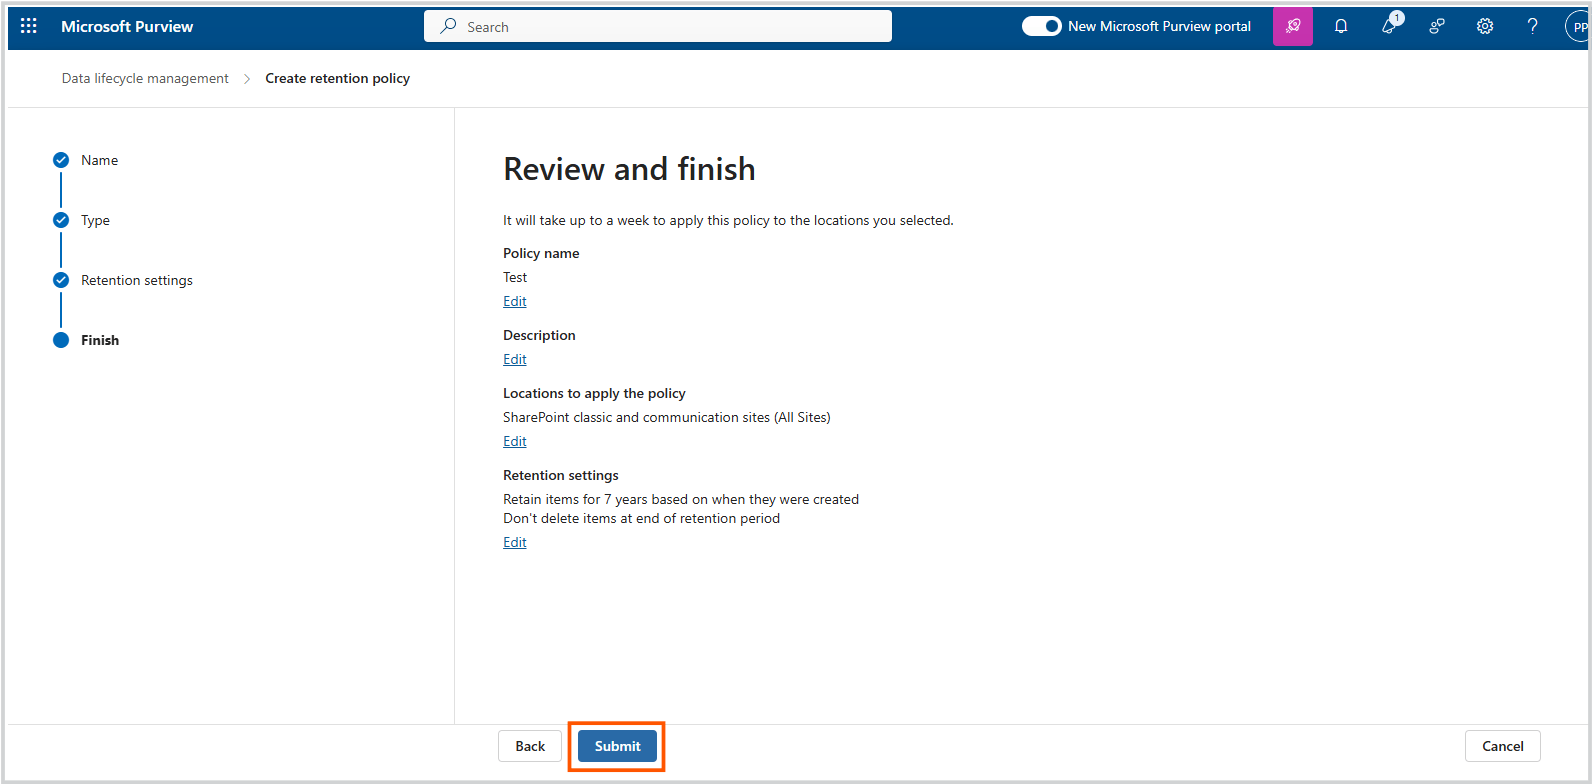
Option 3 : How to back up SharePoint Online using compliance retention policies
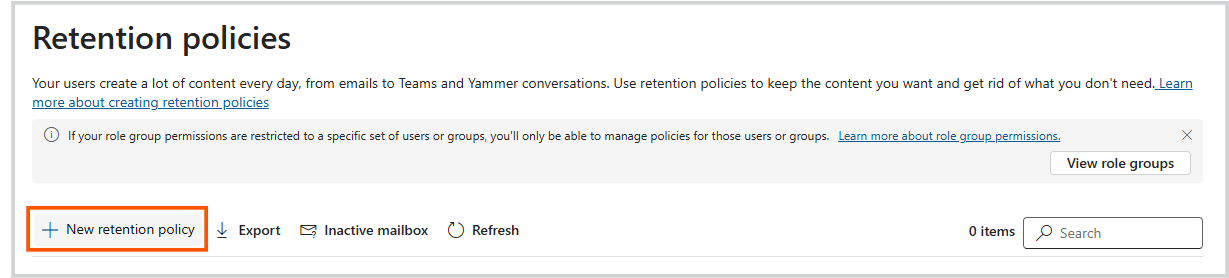
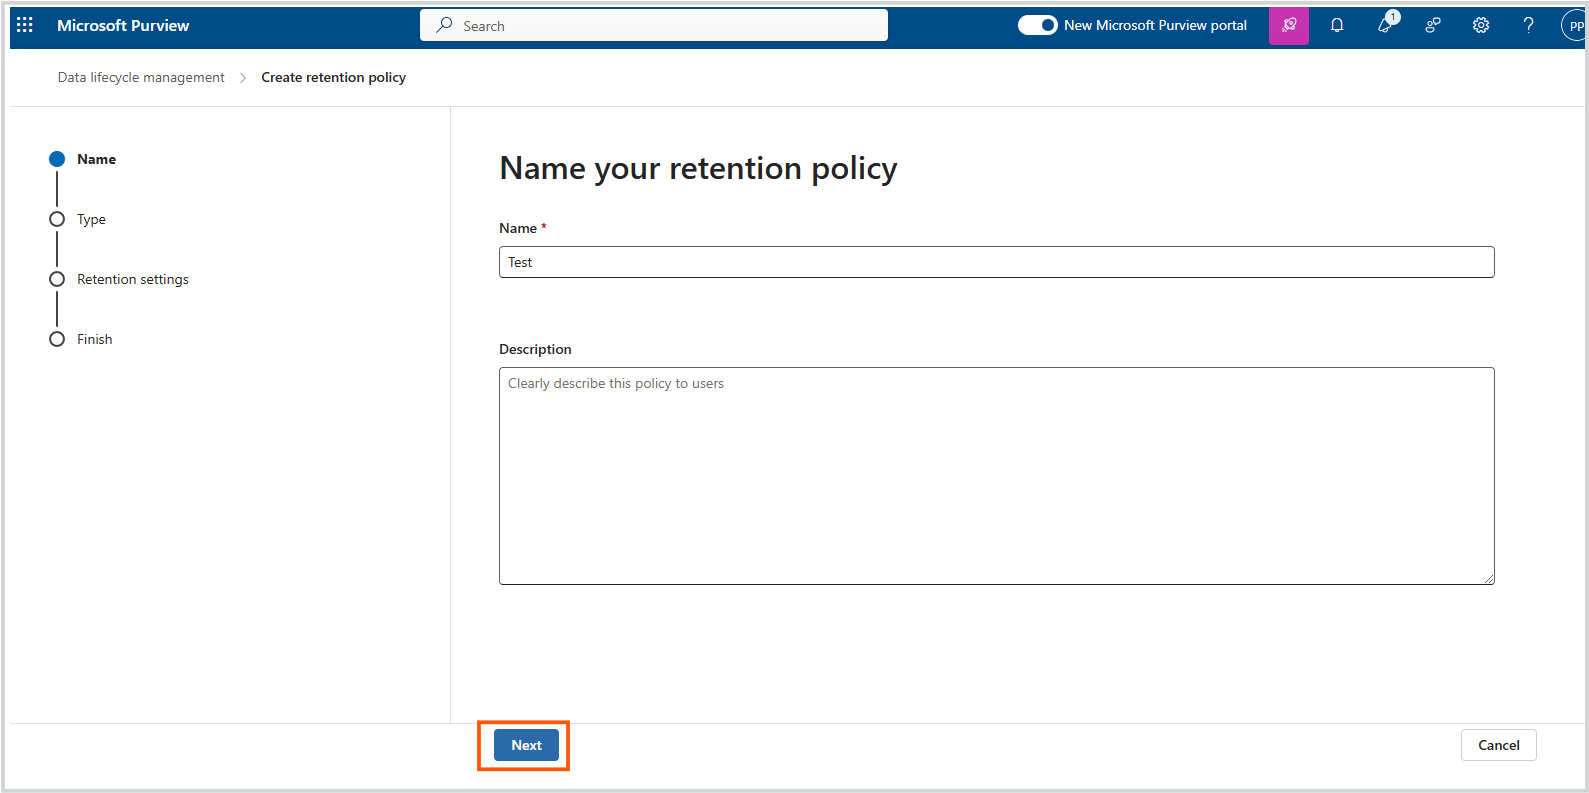
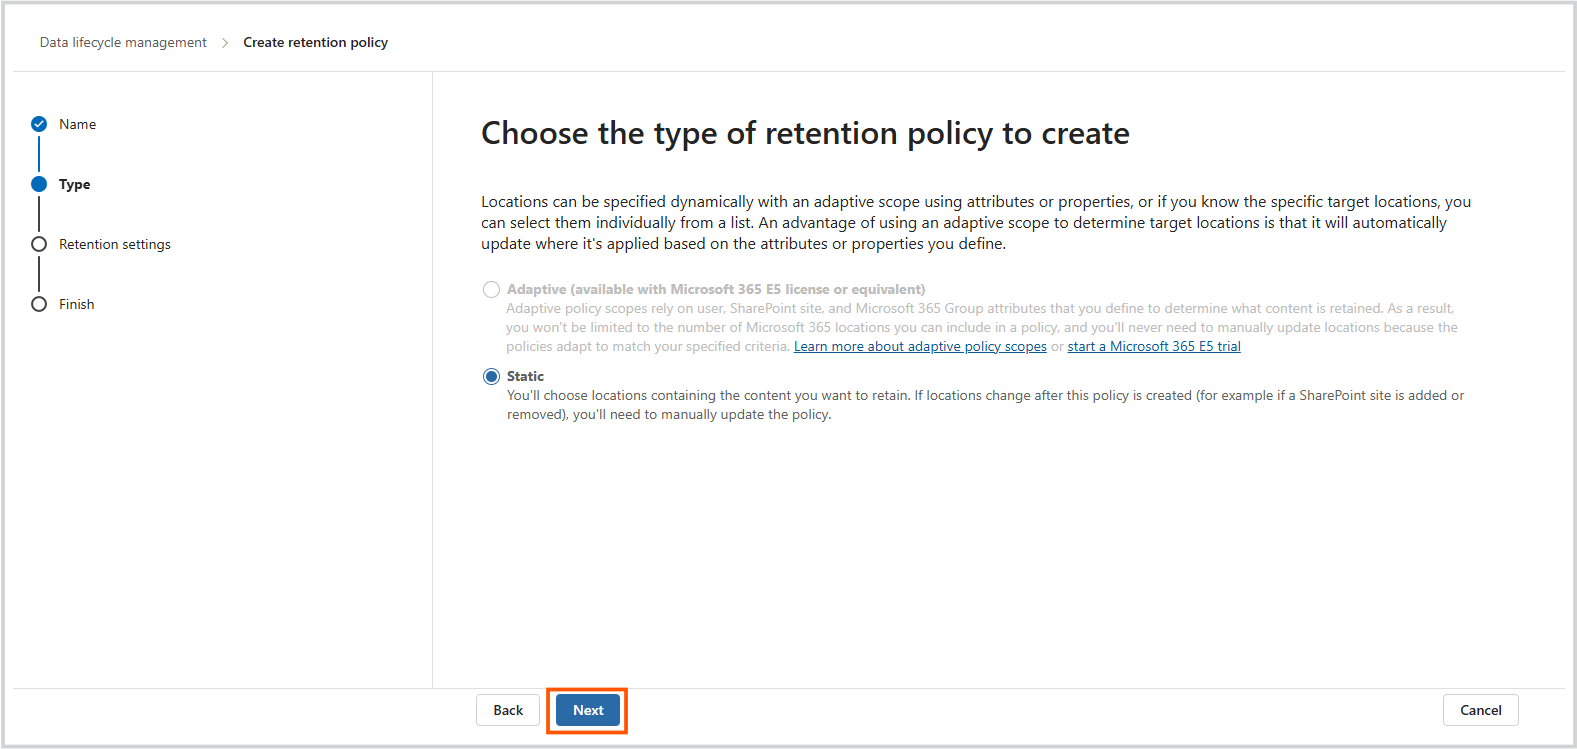
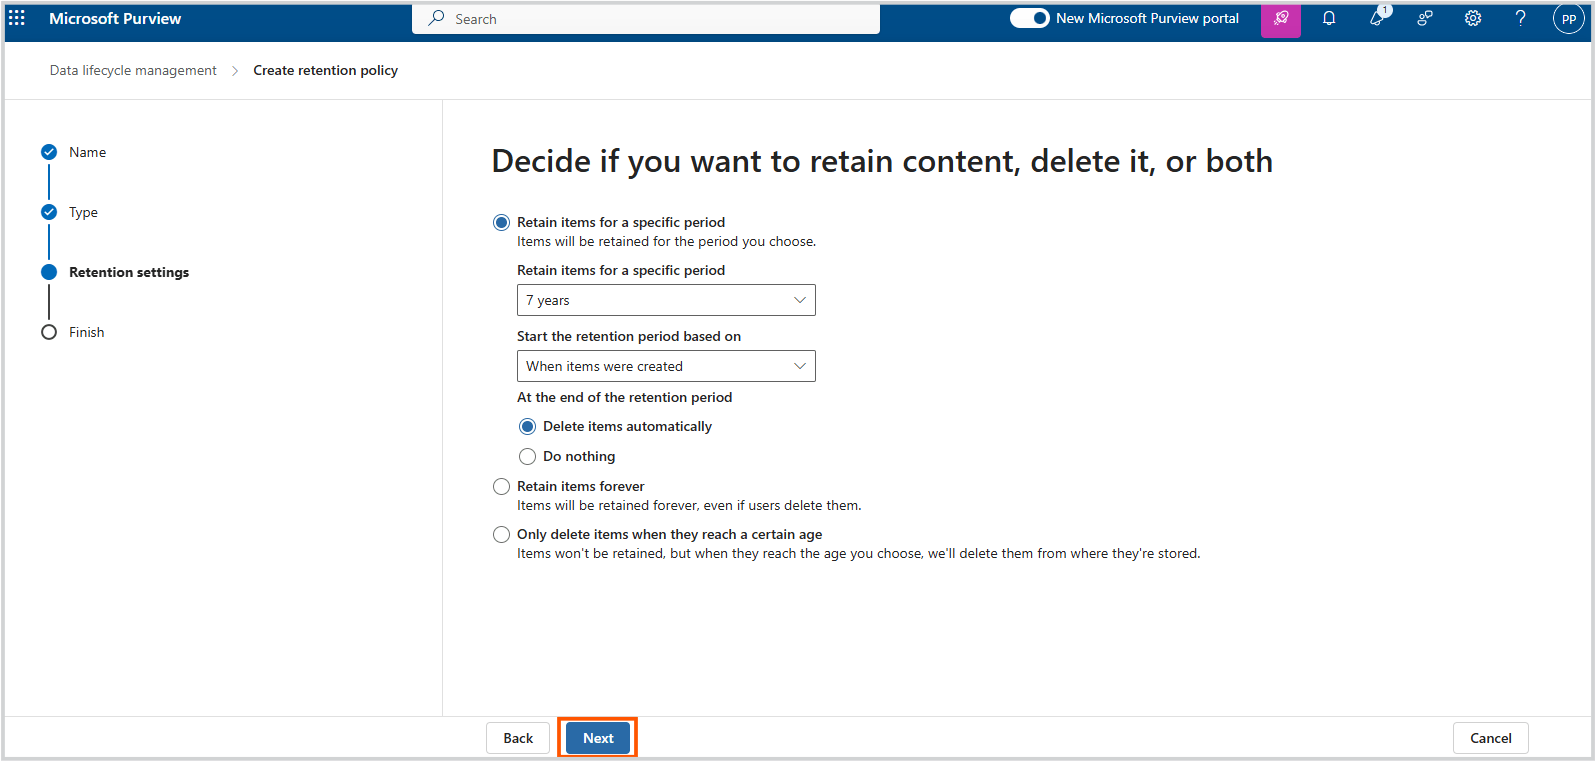
Microsoft 365 Compliance Center helps you create compliance retention policies that save all versions of your SharePoint data.

How to enable compliance retention policy

Navigate to policies - retention
  • Step 3: Click on New retention policy.

New retention policy
  • Step 4: Name your policy and click on the Next button.

Add name and description
  • Step 5: Configure the retention settings and click on the Next button.

Configure retention settings
  • Step 6: Click on Choose sites -> select the SharePoint Sites to which you want to apply the retention policy -> Done -> Next.

Choose sites
  • Step 7: Review your settings and click on Create this policy. It will take up to one day to apply the retention policy to the locations you chose.

Once the compliance retention policies are configured, all your newly uploaded and modified files will be retained for the selected SharePoint sites.

Limitations of SharePoint backup using compliance retention policies

  • Retained data counts towards your Microsoft 365 storage quota

  • In the event of a data loss, retained files can only be exported offline and need to be restored manually. Restoring a large number of files will take a significant amount of manual effort and time.

How to back up SharePoint Online using third-party apps

Unlike native Microsoft 365 features which are not designed for backup and restore, third-party cloud backup applications serve this purpose better.

Third-party cloud backup applications like SysCloud offer a fully automated cloud-to-cloud backup and restore service. SysCloud uses industry-standard cloud storage infrastructure with military-grade security.

With SysCloud, IT administrators can back up and restore Microsoft 365 data in just a few clicks. 

Why should you use third-party cloud backup tools to back up SharePoint Online?

The following are the advantages of using third-party cloud backup tools like SysCloud to backup your SharePoint Online data:

1. Account Deletion Keep a safe copy of organizational data even after the user accounts are deleted. This happens mostly during employee exits, thus saves on license costs.

2. Access Data During Outages Access your SharePoint data via the online backup service even when Microsoft 365 suffers an outage, which is not very uncommon.

3. Saves Time Save time in managing backup for large teams.

4. Added-Security Gain added data security with increased admin control and in-built protection for ransomware attacks.

5. Automatic/ Scheduled Backup Schedule automated backups multiple times during the day.

How to back up Microsoft 365 SharePoint using SysCloud

Here is how an admin can backup SharePoint Online data using SysCloud backup application:

  • Step 1: Login to SysCloud backup application using Microsoft 365 global admin credentials.

Login to SysCloud
  • Step 2:Navigate to Backup -> Archives and Restore.

Archives and Restore
  • Step 3:ChooseSHAREPOINT & TEAM SITES and choose the user accounts whose data you want to back up.

SharePoint and Team Sites
  • Step 4:SelectActions and click Start Backup.

Start backup
  • Step 5:You will get a pop-up-form asking for confirmation. Select Yes.

Confirmation

You can see the selected users queued for backup.

Users queued for backup

Now, you will have a second copy of your SharePoint data safely stored in the AWS cloud which can be recovered instantly whenever needed.

Why you should back up Microsoft 365 SharePoint Sites

In addition to the fact that Microsoft is not responsible for backing up your SharePoint data,  here are six more reasons why businesses should back up their SharePoint files:

1. Data Loss from Ransomware Attacks: Bitdefender’s Mid-Year Threat Landscape Report 2020 announced a seven-fold spike in the number of ransomware attacks in 2020 when compared to 2019. In the event of a ransomware attack, SharePoint users who do not have an off-site backup could loss critical data.

2. User Errors: According to Data Center Knowledge, 70 percent of data loss incidents are caused by accidental deletions. These can occur when employees in your organization (a) accidentally delete important files while trying to free up storage space(b) end up removing the original version of a file while trying to get rid of duplicates Such errors are hard to prevent and it would be impossible to restore the data past the default retention period.

3. Internal Threats: Steve Durbin, Managing Director of the Information Security Forum explains that the massive shift to a work from home model (as a result of the COVID-19 pandemic) may cause employees to become disgruntled or resentful due to lowered remuneration, reduced promotion opportunities and uncertainty about the future.A disgruntled employee could permanently delete critical business data.

4. Business Continuity in the Event of SaaS Outages: According to CRN, on 7th October 2020, Microsoft servers suffered outage for the third time in 10 days. The incident follows a five-hour outage on September 28 and a four-hour outage on October 1.Backing up your SharePoint files can help you access them even if SharePoint is not available in the event of an outage which is not very uncommon.

5.Limitations of Native Retention Settings: The native retention settings offered by Microsoft do not serve as an effective data recovery option. This is because the deleted files are:(a) only retained for 93 days from the time you delete them, beyond which they are permanently lost.(b) stored along with your live account data. In the event of a ransomware attack, all your Microsoft 365 data is compromised, including the retention copies.Having an independent backup of your data stored off-site is an effective bulwark against such data loss incidents.

6. Legal Compliance and Litigation Purposes: Most companies are required to comply with several state and federal regulations. A backup strategy can help in supporting compliance requirements.

How to recover deleted SharePoint files in Microsoft 365

Backup is just the first step in securing your business data. The ability to recover permanently deleted SharePoint files is also critical for Microsoft 365 administrators. Read our in-depth article to learn the different ways in which you can recover deleted SharePoint files.

Frequently asked questions on SharePoint backup

1. How do I back up my SharePoint to an external drive?

To back up your SharePoint files to an external drive, download the required files to your device using the manual method Once the files are downloaded to your local device, copy them to the external drive.

2. How do I download all files from SharePoint to my PC?

To download all your SharePoint Online files, follow the below steps:
Step 1: Log in to SharePoint Online using your Microsoft 365 credentials
Step 2:  To select all the files, click the circle to the left of the header row (toggle selection for all items), or press CTRL + A on your keyboard.

Step 3: In the top navigation, select Download. You can also right click on one of the files and select Download. All the files will be downloaded to your computer in .zip format. 

3. Does Microsoft back up SharePoint Online?

No, Microsoft doesn’t back up your SharePoint data. It is clearly stated in their terms of service that they are not responsible for any data loss due to negligence or malicious activities, and they recommend backing up your Microsoft 365 data including SharePoint files using third-party apps.

4. How do I move a subsite to another site in SharePoint?

Here is how you can move a subsite to another SharePoint site:

Step 1: Log in to Microsoft 365 admin center.

Step 2: Navigate to Admin centers section and select SharePoint.

Step 3:  In the SharePoint admin center, go to  Active Sites. This will enlist all the active sites in your SharePoint account. Click on the url of the site from which you want to move the contents to another site.

Step 4: After opening the site, click Site contents. 

Step 5: The Site contents section displays all the content and subsites of the current site. Click the Subsites option.

Step 6: Navigate to the desired subsite -> click the Show actions icon -> Site contents.

Step 7: Select the document -> select any folder item and click the Move to option.

Step 8: Select the site to which you want to move the selected content.

You can see the migration in progress. Once the migration is complete, the status of the progress changes to Done . You can go to the destination site and confirm the  migration.

5. How many days SharePoint Online sites are backed up?

According to Microsoft, SharePoint Online retains backups of all content for 14 additional days beyond actual deletion. If content cannot be restored via the Recycle Bin or Files Restore, an administrator can contact Microsoft Support to request a restore any time inside the 14 day window.

6. Where is SharePoint Online data stored?

All the SharePoint files/documents, list items, site contents, and metadata will be encrypted and stored in the SharePoint content databases. SharePoint Online uses multiple SQL databases (called content databases) to store users’ data on Azure storage.

In this article
  • Back up SharePoint Online manually
  • Back up SharePoint using native Microsoft 365 features
  • Back up SharePoint Online using third-party apps
  • Why you should back up Microsoft 365 SharePoint Sites
  • Frequently asked questions
twitterlinkedin