- An introduction to administrative units
- Manage administrative units
- How inheritance works for groups in administrative units
- Administrative units and Privileged Identity Management
- My Staff portal
- Limitations of administrative units
- FAQs
Article at a glance
- AUs can only contain users and groups, not devices. They require Azure AD Premium licenses, and not all administrative roles are available for AUs.
Read more
Azure Active Directory (Azure AD) is Microsoft’s cloud-based identity and access management (IAM) service, with over 420 million daily active users.IT admins use Azure AD to manage role permissions and control users’ access to apps and resources. This article looks at administrative units, an Azure AD resource used to limit administrative scope within Azure Active Directory.
An introduction to Azure AD administrative units
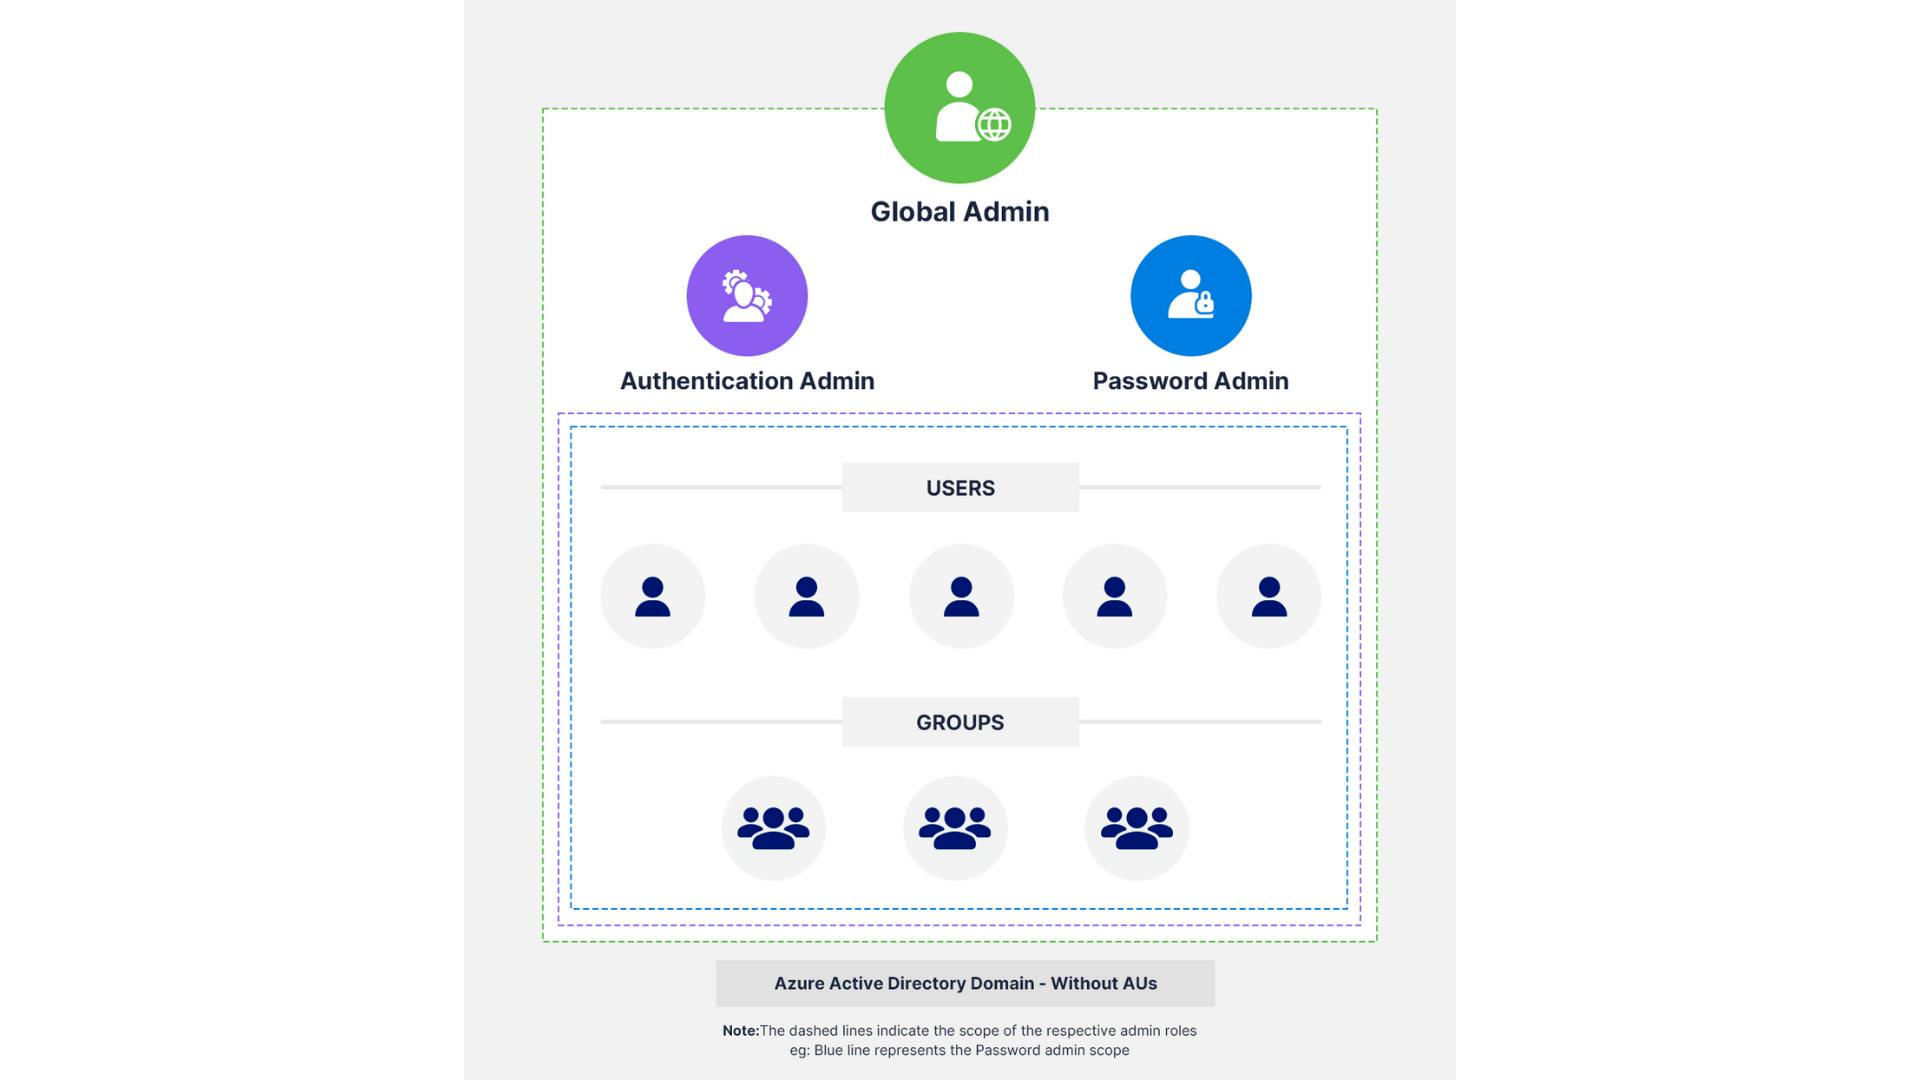
Microsoft defines an administrative unit as an Azure Active Directory (Azure AD) resource that can be a container for other Azure AD resources. Administrative units allow an organization to grant admin permissions that are restricted to a department, region, or any other segment of the organization that you define. An administrative unit can contain only users and groups.
Note: To use Azure AD administrative units, you need to have an Azure AD Premium license in addition to your Microsoft 365 licenses.
Why do you need administrative units?
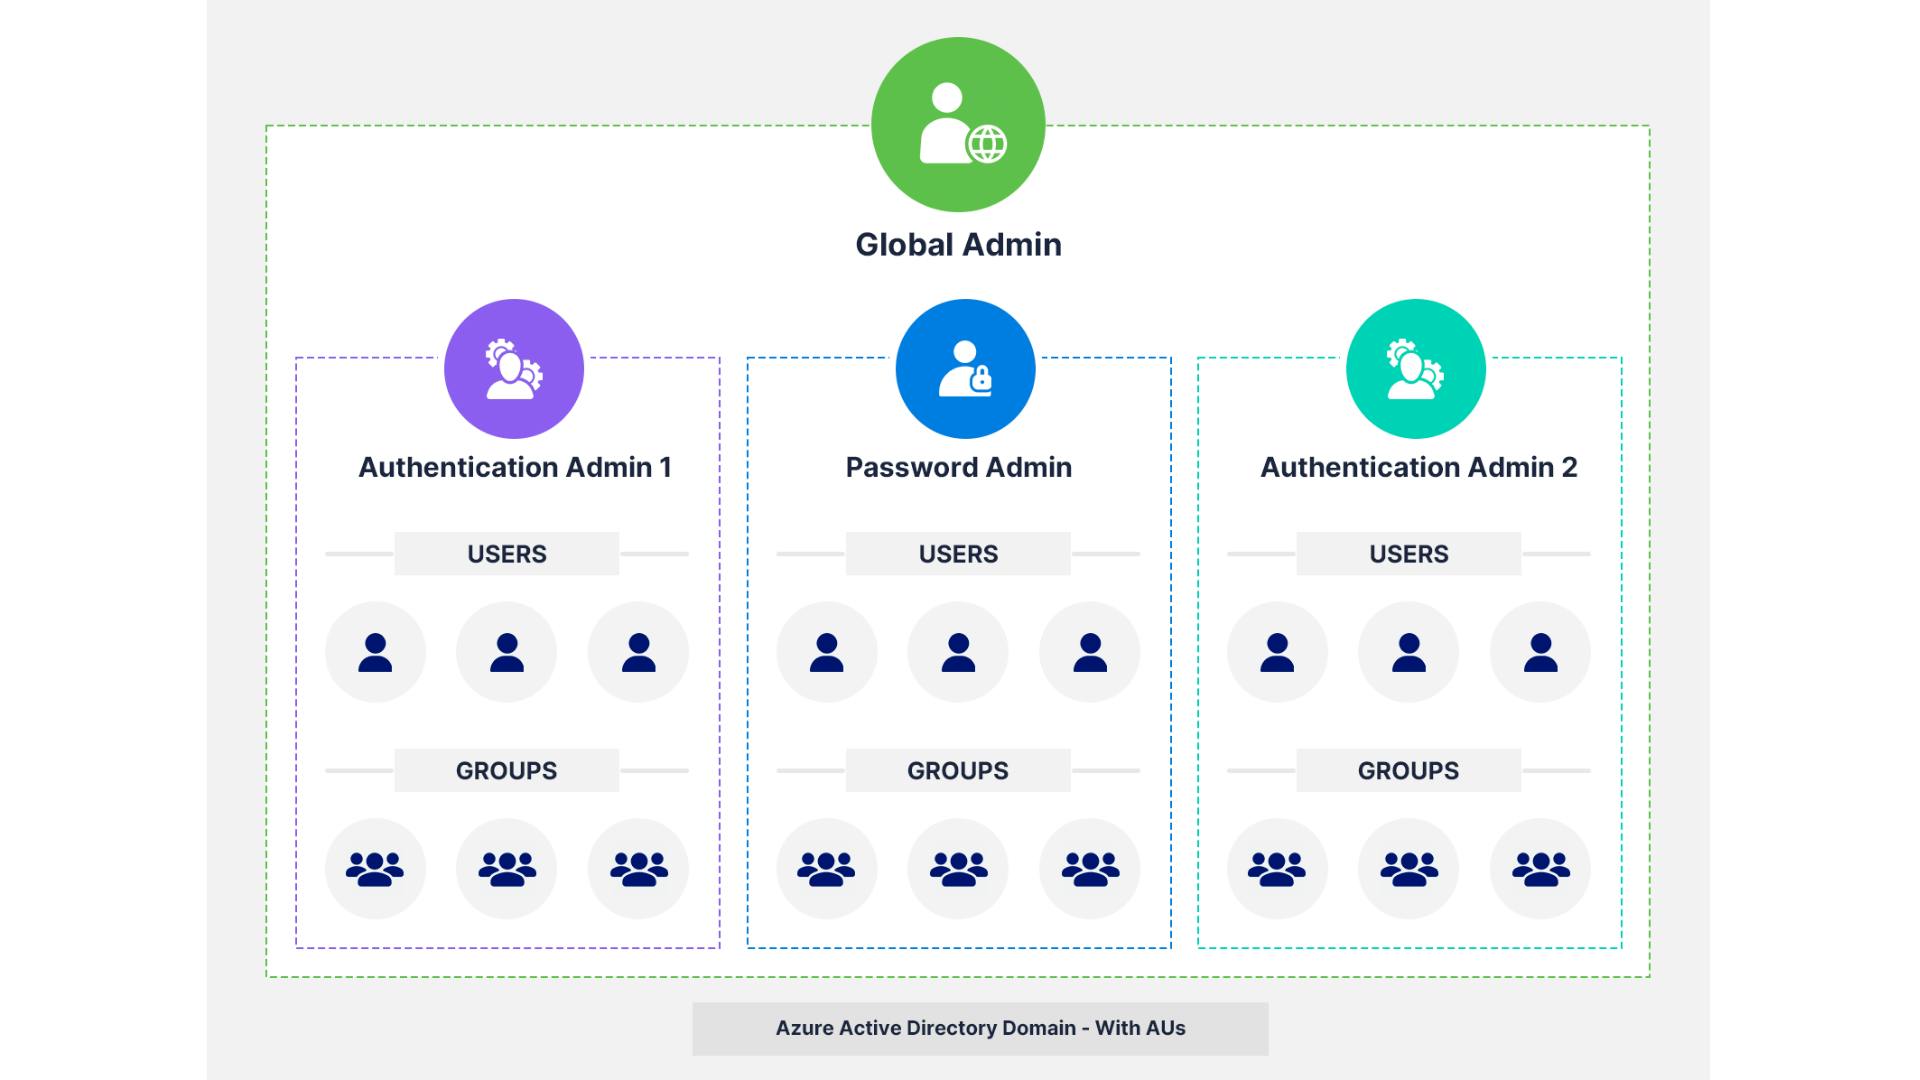
For example, assigning a user to the “User Administrator” role in Azure AD will give them the rights to manage all the users in the organization, which might not always be required. This goes against Microsoft’s principle of least privilege, which states that users and applications should be granted the minimum level of access needed to perform required tasks.
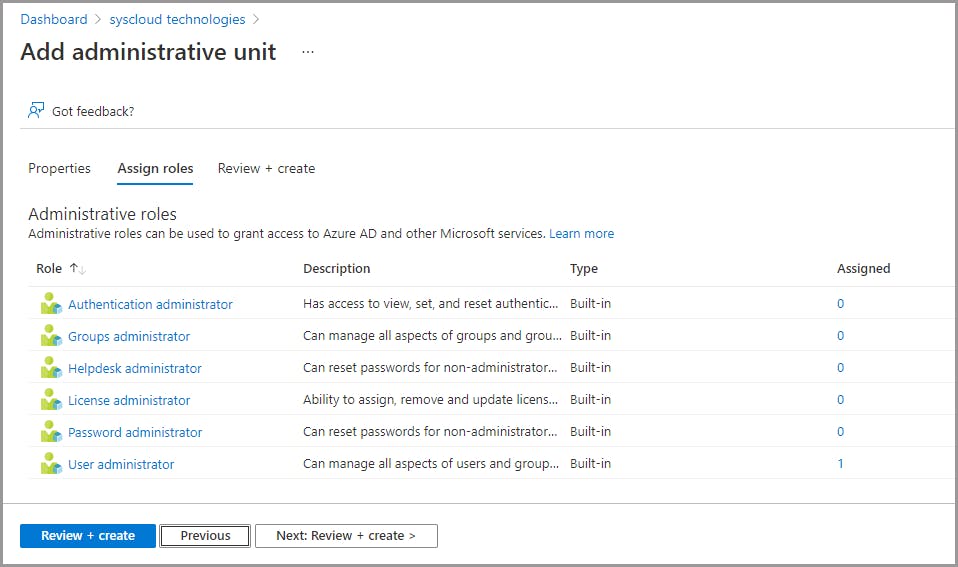
Note: Only the following Azure AD roles can be assigned to an administrative unit: Authentication administrator, Password administrator, User administrator, Helpdesk administrator, License administrator, and Groups administrator
Manage administrative units in Azure Active Directory
Note: You need to be a Privileged Role Administrator or Global Administrator to manage (create, remove, populate, and add roles to) administrative units.
Licensing requirements
- Azure AD Premium P1 or P2 license for each administrative unit administrator
- Azure AD Free licenses for administrative unit members
Note: Administrative units can also be managed by using PowerShell cmdletsand scripts, or Microsoft Graph. For more information, see Prerequisites to use PowerShell or Graph Explorer.
Create an administrative unit
Step 1: Sign in to the Azure AD admin center. (You can also sign into the Azure portal, go to Azure Active Directory, and follow the same steps mentioned below)
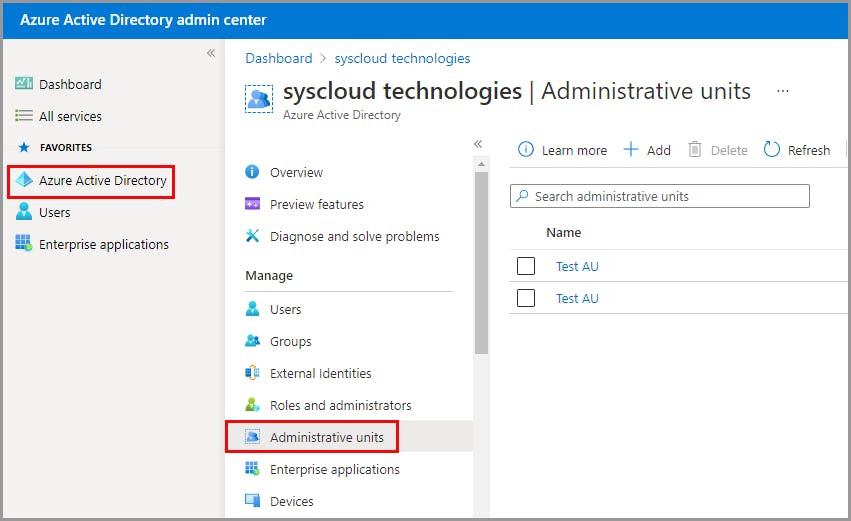
Step 2: Navigate to Azure Active Directory -> Administrative units.
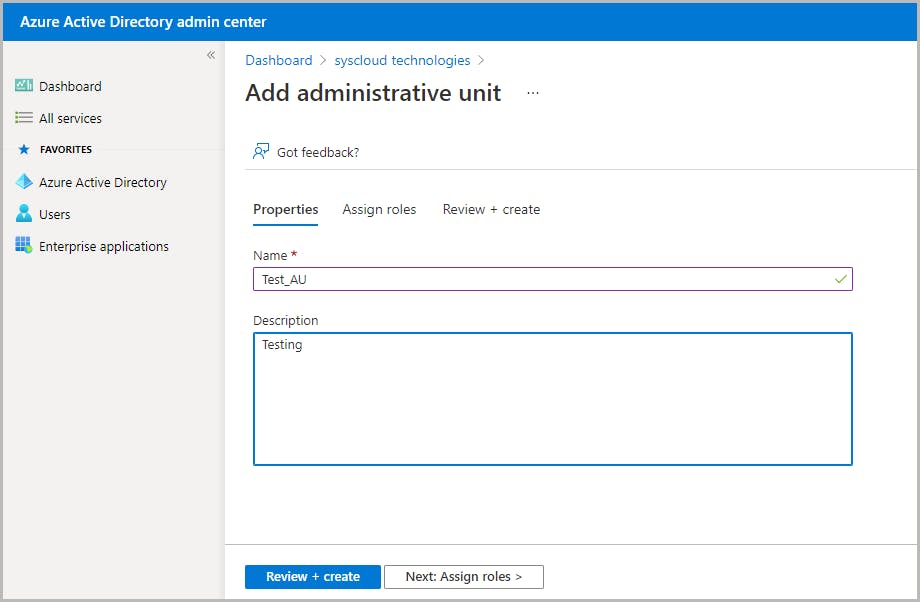
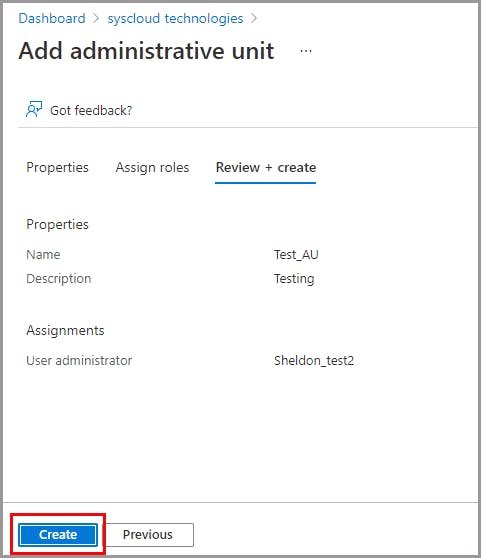
Step 3: Select the +Add button at the top of the pane, enter a name and description for the administrative unit, and click on the Review + create button at the bottom. This will take you to the Assign roles section
Step 4: You can select an administrative role from the given list and assign a user to the role. You can skip this step if you want to only create an administrative unit for now, and assign administrative roles later.
Step 5: Click either Review + create or Next : Review + create button to review the properties and assignments, and click on the Create button. This will create a new administrative unit in the Azure Active Directory.
Note: Administrative units can also be created using PowerShell or Microsoft Graph API.
Add users to an administrative unit
Note: You can only manually add users to an administrative unit. Adding users to an administrative unit dynamically based on an object property is not supported.
Step 1: Sign in to the Azure portal or Azure AD admin center.
Step 2: Select Azure Active Directory -> Administrative units, and then select the administrative unit to which the user needs to be added.
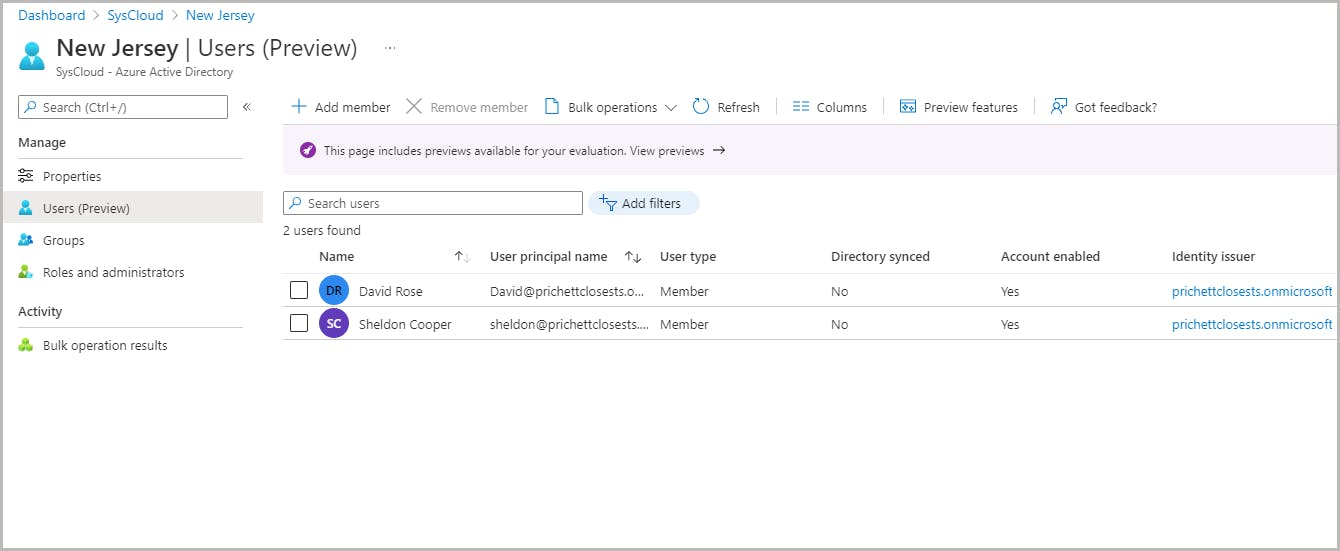
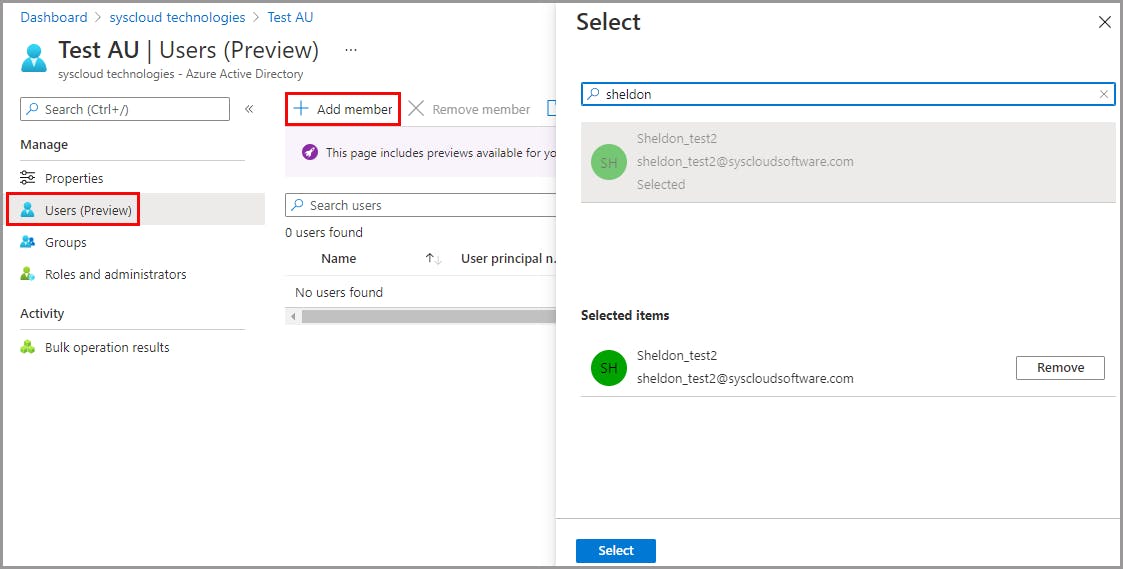
Step 3: Select Users -> +Add member and on the Add member pane, select one or more users that you want to add to the administrative unit.
Step 1: Sign in to the Azure portal or Azure AD admin center.
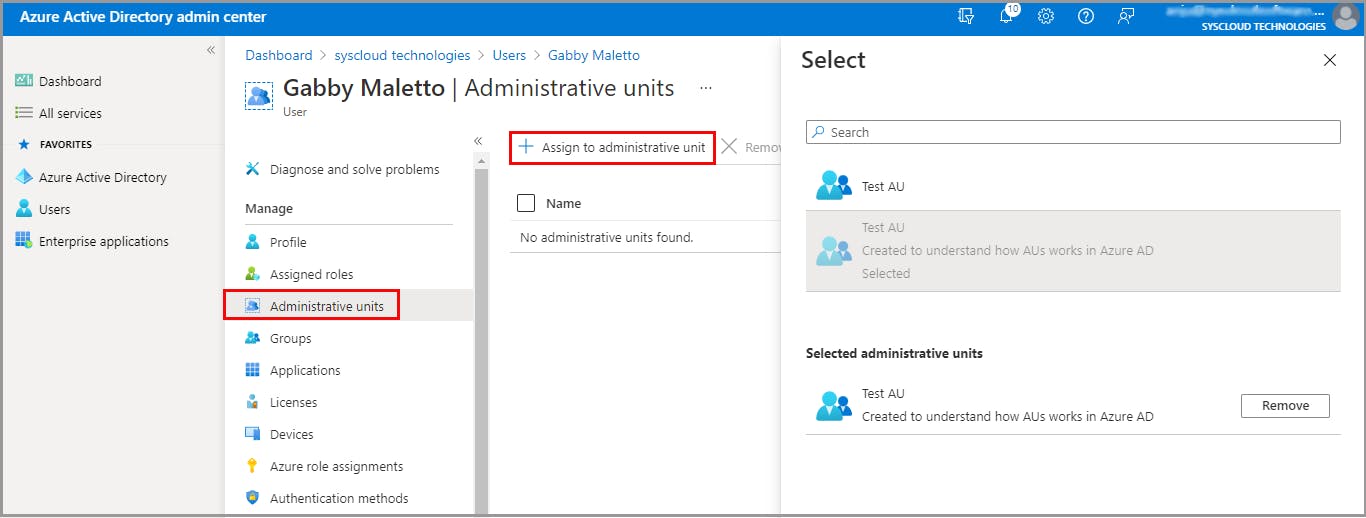
Step 2: Select Azure Active Directory > Users and select the user to be assigned to an administrative unit. This will open the user’s profile.
Step 3: Select Administrative units. To assign the user to one or more administrative units, select +Assign to administrative unit and on the right pane, select the administrative units to which you want to assign the user.
Step 1: Sign in to the Azure portal or Azure AD admin center. Select Azure Active Directory -> Administrative units.
Step 2: Select the administrative unit to which you want to add users.
Step 3: Select Users -> Bulk activities -> Bulk add members. Upload the CSV file containing all the users.
Note: PowerShell or Microsoft Graph API can also be used to add users to administrative units.
Add groups to an administrative unit
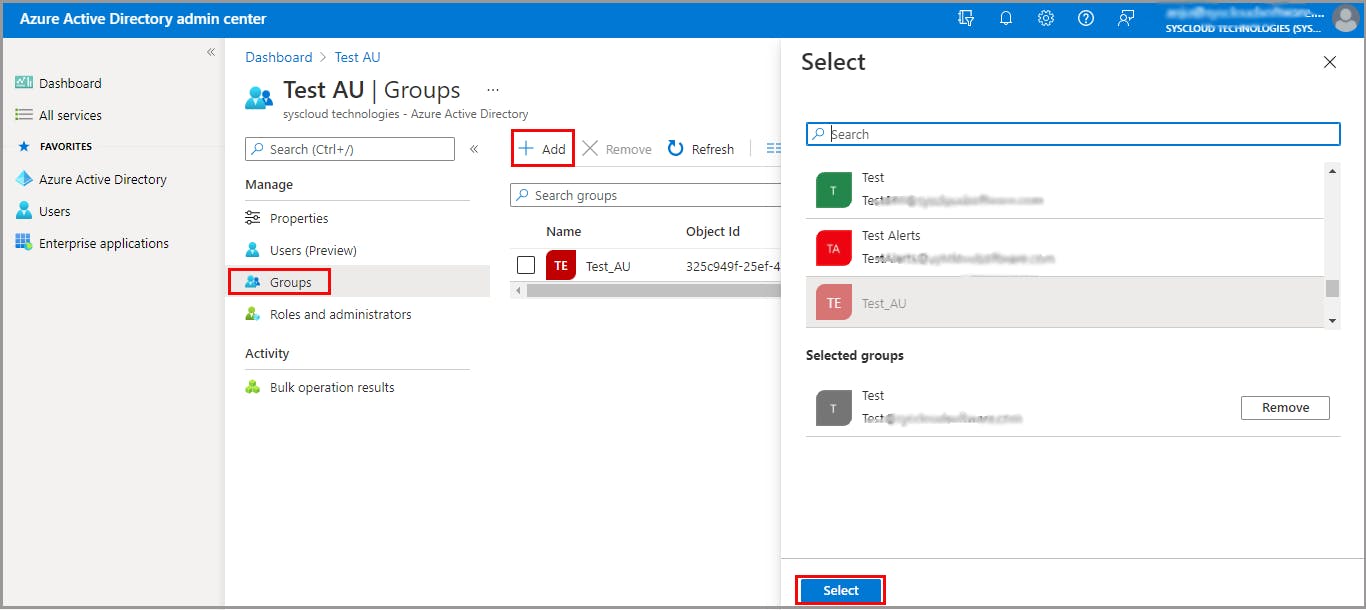
Note: Dynamic groups cannot be added to an administrative unit.
Step 1: Sign in to the Azure portal or Azure AD admin center.
Step 2: Select Azure Active Directory -> Administrative units. Click on the administrative unit to which you want to add groups..
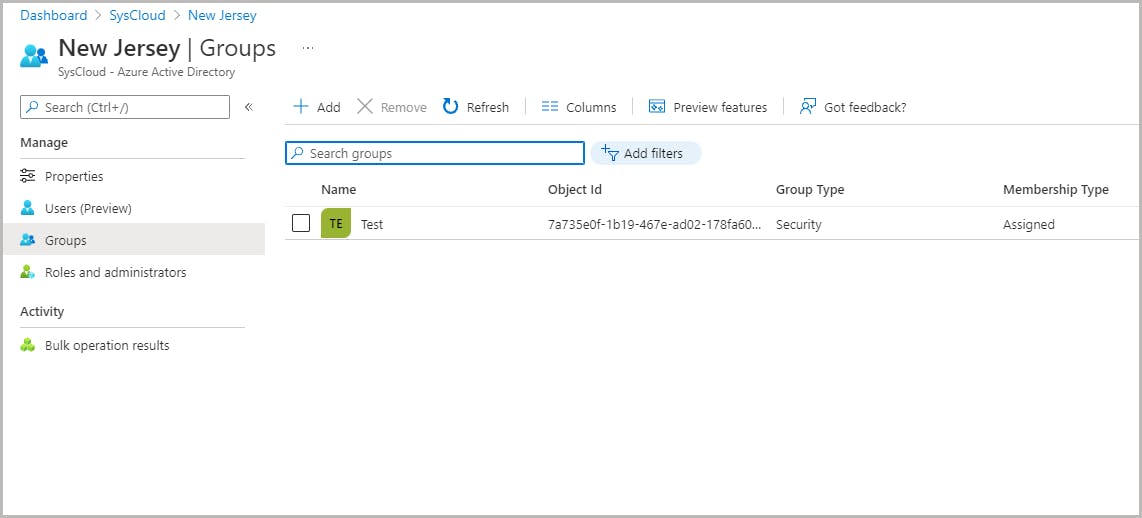
Step 3: Navigate to Groups -> +Add. The right pane lists all the available groups in your organization. Select the groups you want to add to the administrative unit.
Step 1: Sign in to the Azure portal or Azure AD admin center.
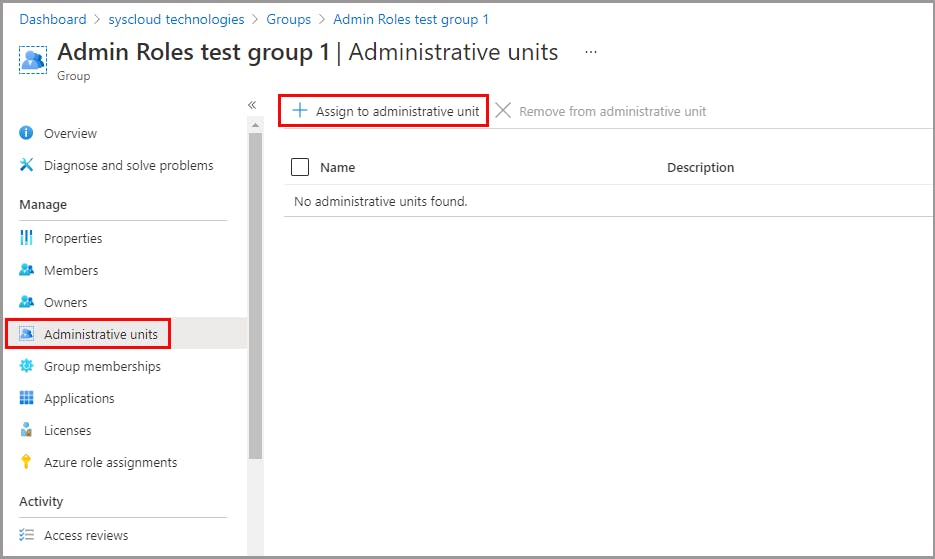
Step 2: Select Azure Active Directory -> Groups. Open the group that you need to add and navigate to Administrative units-> +Assign to administrative unit. This will display a list of administrative units in your organization.
Step 3: Select the administrative units to which you want to assign the group. This will add the group to the selected administrative units.
You can also assign groups to administrative units using PowerShell or Microsoft Graph API.
Note: When you add a group to an administrative unit (AU), only the group is added and not the members of the group. This means that the AU admin can manage the properties of the group alone, not that of the members of the group. Learn more>
Assign admin roles for an administrative unit
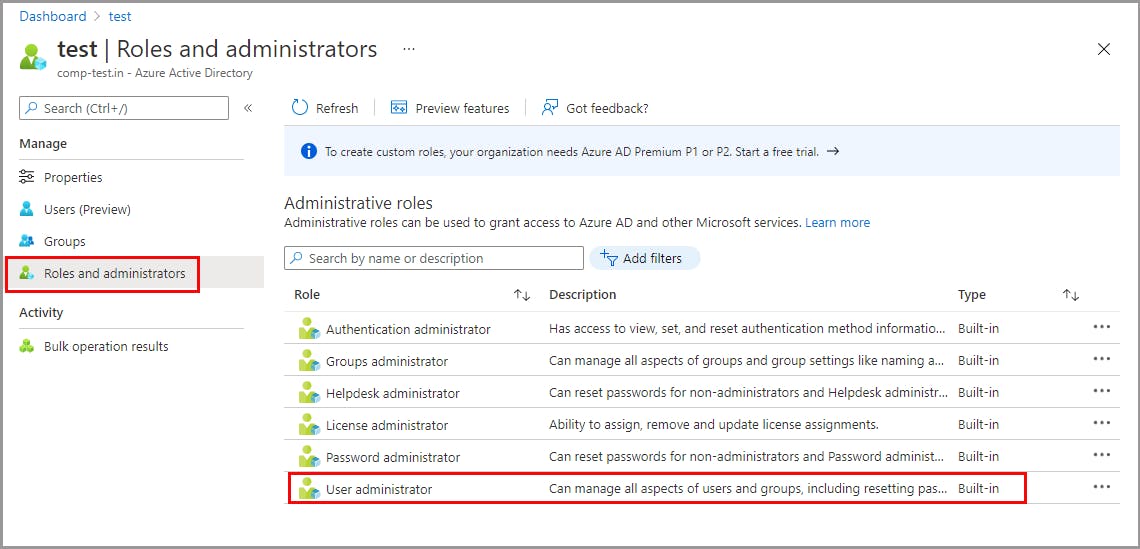
View the roles that are available to be assigned with administrative unit scope. Each role is independent from the global roles (roles with global scope) in Azure AD. Therefore, by using scoped roles, you can easily delegate administrative privileges to users who should only administer a specific administrative unit.
Step 1: Sign in to the Azure portal or Azure AD admin center.
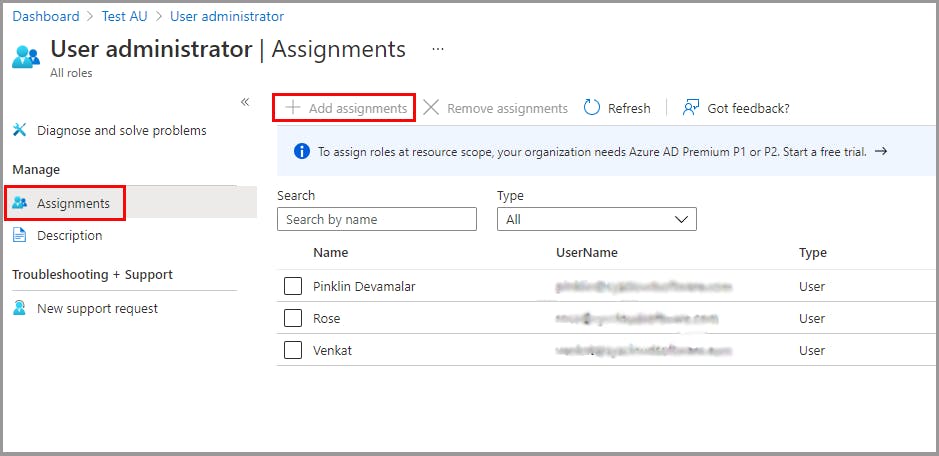
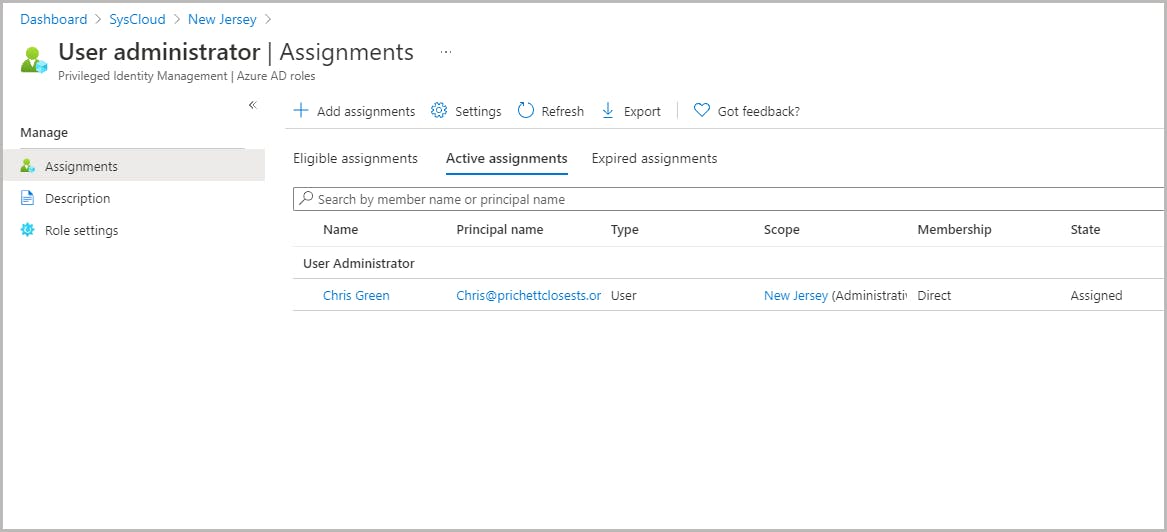
Step 2: Navigate to Azure Active Directory -> Administrative units, and then select the administrative unit to which you want to assign a user role scope. On the left pane, select Roles and administrators to view a list of all the available roles. Select the role that you need to assign to a user, for example, User administrator role.
Step 3: Click on the +Add assignments button. On the Add assignments pane, select the user(s) to be assigned to the role.
Note: To assign admin roles at an administrative unit level, your organization needs Azure AD Premium P1 or P2 license. If not, the "+Add assignments" button will be greyed out as shown in the above screenshot.
You can also assign scoped roles to users using PowerShell or Microsoft Graph API.
Learn how to view a list of the administrators assigned to an administrative unit.
How inheritance works for groups in administrative units
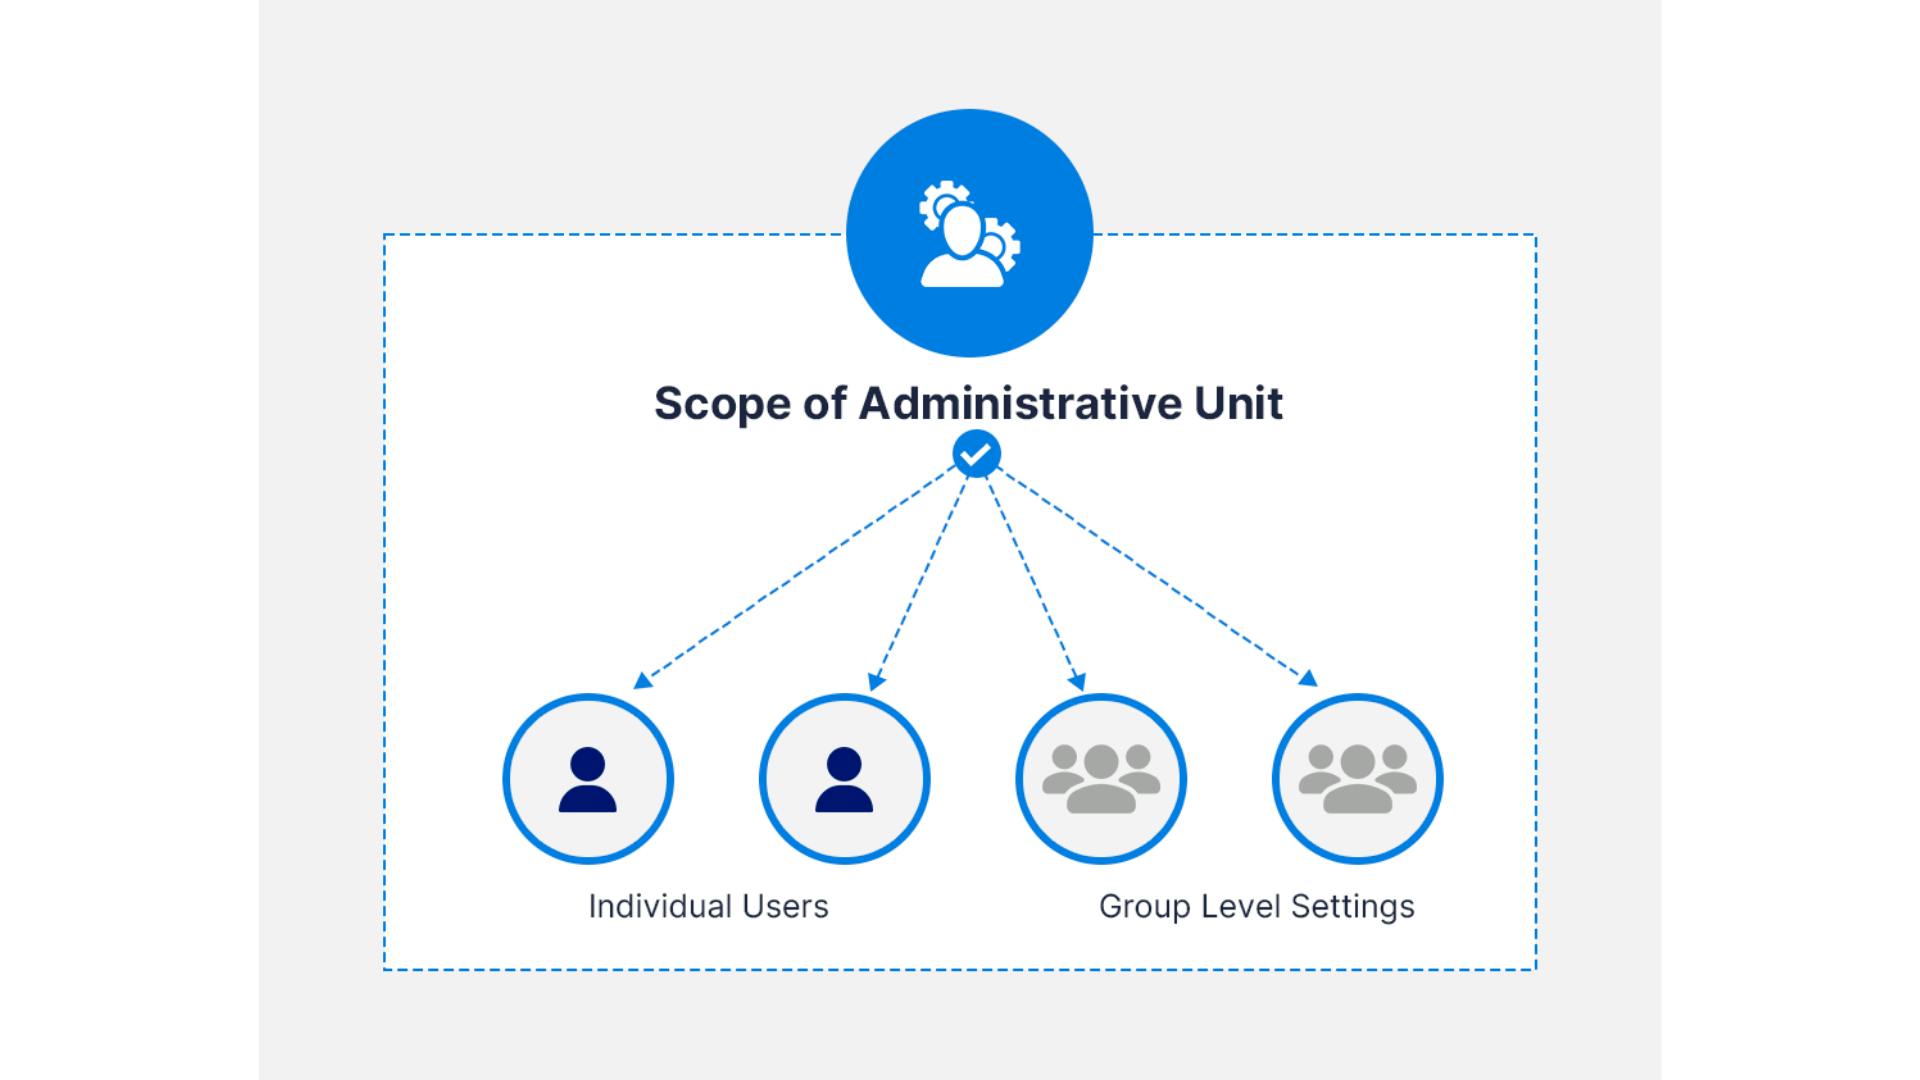
- If dynamic membership were allowed, it would be possible for anyone who can modify the user attribute to change administrative unit membership. For example, if an attribute such as "department" were considered to manage administrative unit membership, a User administrator could modify certain users’ departments, and thereby change the administrative unit membership.
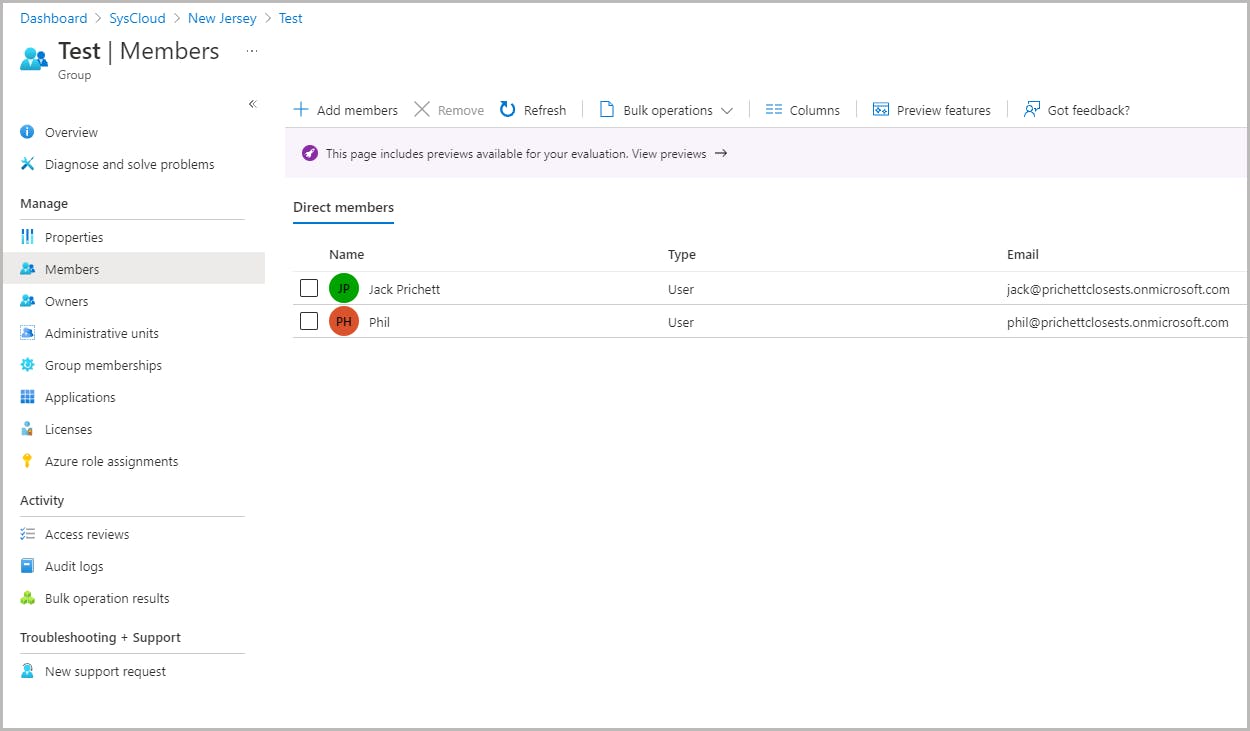
- If group inheritance were allowed, someone who had the ability to change group membership could also modify the administrative unit membership. For example, a Groups administrator or Groups owner could add more users to a group, and thereby change the administrative unit membership.
Click here to view the current support provided by Microsoft for various administrative unit scenarios, via the Azure portal, Microsoft 365 admin center, and Graph/PowerShell.
Administrative units and Privileged Identity Management
Key features of Privileged Identity Management
- Provide just-in-time privileged access to Azure AD and Azure resources
- Assign time-bound access to resources using start and end dates
- Require approval to activate privileged roles
- Enforce multi-factor authentication to activate any role
- Use justification to understand why users activate
- Get notifications when privileged roles are activated
- Conduct access reviews to ensure users still need roles
- Download audit history for internal or external audit
Note: Using Privileged Identity Management requires an Azure AD Premium P2 license. For details, see License requirements to use Privileged Identity Management.
Assign scoped roles in Privileged Identity Management
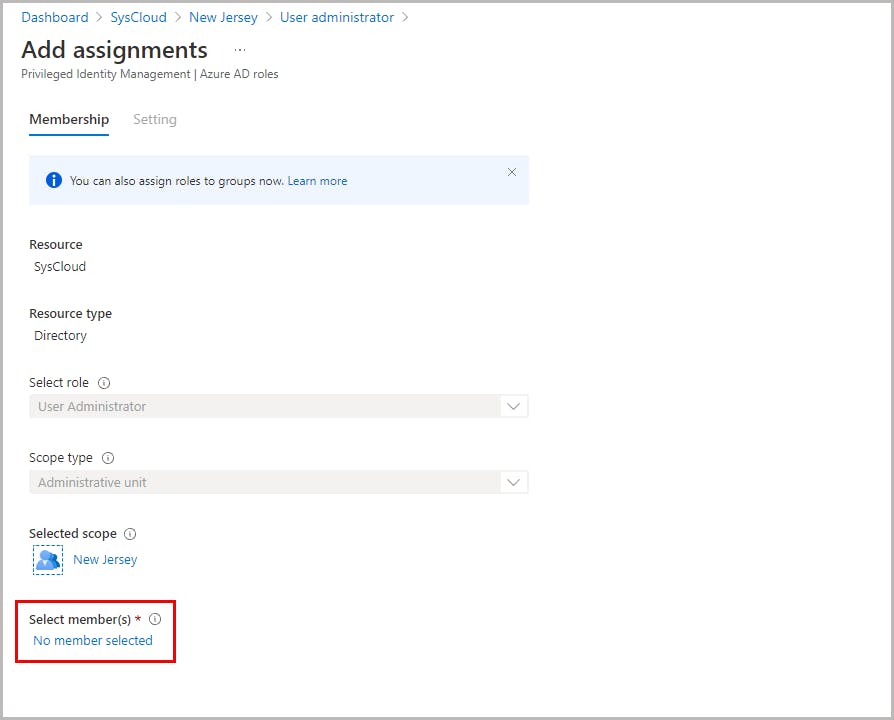
Note: You need to be a Privileged role admin or Global admin for this.
Step 1: Open the administrative unit for which you need to assign an admin. Navigate to Roles and administrators, and select the role you need to assign.
Step 2: Click on +Add assignments. This will take you to the Add assignments page. Select the member to be assigned to the role, and click Next.
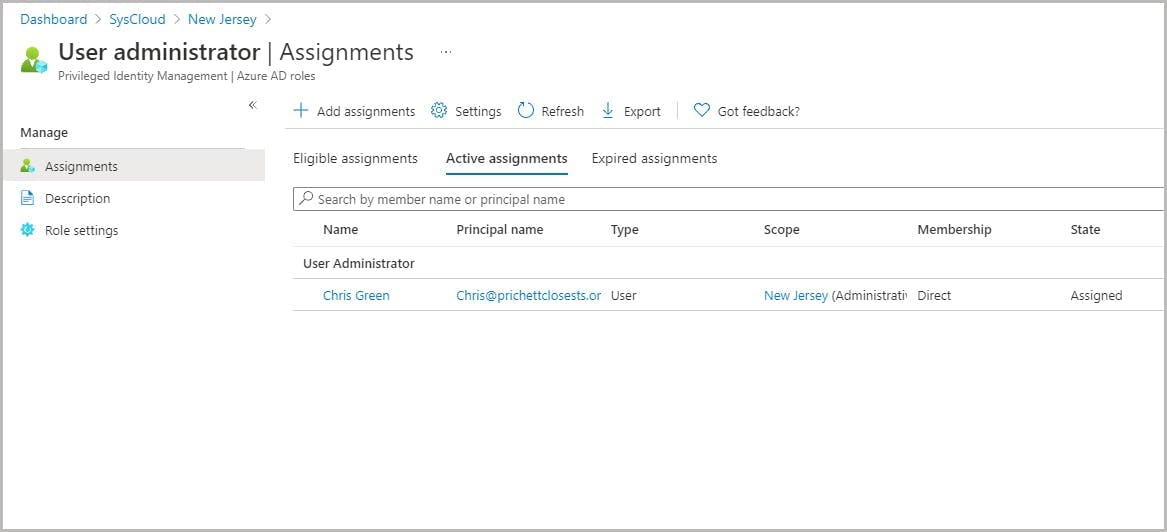
Step 3: In the Assignment type list on the Setting pane, select the required assignment type.
Eligible assignments require the member of the role to perform an action (after the role has been assigned to them) to use the role. Actions might include performing a multi-factor authentication (MFA) check, providing a business justification, or requesting approval from designated approvers.
Active assignments don't require the member to perform any action to use the role. Members assigned as active will have the privileges associated with the role immediately after the assignment has been made.
Step 4: Specify the assignment duration and click Assign to create the new role assignment.
Permanent assignments : Have no expiration date. Use this option for permanent workers who frequently need the role permissions.
Time-bound assignments: Expires at the end of a specified period. Use this option with temporary or contract workers who require the role only for a specified duration.
Administrative units and My Staff portal
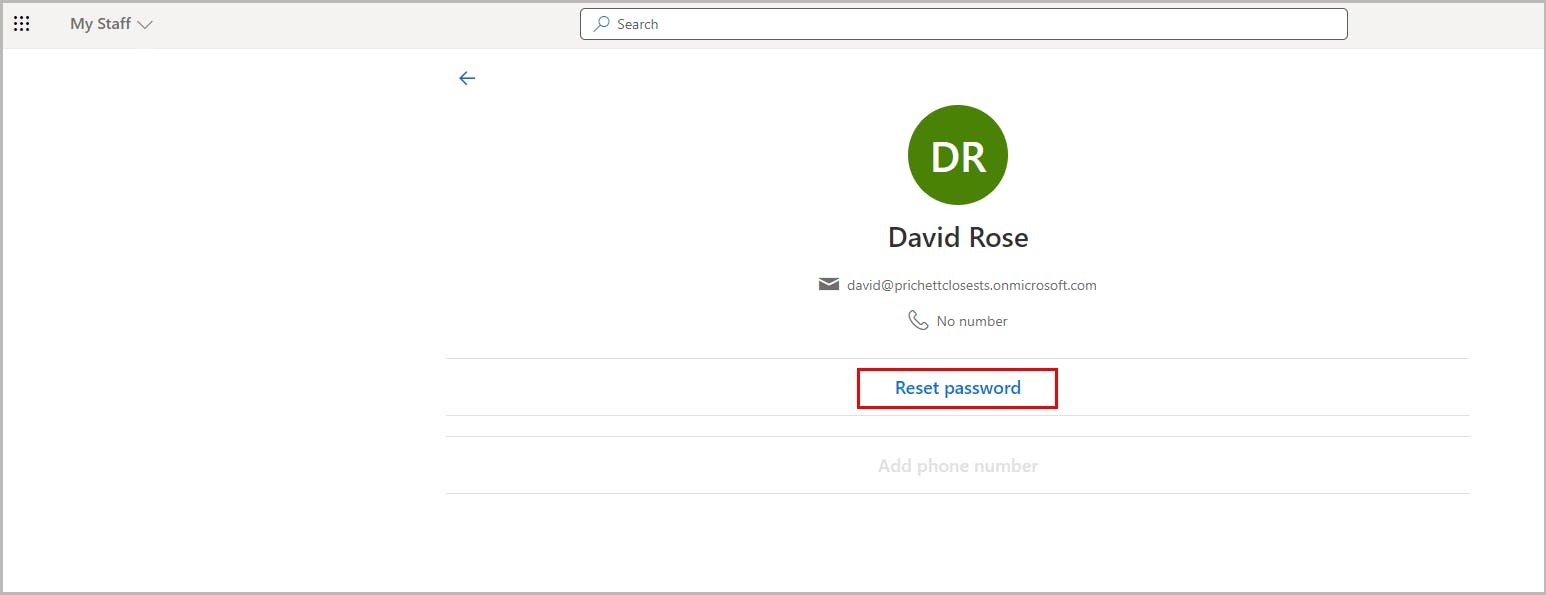
My Staff portal (mystaff.microsoft.com) is based on administrative units, and it allows delegated administrators to perform a limited set of account maintenance actions, including password reset, without signing into the Azure AD portal. Using this portal, an AU administrator can manage the members of the specific administrative unit (AU).
- Add and update phone numbers
- Reset passwords
- Enable phone sign-in
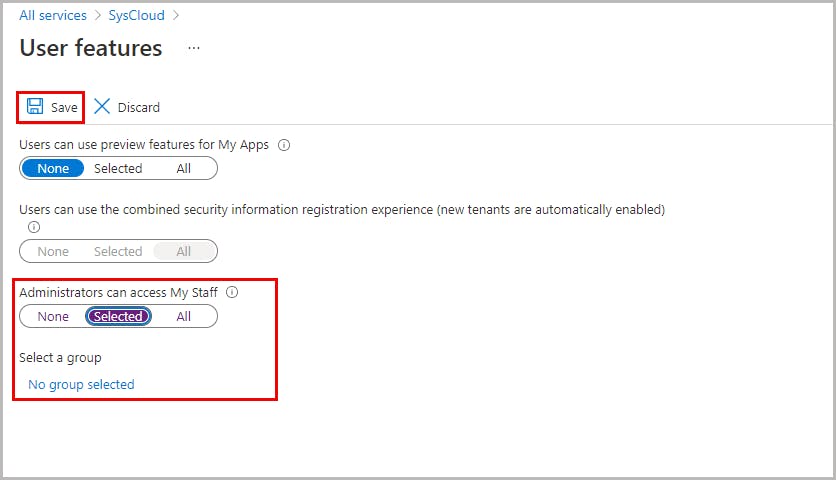
How to enable My Staff in Azure Active Directory
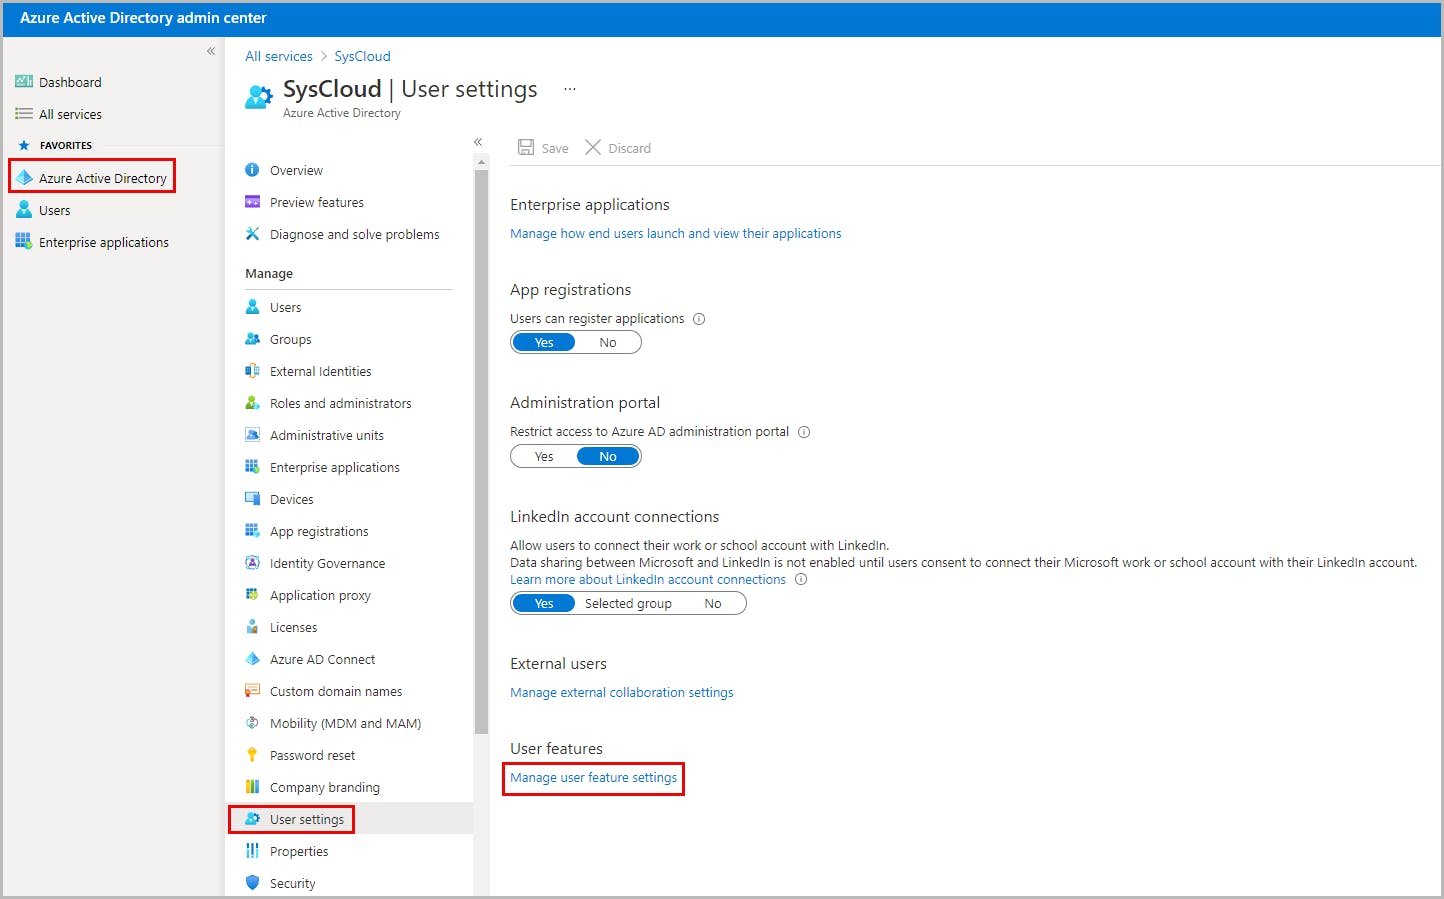
Step 1: Sign in to the Azure portal or Azure AD admin center as a User administrator or Global administrator.
Step 2: Select Azure Active Directory -> User settings -> Manage user feature settings.
Step 3: Enable the feature for all users or a group of users, and click Save.
Note: Only users who've been assigned an admin role can access the My Staff portal . If you enable My Staff for a user who is not assigned an admin role, they won't be able to access the portal.
How My Staff works
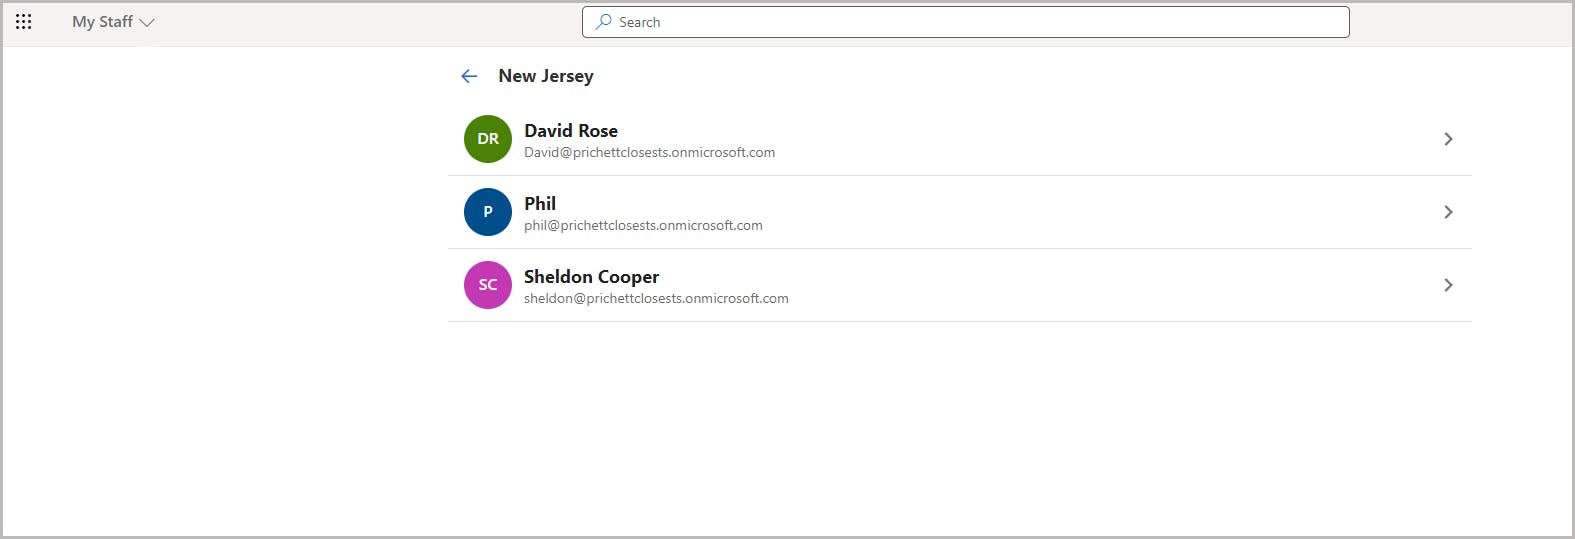
When a delegated administrator goes to the My Staff portal, they are shown the names of the administrative units over which they have administrative permissions. If an administrator's permissions do not have an administrative unit scope, the permissions apply across the organization. After My Staff has been enabled for your organization, the users who are enabled and have been assigned an administrative role can access it at https://mystaff.microsoft.com. They can select an administrative unit to view the users in that unit, and select a user to open their profile.
Chris can now use the My Staff portal to manage all the members in the New Jersey administrative unit.
How to reset a user password
Step 1: Sign in to the My Staff portal. All the administrative units in the respective admin’s scope will be displayed.
Step 2: Select the administrative unit that contains the team member whose password has to be reset. This will display all the members in the selected administrative unit. (Refer to the screenshots in the above section)
Step 3: Open the member’s profile. Click on Reset password -> Continue to reset the password.
Note: The “Add phone number” option is greyed out in the above screenshot since the selected admin (Chris Green, in this case) has only User admin permissions assigned. A user admin can only reset the password, not add or edit phone numbers. To manage the phone numbers of users in an administrative unit, one needs to be assigned as an Authentication admin for that administrative unit. Learn how to manage users’ phone numbers from the My Staff portal.
Read the My Staff user documentation provided by Microsoft to learn more on how a team manager can use the My Staff portal. In the documentation, the term “locations” is used to refer to administrative units.
Limitations of administrative units
- An administrative unit can contain only users and groups. Devices cannot be added to administrative units. Therefore, scoping management of devices is not possible.
- Not all Azure AD administrative roles are available for administrative units. You can only assign one of the following six roles to an administrative unit: Authentication administrator, Password administrator, User administrator, Helpdesk administrator, License administrator, Groups administrator
- Administrative units require Azure AD premium licenses
AU-scoped administrators cannot manage their users’ MFA settings in the Microsoft 365 Admin Center. (See currently supported scenarios)
- Administrative units apply scope only to management permissions. They don't prevent members or administrators from using their default user permissions to browse other users, groups, or resources outside the administrative unit. Admins can browse other users in the Azure AD portal, PowerShell, and other Microsoft services. However, in the Microsoft 365 admin center, users outside a scoped admin's administrative units are filtered out.
- You can only assign groups individually to an administrative unit. There is no option to assign groups as a bulk operation.
Frequently asked questions on Azure AD administrative units
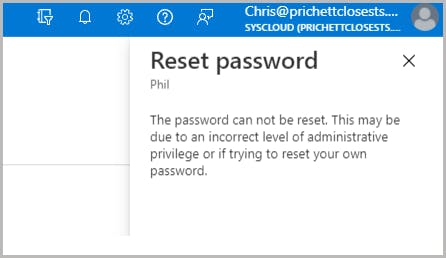
1. I am a delegated Password/User administrator for an administrative unit. Why am I unable to reset a specific user's password?
(a) An AU-scoped admin can only manage users who belong to that administrative unit. Make sure that the user belongs to the administrative unit to which you've been assigned.
2. Can a user or a group belong to more than one administrative unit?
Yes, a user or a group can belong to multiple administrative units. This is one of the major differences between Azure AD administrative units and Google organizational units.
3. I added a group to an administrative unit. Why are the group members not showing up in the administrative unit?
When you add a group to an administrative unit, that does not result in all the group members being added to it. Users must be directly assigned to the administrative unit. Learn more
4. Can administrative units be nested?
5. How are administrative units different from groups in Azure Active Directory?
Azure AD administrative units are used to restrict the scope of administrative role assignments whereas Azure AD groups are used to manage users’ access to apps and resources. Using groups lets the resource owner (or Azure AD directory owner) assign a set of access permissions to all the members of the group, instead of having to provide the rights one-by-one. Read Manage app and resource access using Azure Active Directory groups to learn more.
Groups
- Used to manage users’ access to apps and resources
- Members of the group inherit the permissions assigned to the group
Assigning an admin role to a group will result in all the group members having that admin role. Learn more
Administrative units
- Used to restrict the scope of administrative role assignments in the Azure Active Directory
- Adding members to an administrative unit (AU) does not change their permissions by default. Rather, it gives permission to the AU–scoped admin to manage the members of the AU.
- A user who is assigned as the administrator for an administrative unit will be able to manage all the members of the administrative unit.